skip to main |
skip to sidebar
I wish I could say that I started to make something totally different with the sweetcorn, made a complete hash of the job and yet heroically and singlehandedly saved the situation, rescuing the corn and making it the star of an impromptu recipe.
I wish.
No such heroism here, there no accolades for Supercook for saving the world from a culinary disaster. There was no disaster, and nothing to save. *sigh*
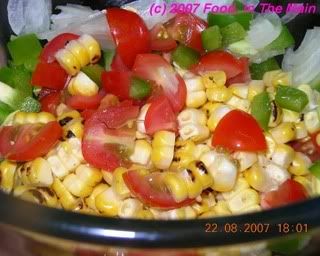
No, this salad is just one of Tarla Dalal's health recipes which stuck in my head for being so darned simple. ("Simple" - my mantra, my raison d'etre, my motto, my everything). Roast the corn over an open flame till it gets some black spots (that's the burnt part), mix it with some raw chopped vegetables and pour over a simple dressing. Eat immediately at room temperature or eat cold. Either way, it's nice. Not spectacular, but nice. Today being the third hot day of the entire summer, I decided to go with a simple salad for dinner as it was just me, Pete being stuck with the accountants at work.
So here it is. An unheroic simple recipe from an even more unheroic cooker (tee hee). At least it's colourful!
Recipe for: "Burnt" corn salad

Ingredients:
1 corn cob
1 tomato, chopped (I used about 10 baby plum tomatoes)
1/2 white onion, sliced very thin
1/2 green bell pepper, chopped
For the dressing:
2 tbsp olive oil
1 tbsp lemon juice (or to taste)
pinch salt
pinch red chilli powder (I used ancho chilli powder)
Method:
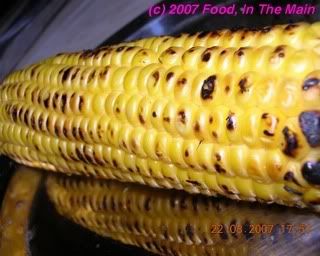
1. Roast the corn over an open flame until it gets black specks all over.
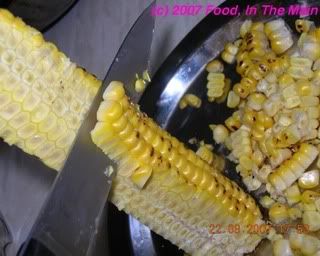
2. Cool for a moment or two, then pare the corn niblets off the cob with a sharp knife.
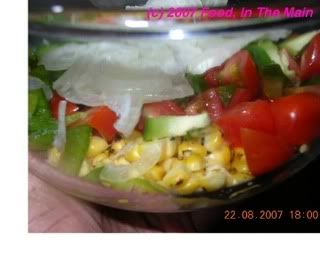
3. Put the corn in a bowl along with the chopped tomato, bell pepper and onion.
4. Whisk the ingredients for the dressing very well.
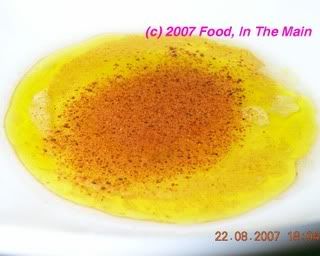
Pour over the corn mix and stir it in.
5. Serve chilled or at room temperature.
Phew, made it to Anita's poori party in the nick of time! All week I've been waiting for a chance to make poori-bhaji and take photos, but something or the other ended up taking precedence every single evening - the purchase of a new Range Rover being the most momentous event.
Momentous, and instantaneous. Pete's very quick off the mark when he's determined about something - so he researched Range Rovers on the Net for a day, shortlisted a few, we drove down to Coventry the next day, test-drove it, checked it and the day after that drove back down there to collect it. The new Range Rover is a beauty of a car, with enough toys in it to satisfy even the most demented petrolhead. But even this supercar doesnt lend itself to the making of poori-bhaji on the road!
So the first chance I got to actually set foot in the kitchen was today - and here's my addition to the party, Anita! I'm the tardy guest who comes in last... but I made it. And I plan to be the last to leave. Ab party poori ho gayi! ;)
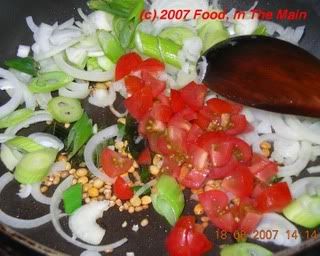
Recipe for: Aloo bhaji
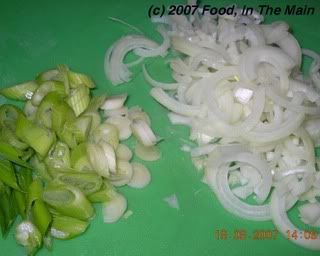
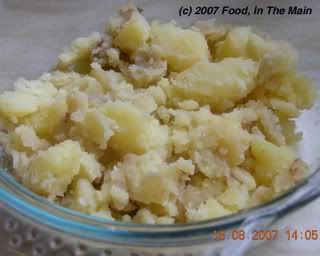
2 large potatoes, boiled and peeled
1 large onion, sliced thin
1 spring onion, sliced
1/2 tomato, chopped
3-4 green chillies, chopped (or to taste)
1 tsp gram flour/besan
1 tsp chana dal
1 tsp urad dal
3-4 fresh curry leaves
1 tsp mustard seeds
2 tsp oil
1/2 tsp garam masala
1/4 tsp turmeric powder
pinch asafoetida powder
Salt to taste
1 cup water
Chopped coriander leaves for garnish
Method:
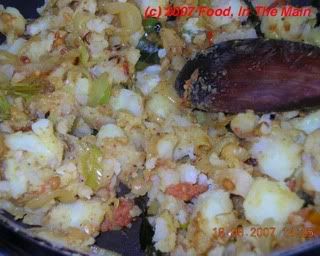
1. Smash the boiled potatoes by hand, to get that rustic look. The pieces dont have to be evenly sized.
2. In a pan, heat the oil. Add the mustard seeds, green chillies, turmeric powder, asafoetida powder, chana and urad dals and curry leaves. Cover and let the mustard seeds splutter and the dals turn golden.
3. Add the onions and tomatoes and the garam masala.
Fry till the onions turn transparent and the tomatoes are mushy.
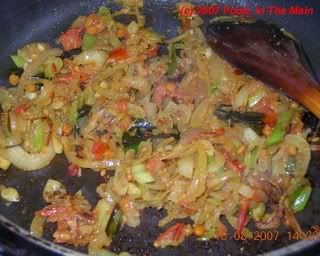
Then add the smashed potatoes and salt. Mix well.
4. Dissolve the gram flour/besan in 3-4 tbsp water, then add that along with one cup water to the potatoes.
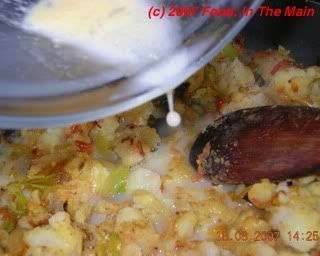
Stir well and let the mixture come to a gentle simmer. (Add a little more water if you like your bhaji runny - the gram flour tends to act as a thickener.)
5. Garnish with fresh chopped coriander leaves and serve hot with pooris.
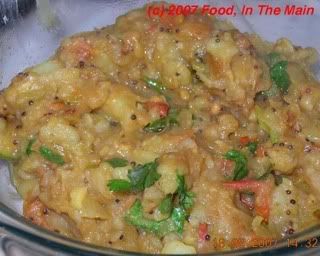
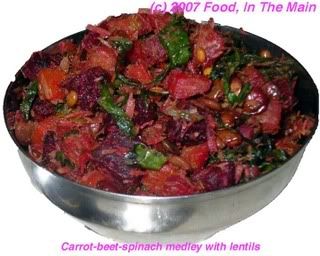
Couldnt think of a punchy title for what I made, so I had to settle for a descriptive one. For starters, I'm not sure whether this can be termed "thoran" or "porial" or "sundal" - it has elements of all three. I bought farm-fresh beets (with greens!) and fresh spinach (the adult kind, fully grown) at the Shrewsbury market, and I didnt quite know where to start. Had too many bookmarked recipes to choose from and vacillated between them, discovering that I was short of this or that ingredient for this or that recipe. (Indecision, as Charlie Brown says, is an awful thing.)
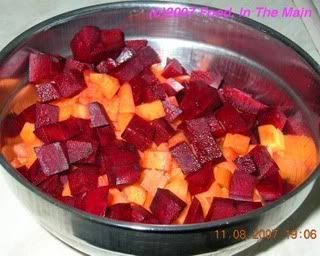
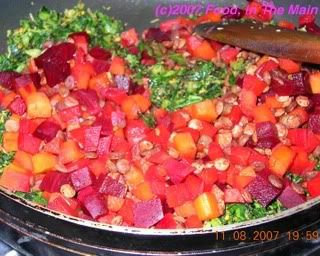
So eventually I ended up making a fairly simple dry "curry". I peeled and chopped two carrots and a medium size beet into small chunks, then put them in the pressure cooker along with a handful of green (or brown) lentils. Two whistles of the pressure cooker and the vegetables were cooked to perfection - retaining their shape and not too soft. Plus, the beets gave some of their lovely colour to the carrots, ending up all pink and red and orange.
The lentils could probably have cooked a little longer (or maybe they could have done with a little water, because I didnt add any!) - they were just about al dente. Still, I like them chewy and they acquired a slightly softer texture by the time I was done making the curry.
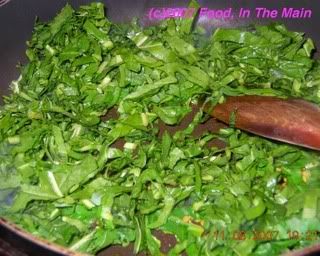
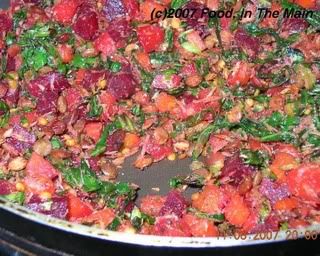
The greens I washed and dried. Then I stacked and rolled up the leaves and cut them to thin ribbons, including as much of the stem as I could. It took only a few minutes to saute/wilt them in a pan while still retaining their bright green colour. After which I added the coconut-green chilly-cumin mixture and stirred it all up. Sauteed the whole thing for a few minutes, then served it up with rice and celery thokku for a meal that was agreeably - and surprisingly - nice! The bright jewel colours of the finished product was an added bonus.
PS. Please forgive me the rather clunkily edited (background cut out) first photograph below - my first attempt with Adobe Photoshop! I hope to improve over time...
Recipe for: Carrot-beet-greens medley with lentils
Ingredients:
To pan-cook:
1 cup sliced fresh greens
Salt to taste
To pressure-cook:
2 medium carrots, peeled and chopped into 1-cm chunks
1 medium beet, peeled and chopped into 1-cm chunks
a generous handful of green/brown lentils
To grind together:
2-3 generous tbsp grated coconut
1/2 tsp cumin seeds
4-5 green chillies
For tempering:
1 tsp mustard seeds
1 tsp urad dal
pinch of asafoetida
2 tsp oil
Method:
1. Put the lentils in a vessel with 2-3 tbsp water, then add the beets and carrots.
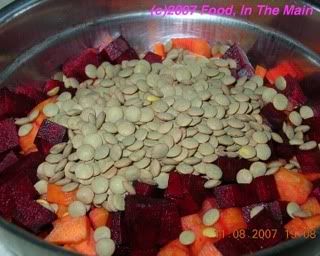
Pressure-cook for two whistles or till just done. Reserve.

2. Grind the coconut, cumin seeds and chillies together. Reserve.
3. Heat the oil in a pan, add the asafoetida powder, mustard seeds and urad dal. Cover the pan and let the mustard seeds splutter and the dal turns pale brown.
4. Add the sliced greens now.
Stir fry till they are wilted and nearly cooked, but still retain their colour. Add half of the ground coconut and stir in, cooking
on low heat for 2-3 minutes.
5. Now put in the cooked carrots, beets and lentils.
Add the remaining coconut masala and stir it all in, adding salt to taste.
6. Stir the curry for another minute or two, making sure it is heated through. Serve hot as a side dish with rice/sambar/thokku or roti.
The first I ever heard of celery was when I was giggling my way through Ogden Nash's brilliantly funny, cleverly worded and quite captivating collection of poetry (Candy is Dandy, but Liquor is Quicker). Four lines was all it was, and the poem (like a lot of his other poems) unhesitatingly took up residence in my head. Here it is, in its brief but perfectly descriptive glory:
"Celery, raw
Develops the jaw.
But celery, stewed,
Is more quietly chewed."
Brilliant, or what? (For those who would like to know more about Nash's poetry, click here.)
When I came across the actual vegetable (can't remember exactly when, perhaps it was in Singapore), I discovered that much as I liked the poem, celery wasnt quite to my taste - raw OR stewed. Crunchy, yes. Practically zero calories, yes. Perfect for dieters, yes. But tasty? No. Not to my tastebuds, not really. Its very strong flavour overpowers everything else in the vicinity, if you ask me. If you use it in soup, all you taste is celery (which is okay if it's celery soup you're making, but not otherwise). Even celery SEED (which is in Pete's all-time favourite 21-herb seasoning from Trader Joe's) is strong enough to muscle in on the other 20 herbs in the mix.
So I pretty much gave up on it. Until a couple of days back, when my mother informed me that she had made celery thokku from a recipe that she came across in Hema's blog, Vegetarian Concoctions. (I'd sent amma a link to the yelai vadam recipe I'd seen there, and she went on to browse other recipes.)
Celery thokku? Wow. Talk about innovation, not to mention imagination. Mine would definitely have boggled if anybody had asked me to make something Indian with this vegetable. I did cross-question amma about the edibility of such a thokku, and she gave it the thumbs-up. I was still a bit hesitant to believe her, though. I don't mean to imply that my mother was telling porkies, but the problem is she's an indiscriminate lover of all vegetables, including those I really dislike! So I tend to take her recommendations with a slight pinch of salt.
As it happened, Pete and I went to the Shrewsbury market on Saturday, and there were large bunches of celery marked down to 50p for 5 stalks. This seemed too good to pass up, so I bought a bunch, totally intending to make celery thokku.
Man, those stalks needed some washing to get rid of the bits of remaining soil (they were pre-washed, but still). Then I stringed the ribs (strung them? de-stringed them? de-strung them? whatever) - I'm not sure you need to do that with celery, but I did it anyway. (When I snapped one in half, little bristly bits stuck out from the broken ends. So I grabbed the bits and pulled them, one at a time. And that is how you de-string celery. Thought I'd record it for posterity, just in case.)
I had quite a pile of stringy bits when I was finished, and it seemed like a good idea not to have them in the thokku.
For the recipe, I pretty much followed Hema's instructions, except that I added a couple of cloves of garlic (the last bits of a bulb languishing in my cupboard) - garlic's always good, right? Right.
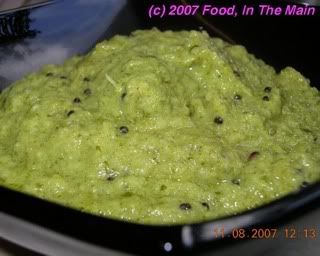
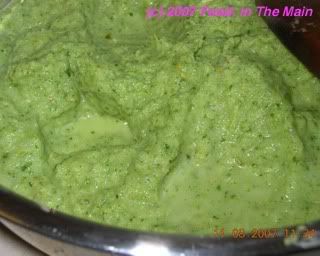
So here's my verdict: Wow, the celery thokku was surprisingly good! Only gently tasting of celery, great mixed with rice, and perfect as a dip. I spread some on the scones that I made, and it tasted great! I must say that my thokku stayed stubbornly green, unlike Hema's which took on a nice dark colour. Mine was also runny compared to hers... perhaps I should have let it cook down even more. In any case, it was dee-lish! The world (me included) owes a debt of gratitude to Hema and her mother-in-law for this really innovative recipe. :)
So - thank you, ladies! :)
Recipe for: Celery thokku
Ingredients:
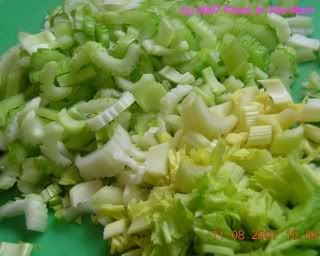
5 stalks celery, stringed and chopped
5-7 green chillies (or to taste), chopped
1/4 tsp asafoetida (hing) powder
1 tsp fenugreek seeds
1/2 cup chopped coriander leaves
1" piece ginger, chopped
2 cloves garlic, sliced
1 tsp mustard
1/2 tsp turmeric powder
Salt to taste
1/4 cup gingelly oil (preferably)
Method:
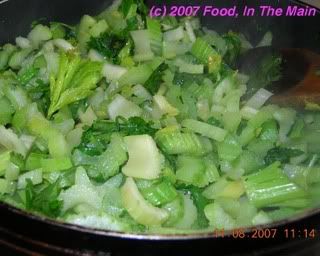
1. Heat 2 tbsp oil in a wide pan. Add the chopped celery and saute it with the coriander leaves for 7 minutes.

Take off the heat and let it cool.
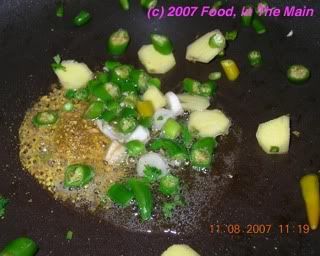
2. Add another tbsp oil in the pan and add the methi (fenugreek) seeds, chopped chillies, ginger and garlic. Cook this for 2-3 minutes, stirring.
3. Grind the cooled celery along with the ginger and garlic mixture, making a smooth paste.
4. Pour the rest of the oil in the pan now, and add the mustard seeds. Once they splutter, add the celery paste.

5. Add salt to taste, turmeric powder and asafoetida powder and mix well. Cook the thokku on a low simmer till the oil leaves the sides of the pan and the mixture cooks down to a thick consistency.
6. Mix the thokku with plain cooked rice, spread it over toast, roll it up in chapaties, use it as a dip.
My herbs - curly and flat leaf parsley, Italian and Thai basil, oregano, mint, thyme and rosemary - are all growing like crazy at the moment, and I'm throwing them into practically everything I make, to try and keep up with their profusion. It's lovely to have fresh herbs handy, but somewhat difficult to know what to do with them since I dont need to use them all every day! (If only I could grow coriander in the amounts I need - but that's not really feasible, as it's the one herb which I DO tend to use a whole lot).
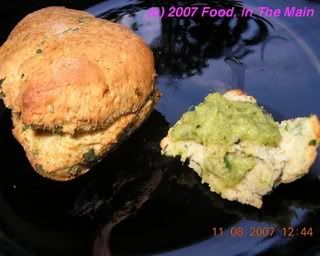
One of the recipes I tried out today was scones with fresh herbs. It's a quick, painless - and eggless - recipe and believe me, the scones are LOVELY! I'm sure you could add some chopped green chillies to give your tastebuds a kick-start, but I didnt because of the rather gentler palates around me!

The scones are gorgeous served warm, split and spread with garlic butter, as an accompaniment for soup. (Mine was courgette-mint soup - recipe coming). I also tried some with celery chutney as a dip - yummy!
Recipe for: Five-herb eggless scones
Ingredients:
1 cup plain flour
1/2 tsp salt
1/4 tsp baking soda
1/2 tsp baking powder
1 tbsp butter
1/3 cup milk (or as required)
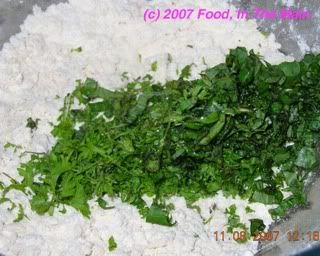
2 tbsp fresh finely chopped herbs (thyme, rosemary, parsley, oregano, basil)

Centre: Oregano; Clockwise from top right: Rosemary, thyme, Thai basil, curled parsley
Method:
1. Preheat the oven to 220C and lightly flour a baking sheet
2. Sift the flour, salt, baking soda and baking powder into a bowl.
3. Rub in the butter till the mixture resembles fine breadcrumbs.
4. Mix in the herbs.
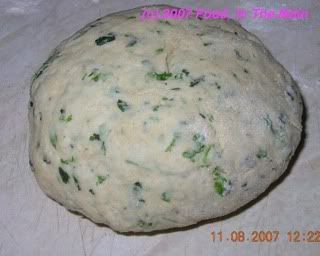
5. Gradually add enough milk to make a light, spongy dough.
6. Turn the dough onto a lightly floured surface and knead till smooth.
7. Roll it to 1” thick. Cut into rounds with a floured 2” cutter, if desired. (I just cut them through with a pizza cutter, so I got four triangles and two square shapes!).

8. Place the scones on the prepared baking sheet and bake for 10-15 minutes or till well risen and golden brown.

9. Serve warm, split and buttered if you like, along with soup.

There was quite a lot of the syrup left when I'd made stewed summer fruit, so Pete suggested I make a cake and use the juices to sweeten it. It seemed like a good idea, but then I wasnt sure how to set about it. Thank goodness for google, because I found a recipe here that was perfect for a starting point.
I didnt use half a cup of butter (as the recipe recommended) and I used wholewheat flour (actually it was chapati flour!) for the cake. Plus, of course, my cup-and-a-half of leftover fruit syrup. (Or you can use 1-1/2 cups of frozen orange juice concentrate in place of the syrup.)
Since I didnt add any extra sugar, I was pretty sure the cake would not have been quite sweet enough. Pete's suggestion was to make orange icing with fresh orange juice and orange zest, so I did - carefully this time, so that it didnt become runny. When he had a taste of the icing, he looked thoughtful for a few moments, then came up with yet another suggestion - to add grated ginger.
Now I like ginger in savoury dishes and use it all the time - but to use it, raw, in icing, didnt seem like the best idea. I was pretty sure it would be a horrible combination, but as it turned out, it worked remarkably well. So well that even I liked the icing despite my misgivings. So did Pete. He was actually quite magnanimous and didnt rub anything in - not the ginger, not the orange juice and not even his success! :)
I suppose that this is really Pete's cake - all I did was follow his suggestions. So here's his recipe for fruit juice cake with orange-ginger icing. Ta-dah!
Recipe for: Fruit juice cake with orange-ginger icing

Ingredients:
2 tbsp butter, melted
1-1/2 cups stewed fruit syrup (or frozen orange juice concentrate)
2 eggs
1 teaspoon vanilla extract
2 cups whole wheat flour (or pastry flour)
1/4 tsp salt
1 tsp baking soda
For the icing:
2 cups superfine or icing sugar
1/2 tsp orange food colouring (optional)
1 tsp orange zest
A few tbsp fresh orange juice (as required)
1 tbsp fresh grated ginger
Method:
1. Combine the melted butter and the fruit syrup (or fruit juice concentrate) in a large bowl.
http://i6.photobucket.com/albums/y246/shyam69/More%20food%20blog%20pix/cake.jpg
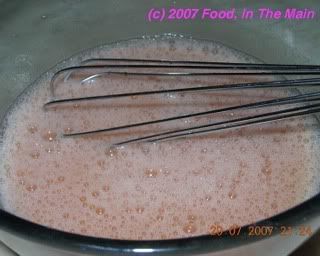
2. Beat in the eggs until the mixture is smooth. Add the vanilla extract and beat briefly.
3. Measure the flour, salt and baking soda into the bowl.
4. Whisk the mixture until the batter is smooth and fluffy. This will only take a few moments.
5. Pour the batter into an 8" round baking pan sprayed with Pam.
6. Bake the cake at 350°F (180C) for 35 minutes or till the cake tests done. It should be golden brown and pull away from the sides of the pan.
7. Split the cake in half when cool, and ice with orange-ginger icing.
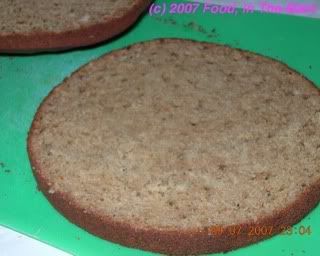
Store covered in the fridge.

8. To make the icing, beat 1 cup icing sugar with 1-2 tbsp orange juice until fluffy. Alternate the remaining icing sugar with orange juice until the icing is creamy and thick enough to spread.
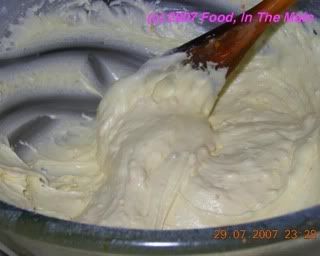
9. Add the orange zest, orange food colouring and grated ginger and beat well until fluffy and well incorporated.
Question: Should you buy fruit just because they look really really nice and are going cheap?
Answer 1: No. (Reasoning: Why are they cheap? Because they're probably not very edible.)
Answer 2: Yes. (Reasoning: They look nice. They're cheap! You get loads and loads of it cheap! Did I mention they're cheap? What's not to like? Buy buy buy!)
Guess which answer is mine? Yep, Answer 1.
Answer 2, naturally, is Pete's. And since he was shopping on his own, he bought rather a lot of peaches, plums and apricots.
The idea was sound, the fruits weren't. They were sour. (This is why I like canned peaches and apricots better than fresh!) They continued being sour even though we gave them generous amounts of time to ripen to sweet, instead of which they began to go soft. And still stayed sour.
I was loathe to waste all the fruit, and I really didnt know what to do with the darn things. I didnt want to make jam. There arent many takers for jam at home, funnily enough.
So I trawled my trusty Net for ideas, and came upon Jamie Oliver's stewed fruit crumble. It's a pity that I didnt get to the review (link below) until after I'd put the fruits in the hot syrup! Otherwise I would have known to peel and pit the fruit before stewing them. (On the other hand, perhaps leaving the peel on helped retain the shape of the fruit, I dunno.)
By the way, the review by The Cookbook Critic is absolutely spot on! I had the exact same doubts as the writer, especially when it came to removing the stones and peel from the fruit - yikes, the syrup was hot, and I missed a couple of pits that only made their presence felt when Pete nearly cracked his teeth on one! And yes, I too cursed like a shipful of sailors.
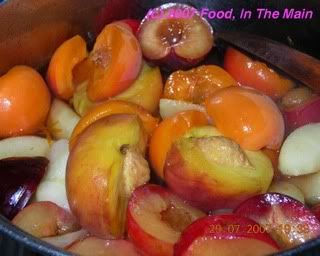
Anyway, I used peaches, apricots, plums, an apple and strawberries. LOTS of fruit! The main thing I took from Jamie's recipe was how to make the syrup to stew the fruit. I didnt make the fruit into a crumble rightaway, though (That's material for another post and in any case I didnt use Jamie Oliver's crumble recipe!).
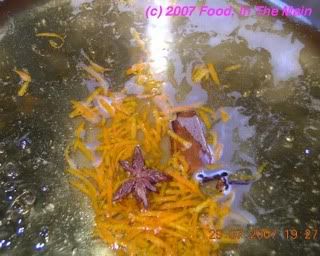
Recipe for: Stewed summer fruits
Ingredients:
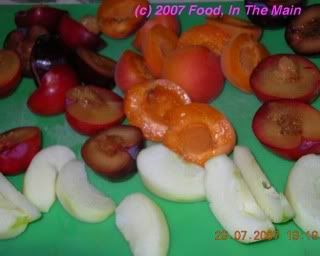
6 apricots
6 plums
1 apple
3 peaches
a handful of strawberries
2 tsp good quality vanilla extract
1 cup sugar
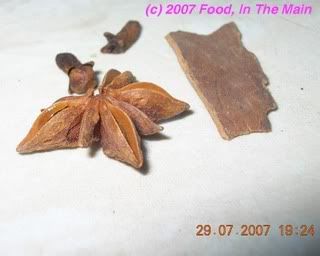
2 cloves
1 cinnamon stick
1 star anise
zest of one orange
Method:
1. Peel, core and pit the fruit (as appropriate). Hull and halve the strawberries lengthways.
2. Put the sugar and 1-1/4 cup water in a high-sided pot (if you have one) or use a big one that can accommodate all the fruit.
3. Place on the heat, and when it starts to warm up, add the vanilla extract, the cloves, cinnamon stick, star anise and orange zest.
4. Bring to the boil and let it bubble until the liquid becomes clear.
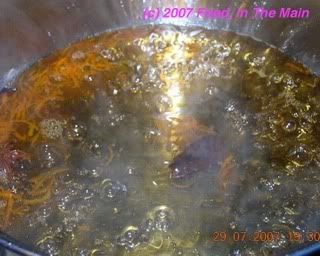
Remove the whole spices.
5. Turn the heat down to a simmer and put the apple and peaches in.
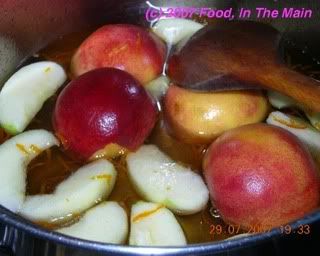
Let it cook for about 4 minutes, then add the remaining fruit (minus the strawberries).
6. Simmer the fruits slowly for 5 minutes, turning them over occasionally to make sure they all get the benefit of the syrup.
7. Then add the strawberrie and simmer for another two minutes.
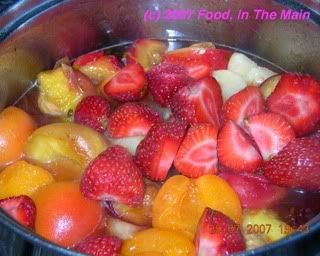
8. Let the fruit sit in the syrup for all the flavours to develop.
Serve the stewed fruit warm with some of the syrup and icecream or cream.

