skip to main |
skip to sidebar
 Ever heard of this cake? No? Really? All you fantastic cooks out there, you’ve never made this cake? Not even heard of it? Really? How very strange…
Ok, not so strange. Because I made it up The cake is just a pound cake with the ingredients halved because I could not bring myself to use four eggs in one cake. Plus the cake would have been wayyyy too large, even with the kids at home. So, I reduced all the ingredients by half – basically making a half-pound cake.
Then where did the “10 shilling” tag come from, you ask? Aha. Therein lies a very sad little play on words – mmmm... shall we say that I coined it? Ahahahaha!
Ok, here it comes. I’m guessing most of you know that before British pound went decimal in 1971, it was divided into twenty shillings and each shilling was divided into twelve pennies or pence. Although those divisions may seem odd, in fact having a pound divided into 240 equal parts does mean it can be exactly divided into halves, thirds, quarters, fifths, sixths, eighths, tenths, twelfths, fifteenths, sixteenths, twentieths, twenty-fourths, thirtieths, fortieths, forty-eightieths, sixtieths, eightieths, and one-hundred-and-twentieths. A decimal system allows precise division only into halves, quarters, fifths, tenths, twentieths, twenty-fifths, and fiftieths.
(If you math buffs want more of this sort of drivel, you can find the rest of it here.)
Guesses about the origin of the coined title, anybody? No? (I'm assuming no. I Want To Explain. I Have To Explain. How Else Could Anybody Appreciate This Exquisite Sense of Humour and Play on Words?) Ok, here's the explanation. A pound is 20 shillings, or used to be. Half of a pound is 10 shillings. Half of a pound cake, therefore, becomes...? Yes! A 10-shilling cake! Ta-DAAAA!
This 10-shilling cake was lucky to have come out as lovely as it did because in a fit of absentmindedness, instead of adding the butter to the bowl containing sugar (prior to beating the two till light and creamy), I plopped the butter into the bowl in which the egss were waiting to be beaten. Oooops!

Well, in for a penny, in for a pound (or a half-pound, or even 10 shillings! ahahahaha!), so I just tipped the sugar into the egg-butter mixture and beat the resulting mixture to within an inch of its life. It must have learnt its lesson, because the cake was light and crumby and delightfully lemony. Sometimes mistakes CAN be sammaLichufied (Tanglish - Tamil English - for "managed" or "made good").
Recipe for: Lemon 10-shilling cake

Ingredients:
1/2 cup butter, softened
1 cup sugar
2 eggs
1 tsp vanilla
1-1/2cups sifted flour
1/4 tsp. baking powder
1/4 tsp. baking soda
1/8 tsp. salt
1/2 cup buttermilk
Juice of one lemon
Icing:
1 cup icing sugar
Enough lemon juice to make thick or runny icing as per taste
Method:
1. Preheat oven to 170C. Spray a small (6") bundt pan with Pam, wipe off the excess, and set aside.
2. In large mixing bowl, beat butter with sugar and eggs vigorously, until the batter is light and frothy.

3. Sift together flour, baking powder, soda, and salt.
4. Add to butter mixture alternately with buttermilk and lemon juice, beginning and ending with flour.
5. Spoon batter into prepared pan and bake at 170C for 55-65 minutes until cake is lightly browned, set, and a toothpick inserted in the centre comes out clean.

6. Cool 5 minutes in pan, then invert onto serving plate and cool completely.
7. Mix icing sugar with lemon juice, then drizzle over the warm cake.

Let cool to set.
This isnt so much about a recipe as about an experience - one that I never, ever, EVER want to undergo again. As far as I'm concerned, it was more traumatic than any other disaster I've had in the kitchen. Yeah, it even beat cakes that wouldnt rise, cakes that looked and tasted like sweetened Fevicol, muffins that refused to part from their cases, rice that congealed into a lump, dosa batter that over-fermented and bubbled over spectacularly all over the kitchen counter and thence to the floor with a smell reminiscent of damp rotting garbage... and so on. Those disasters, difficult as they were to deal with, were restricted to me and my ego - they didn’t affect anyone else. Especially physically.
But the occasion I'm talking about very nearly forced us to evacuate the house, it was that bad. Let me start at the beginning, though. Ever since I saw Sra’s sambar kaaram post on her blog When My Soup Came Alive, I’d been wanting to make it. It sounded like just the thing – versatile enough to be used as molagapodi or as emergency seasoning/added flavour for vegetables and so on.
The first item on her list of ingredients was dry red chillies. Now I only had fiery little red chillies, not the long, less hot ones that are more commonly used in Indian kitchens. I’d been looking for the latter, but for some reason they’re not available on the online grocery shop I use or in the Indian shop in Telford. The only other place I knew of was Birmingham, and it certainly wasn’t worth the trip there for just one item.
Anyway, the chillies I had were termed “extra hot chillies” – but they didn’t have a more specific name. I suspect they were birds eye chillies, because they were less than an inch long. I wasn’t going to make sambar kaaram in the quantities specified by Sra, so I scaled down the recipe to more manageable proportions – and cut down on the little red devils even more, knowing how potent they were.
Dry-roast the ingredients separately, the instructions said. The first item was the chillies. At this point, I should have foreseen what would happen – and if any of you would have realised it, if you were in my position, hats off to you. I guess I didn’t have my thinking cap on that day. So what I did was throw about 1/8 cup of the little dry red chillies in my hot pan and start dry-roasting them.
I had taken the precaution of shutting the doors and windows and turning on the extractor fan, so I wasn’t too worried about any fumes affecting Pete. I expected some fumes, because dry-roasting red chillies always releases fumes, but I was confident of being able to handle it without much trouble.
Within a few moments, though, it felt like the air in the kitchen had been replaced with some toxic gas. The fumes from the chillies were extremely potent – I could hear Pete coughing in the next room. I didn’t want to open the kitchen door to go out because I knew the fumes would escape out there, making it even worse for Pete. So I turned off the heat, hoping that the air would soon clear. But it just seemed to get worse, and every breath I took felt like I was drawing fire into my lungs. I was coughing so hard that I couldn’t breathe, and my eyes were stinging. I opened the window to let in fresh air, but that didn’t help either. I had panicky thoughts of the fumes getting into my neighbour’s garage and affecting them as well, imagining that they would alert the police about poison gas and I'd be arrested as a terrorist for attempted biological warfare or for disturbing the peace or poisoning the neighbours or something. I know it sounds ridiculous and exaggerated, but those fumes were no joke, believe me.
Eventually I had to get out of the kitchen, and it DID affect the other rooms when I opened the door to get out – but it wasn’t as strong out there as it was inside. Besides, we fled upstairs after opening the doors to the conservatory and the back garden. Still, it took a couple of hours before I could muster up the courage to re-enter the kitchen and even then the residual fumes started me coughing again.
I’m not kidding when I say that chemical warfare had nothing on those red chillies – they would be a cheap, deadly and most effective way to incapacitate any enemy… as long as you could ensure that the fumes didn’t get back to you!
That was a lesson learnt the hard way… but those are the lessons that you never forget, right? I treat those little red bombs with the greatest respect now.
So did I throw them away? Not on your Nellie, not after all the trouble I’d gone through! I made the sambar kaaram, and it was as tasty as I’d imagined it on reading Sra’s recipe. Of course it was hideously hot despite my having reduced the amount of chillies when I scaled down the ingredients... so I had to repair it by adding more of the other items on the list.
Oh, other than reducing the quantities used, I haven’t changed Sra’s recipe or instructions.
Recipe for: Sambar kaaram
Dry red chillies: 50 gm
Coriander seeds: 25 gm
Fenugreek/Methi seeds: 5 gm
Cumin/jeera seeds: 5 gm
Black gram/urad dal: 10 gm
Salt, to taste
Garlic cloves: to taste (I used 10 fat cloves for a very garlicky taste)
Method:
1. Dry roast the first five ingredients separately.
2. Let cool and grind to a powder, then add salt.
3. Crush garlic roughly, add to the powder and run it in the grinder again.
4. Store in an airtight container.
 Look at that - automatic date settings on the camera cant lie after the photo's taken... so this recipe has been hanging fire since September 2007! I'd find that shameful, except that I dont. Not much.
The downside to off-the-cuff recipes is that you dont remember what you did at that point (especially if, like me, you dont write down the steps) - only the photos that you religiously took serve as a reminder. And then if, again like me, you put off typing the recipe because you think it will be inconvenient to try and remember how you did what you did - well then, you will end up with a recipe that you made four months ago and didnt get around to posting. If this was someone other than me, they'd be embarrassed. Since this is me, I'm not. (Or making an elaborate pretence of not.)
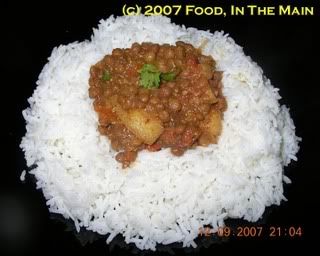
However, my memory hasnt entirely abandoned me, and I remember that his impromptu dal was DELICIOUS - tangy from the tamarind and tomatoes, rich with mustard and garlic, made with a dal I'm very fond of because it retains its shape while still being cooked to a soft texture. Everything's to love here!
So, finally, very nearly 5 months after it made its debut in my kitchen, here is the recipe, making its debut into print.
Recipe for: Tangy sabut masoor dal
Ingredients:
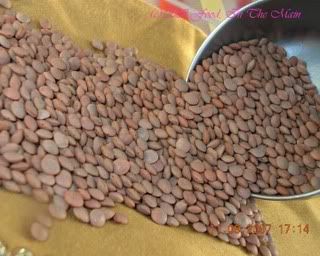
1/2 cup whole masoor dal
1 medium potato, chopped into 1-cm cubes
1/2 tsp tamarind paste
1 tbsp mustard seeds
3-4 cloves garlic
1 tsp cumin seeds
4-5 fresh green chillies (or to taste), minced or sliced into very thin rings
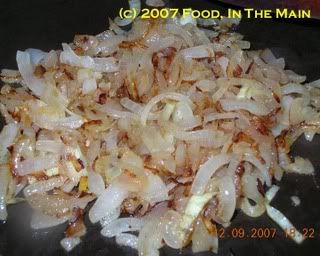
2-3 medium onions, sliced thin
1/2 cup chopped ripe tomato
2 tsp oil
Salt to taste
Fresh coriander leaves for garnish
Method:
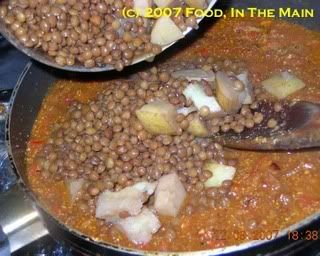
1. Pressure-cook the dal and potatoes with just enough water to cover the dal in the pan.
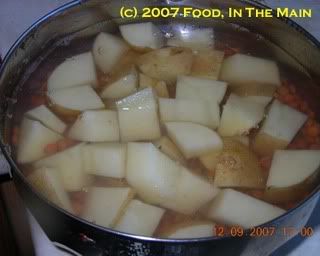
Two whistles should be enough. Let the pressure come down by itself,
If cooking on the hob, make sure the dal and potatoes are cooked but not mushy. Add water as required, dont start off with too much or it'll be a waste of energy and nutrients. You should have about a cupful of water left after cooking.
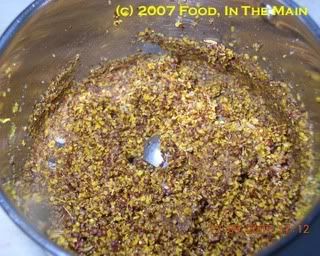
2. Meanwhile, grind together the mustard seeds, garlic and cumin seeds into a powder.
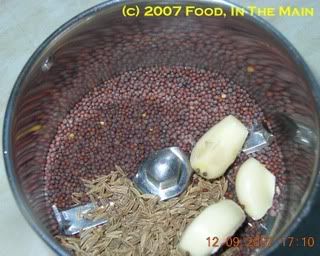
It need not be very smooth.
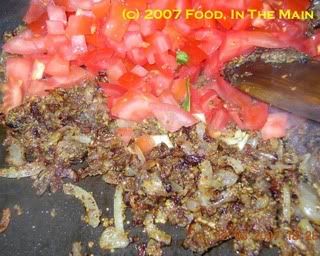
3. In a pan, heat the oil and add the sliced chillies; fry for a minute or so, then add the sliced onions and cook them till they're soft and pale brown.
4. Add the ground mustard powder and stir it in.
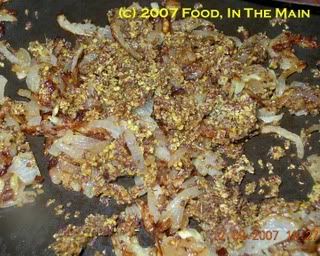
Fry for 2-3 minutes more on high heat, stirring occasionally.
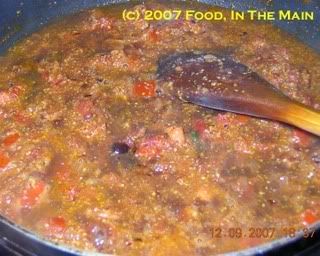
5. Add the chopped tomatoes along with 1/2 cup water.
Fry till the tomatoes turn soft and are breaking down.
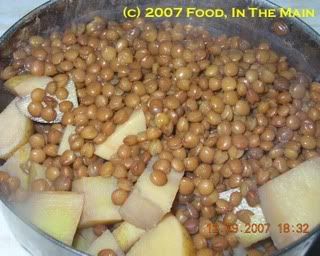
6. Now add the cooked dal and potatoes with the remaining cooking water and stir it all in. Add enough water to make one cupful if there isnt enough cooking water.
7. Stir in the tamarind paste and salt to taste. Let the dal bubble for 5-7 minutes until the ingredients all come together and the water content reduces.
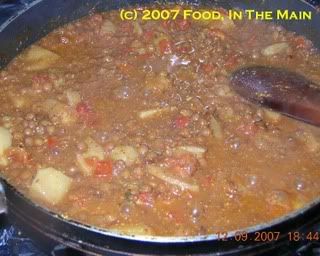
This dal should be quite thick.
8. Garnish with chopped coriander and serve hot with chapaties or rice.

