skip to main |
skip to sidebar
My young cousin Hema is visiting from India, and she’s apparently determined to “learn cooking” from me. The irony is that I’m not doing much cooking at all at the moment because my mother’s here – I know, it’s not fair to leave it all to her, but the thing is, she’s at home all day and I am at work all day… so, given the circumstances, it all works out conveniently well for everybody (yes, especially me.) Anyway, I do cook on weekends, so I’m not taking total and unashamed advantage… or so I like to believe. (Kind readers, please don’t stick the needle of derision in my pathetic little bubble of denial!)
So the project for the day in the cookery department was a simple one, courtesy Hema – peanut butter cookies. It didn’t strike me to ask about her choice till later, although I remember thinking that it seemed a bit strange – well, very American, in other words. When I did ask her, eventually, where she’d eaten peanut butter cookies before, she replied that she never had. Then how did she come up with that suggestion? Apparently, because she likes peanut butter.
Oh. Right.
So peanut butter cookies it was. And in consideration of my mother shunning eggs and everything containing eggs, we made the cookies eggless.

Now I’ve never eaten peanut butter cookies before. I wasn’t even a fan of peanut butter till fairly recently, and even the jazzed up chilli-hot Indian-style “peanut chutney” didn’t quite tempt me. As for the American fascination with peanut butter-and-jam (I refuse to call it jelly) sandwiches, I’ve been known to accuse it of being weird… but everything comes full circle and I now am forced to admit that I’m rather partial to peanut-butter-and-orange-marmalade on toast… something in which I try not to indulge too often!
Anyway, to come back to the point, since I’m not burdened with a sweet tooth and there aren’t any takers for cookies in my house, I’ve never really tried my hand at baking cookies.
I’m actually going to deliberately deviate from the point now – fair warning, right? My first attempt at baking was a recipe for lemon cookies. The recipe seemed simple enough, so I beat and mixed and rolled the dough into balls and placed them on a tray and gave them spreading space - everything seemed to be going swimmingly well as I put the trays in the oven.
The recipe said to bake the cookies for 8 minutes; eight antsy minutes later, I checked the cookies – they were still soft, so back inside they went for another few minutes. They remained stubbornly soft 10 even more antsy minutes later, and I was certain that the recipe had got the baking time wrong. So I just went on baking them. Eventually when the cookies had firmed up through the centre (the edges had gone extremely brown – pretty much black - by then) to my satisfaction, I took the trays out. The recipe instructed me to let the cookies cool for 3-4 minutes before removing them from the tray, so I waited the requisite number of minutes, then tried to detach a cookie to taste it.
It didn’t budge.
I tried again with another cookie, trying to lift it off the tray.
The entire tray rose in the air, but the cookie stayed firmly attached to it.
I tried chipping them off off with various things – a spatula, a knife, a cake slice, even a chisel… but the cookies just crumbled into bits. Pete tasted the bits and said that they were nice (which was very kind of him, because those things were anything BUT nice)… but comforting though his words were, I wasn’t – and am not – as dumb as I looked, and I knew I had a first class disaster on my hands. Or on my trays, to be literal. So I dumped everything in the bin – cookies, crumbs, tray and all.
I blame the recipe, of course I do. I didn’t know that cookies firm up as they cool… why would I? I’d never had a proper oven, never done any baking… and the recipe didn’t think to mention that little fact. To be fair, I guess to experienced bakers, that particular fact is basic knowledge – so basic that they just assume everybody knows it. But I didn’t… so when the cookies felt soft, I assumed that they hadn’t baked enough. And so it turned out a recipe for disaster.
I didn’t try baking cookies for ages thereafter, so making these peanut butter cookies cookies was more or less a “first” for me and Hema both. I didn’t quite know how they would turn out, but one thing I knew for sure – I would stick to the baking time specified!

As it turned out, we must have underbaked the cookies a little, for they stayed just a wee bit soft in the centre even after cooling. But they tasted so good – slightly salty, somewhat sweet – that I don’t think anybody minded.
Recipe for: Eggless peanut butter cookies

Ingredients:
1-1/2 cups AP flour
1/2 tsp baking powder
1/4 tsp salt
1/2 cup butter, room temperature
1/2 cup peanut butter
1 tsp vanilla extract
1/4 cup demerara sugar (or brown) + extra for sprinkling
1/4 cup sugar
2 tbsp cornflour
2 tbsp water
2-3 tbsp milk
Method:
1. Preheat oven to 180C and line two baking sheets with non-stick paper. In a small bowl, whisk together the cornflour and water. Reserve.
2. Mix flour, baking powder and salt in a medium bowl.
3. Beat butter, peanut butter and vanilla in a large bowl until well blended.

4. Beat in both sugars.
5. Stir in half of the flour mixture.

6. Add cornflour mixture and continue mixing, then add the remaining flour mixture and stir it in.

At this point I found the dough to be very very dry, so I added milk, tbsp by tbsp and kneaded it until the dough could be rolled into a ball. (Or rather, my cousin did all this under my - ahem! - supervision!)
8. Roll the dough into 1" balls. Arrange the balls 1/2 inch apart on baking sheets (the cookies wont spread much).

With a fork, flatten the dough balls and make a criss-cross pattern on top.
9. Sprinkle with demerara sugar and bake in a 180C/350F oven for 15-16 minutes, until the cookies are dry on top.

10. Remove baking sheets from oven and let the cookies remain on the sheets for 3 minutes,

then remove to racks and let cool completely before storing in an airtight box.
... because they’re such a pleasure to read, because the photographs are gorgeous enough to make you want to lick your monitor when they’re on your screen, because the writers’ personality comes through as warm and genuine, because their recipes are innovative and have that unmistakable stamp of tweaked originality, because because because...
But mainly because, to me personally, they represent that extremely elusive blend of a pleasant blog that’s easy on the eye, that has intelligent and interesting and funny writing and, most of all, scrummy recipes achievable even by the likes of me in my kitchen – this combination spells perfection, in my opinion. I'm pretty sure a lot of the food bloggers out there will feel the same way!
Ladies (and gents, if any), please take a bow!
Suganya, of Tasty Palettes
The Cooker
Evolving Tastes
Nupur, of One Hot Stove
Hema, of Vegetarian Concoctions
Coffee, of The Spice Café
Sunita, of Sunita’s World
Manisha, of Indian Food Rocks
It’s always the same – when I read about something new (and vegetarian) that I haven’t seen or tried eating/cooking before, I simply HAVE to source some of it for myself. Now, things like edamame-in-the-pod and green chickpeas and other such exotic things aren’t found easily in the UK – or at all, actually. Heck, you cant even get frozen okra. Not even in the frozen section of the supermarket… that is to say, the section in the supermarkets where you find the frozen items (just to clarify).
(Not that I’d buy frozen okra… I just have the feeling that it would be awash in slime once it thawed out. It probably wouldn’t, but you know what those mental images of things you have never seen are like – they persist in your head beyond reasonable argument!)
Anyway, when I discovered that my favourite online Indian greengrocer was selling canned tuvar lilva, I immediately ordered a can to see what tuvar lilva was like, to try it out. Yeah, it’s not the same as fresh, but it’s better than nothing. And don’t try to convince me otherwise because I don’t want to know!
Of course, true to form, once I had that can in my pantry, I let alone for a few months, occasionally looking in on it in a slightly gloating fashion (“I’ve got tuvar lilva too”) but eventually letting it remain on the shelf. Well, it’s got to get accustomed to its new surroundings, right?
Yesterday, however, the time came for me to open my precious can of tuvar lilva (yes, of course I checked with a couple of astrologers for the most auspicious time for the grand opening), in response to a request from my mother to “make something different”) for dinner.
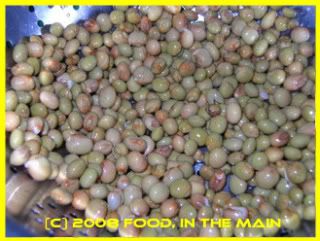
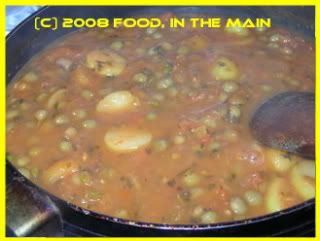
So, with much fanfare and to the booms of a 21-gun salute, I applied the can opener to the can – and slowly the contents came into view... roundish, greenish, beanish tuvar lilva. I thought they looked remarkably like the gungo peas with which I’d experimented earlier. In any case, they tasted quite nice... although I cant help wondering what they’re like fresh. I guess I should be pleased that I could at least get the canned version – like I said, better than nothing – but it’s in the nature of things for human beings to want that which is not available… and say what you will, I AM human.
And after all that, on to the recipe!
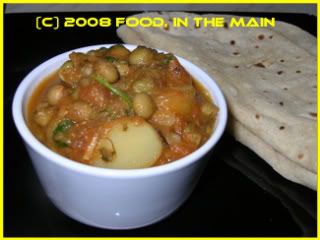
Recipe for: Tuvar lilva dal
Ingredients:
1 generous cup canned cooked tuvar lilva
3 medium onions, sliced
3 tomatoes – 2 quartered, 1 chopped fine
10 small baby potatoes, halved (or quartered, depending on size)
4 green chillies, chopped fine
1 tsp grated ginger
½ tsp cumin powder
1 tsp cumin seeds
1 black cardamom
½” stick cinnamon
½ tsp coriander powder
¾ tsp garam masala
1 tbsp kasoori methi
1 tsp cornflour
1 tbsp oil
Salt to taste
Water as required
Method:
1. Boil the sliced onions in 1 cup of water, covered, for 10 minutes or until the onions are soft and cooked.
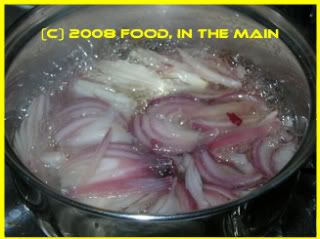
Drain the cooking water and reserve. Let the onions cool.
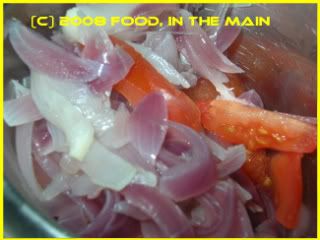
2. Grind the cooked onions with the two quartered tomatoes (adding ¼ cup water if required) into a smooth paste. Reserve.
3. Heat oil in a pan, add cumin seeds & cumin powder, green chillies and ginger.
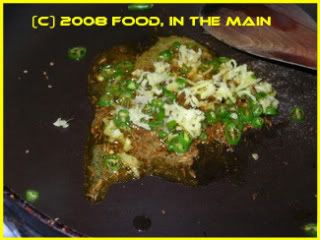
Fry for 1 minute. Then add the cinnamon stick, black cardamom, garam masala, kasoori methi and coriander powder. Stir well and continue to fry for another minute.
4. Then add the chopped tomato and the potatoes, stir it all about till well coated with the oil and spices.
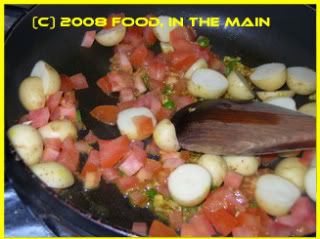
Then pour in the reserved onion water and add the kasoori methi. Stir well and cook on high heat till the water has nearly evaporated.
5. Now pour in the ground onion-tomato mixture along with 250 ml (1 cup) water.
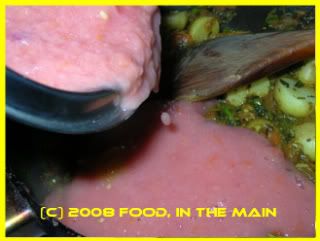
Mix well and bring it to a bubbling boil.

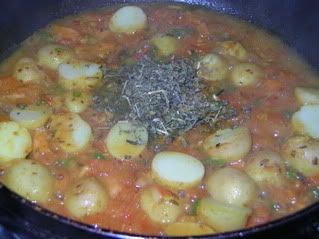
Then turn down the heat to a simmer and let it cook for 10-15 minutes or till the potatoes are done.
6. Add salt to taste along with the cooked lilva tuvar. Turn the heat up again and let the dal bubble for another 5-6 minutes, until any excess water evaporates and the dal thickens.
If it doesn’t get a thick consistency, spoon out some of the watery parts, whisk in the cornflour and stir it back into the dal. Let it boil for a couple of minutes till the dal comes together.
7. Finally garnish with chopped coriander and serve hot over plain rice, or with chapaties.
I am writing this post from an exalted plane, a level where virtuousness reigns supreme, accompanied by just the tiniest smidgen of self-satisfied smugness. I am determined to milk this (relax, it’s fat-free milk) situation for all it’s worth because virtuousness is not usually something to which I can lay claim. Even less do I aspire to it (but that’s a different story altogether).
However, do not despair, dear readers.
Note: I address those of you who, like me, do not always land on the right side of the fat-free, guilt-free, calorie-free, heart-healthy, artery-safe and 5-a-day lifestyle that every food blog, every food writer (and every government diktat) advocates. Those of you who are already converted, you may as well stop reading right here… I preach to my fellow sinners, not the already-converted-and-preaching-themselves (heheh)!
Right, to get back on track… do not despair, dear-readers-who-are-like-me. It is possible for every one of you to reach this plane.
All it takes is applesauce, in a three-step plan.
First step - Make your applesauce. (It’s got to be home-made to reach that highest plane. Sure you can use store-bought applesauce, but the virtue level won’t be as high). So.
Second step – Use the applesauce in a cake. For preference, the banana cake that I made for a friend (recipe below). Sure you can make your own cake following some other recipe, but the virtue level won’t be as high. Note: This is MY recipe for illustriousness, so what I say is Gospel. Or Shyamusmriti, for the Hindu-minded. (Sorry, Manu, this is my show.)
Third step – Cool, cut and eat.
That’s all.
To recap: Make applesauce. Make cake with applesauce. Cool. Cut. Eat. Attain afore-mentioned exalted level.
Recipe for: Fat-free applesauce banana cake

Ingredients:
2 ripe bananas
1 tbsp oil
3/4 cup sugar
1-1/4 cups applesauce
1-1/2 cups flour
1 tsp baking powder
1 tsp baking soda
1/2 tsp cardamom powder
1/2 tsp cinnamon powder
1/4 cups nuts of choice, coarsely chopped (I used walnuts) - optional
Method:
1. Preheat oven to 375F/180C. Spray 6" round baking tin (or bundt pan) with Pam.
2. In a small bowl, mash the bananas with a fork until it's mushy. Add the oil, applesauce sugar, cardamom and cinnamon and mix together.

3. In a separate large bowl, sift together the flour baking powder and baking soda.
4. Add the banana mixture to the flour and fold in gently until just mixed. Do not beat. Stir in the chopped nuts if using.
5. Spoon the batter into the prepared pan

and bake till done and a cake tester comes out clean.
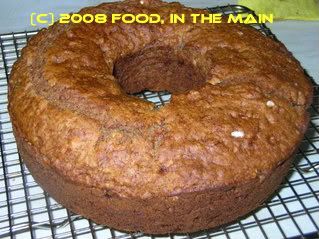
6. Let cool in the pan 5 minutes, then remove and cool completely. Ice lightly if preferred with a simple mixture of icing sugar mixed with milk or cream and a bit of vanilla extract to a thick but pouring consistency.
Note: To make applesauce, chop up two large cooking apples and pressure-cook them for three whistles. Run the cooled cooked apples in a blender to make smooth applesauce.

