skip to main |
skip to sidebar
I may have mentioned once or twice or a few dozen times that, or the first 30 or so years of my life, I hated parakkai (also known as pavakkai, karela, bittermelon or bittergourd - or, if you're my husband, as "green rats"). If you're a karela lover, today's recipe will be right up your street. If you're not a karela lover, this recipe will still be quite a way up your street because you will not taste the bitterness from the vegetable at all.
If you know your karela at all, you would think it's hard to mask the bitterness, but because everything is roasted and there are lots of other ingredients, the resultant powder has no discernible bitterness. At least, none that I could taste. And I didn't even peel the skin or discard the seeds (although if they're red and hard, DO scoop them out and discard) or salt the cut bittergourd to reduce the bitterness. Because I'm lazy and that's the way I roll, baby.
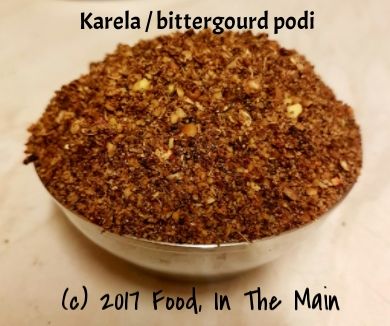
I ate this mixed with rice and ghee, I ate it sprinkled over roasted vegetables, I ate it as a side with kootu and roti, I ate it mixed with yogurt both as a dip and as a salad dressing - it's my most favourite thing at the moment, and it seems to work with everything.
Best of all, since the karela is oven roasted with only a mimimal amount of oil, it's a healthy podi. There are versions where the vegetable is deep fried until crisp, but - while I love deep fried foods with a deep and abiding love - I see no need to load this podi with unnecessary calories.
Recipe for: Bittergourd / pavakkai / karela podi
Ingredients:
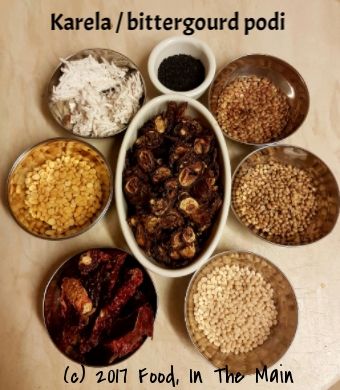
3-4 medium size tender karela
10 dried red Kashmiri chillies
2 tbsp coriander seeds
2 tbsp whole urad dal
2 tbsp chana dal
2 tbsp kollu or horsegram
2 tbsp fresh or frozen grated unsweetened coconut
1 tbsp black sesame seeds (regular will probably also do)
Handful of curry leaves (fresh or frozen)
2-3 cloves of garlic, halved
1 small gooseberry sized ball of tamarind (seeds and strings removed if any)
1/2 tsp asafoetida powder
1/2 tsp + 1 tbsp oil
Salt to taste (or about 1.5 tsp)
Method:
1. Thinly slice the karela, mix with 1 tbsp oil and roast in a 180C/350F oven until the slices are brown with very little green showing. This should take about 30 minutes, but be sure to stir them around every 10 minutes so that they crisp evenly. Let them cool completely.
2. Heat the oil in a wok and add the red chillies. Roast on a medium-low flame, stirring often until the chillies turn a darker shade, about 5 minutes. Be careful not to burn them or you'll regret the fumes! Remove to a plate and cool.
3. Add the coriander seeds, the sesame seeds and all the dals. Dry roast them, stirring often, until they are toasted and fragrant, and turn a darker shade. Again, don't burn them or the podi will taste bitter. Add to the roasted chillies and let cool.
4. Finally, add the coconut, curry leaves, garlic and tamarind and toast in the pan, stirring frequently, until the coconut has turned golden brown and has no more moisture in it - yet again, be careful not to burn it.
5. Once all the ingredients are cool, grind them into a slightly coarse powder. Add salt and asafoetida powder and mix well. Store in an airtight container.
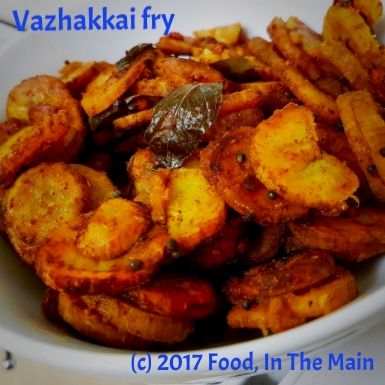
My entire family likes this vegetable, but my sister and I, we're "lattoo" (Hindi slang for "crazy") when it comes to vazhakkai. If we were asked to eat it every day for a year, we would probably beg to have it twice a day! The recipe below is how my mother makes it, and I see no reason to mess with something that I think is perfect. The flavour that the coconut oil gives this vegetable is unbelievable. The two just go together, no question.
That said, if when I get my hands on vazhakkai again, I hope to make a recipe that I've had in my folder for literally years, involving fresh mustard paste. You would think I could hold back at least one vazhakkai for the mustardy recipe... but no. I haven't yet made it because each time I end up making this same one. This dry fry with my mother's thengai kuzhambu (South Indian coconut-and-fenugreek-seed gravy)and steamed rice - I couldn't want for more!
Recipe for: Vazhakkai fry
Ingredients:
3 green (raw) bananas
2 tbsp coconut oil
A few fresh/frozen curry leaves (optional)
1/4 tsp turmeric powder
1/8 tsp asafoetida powder (optional)
1/2 tsp urad dal
1 tsp mustard seeds
1/4 tsp black pepper powder
Red chilli powder to taste
Salt to taste
1 tsp tamarind paste
Method:
1. Wear disposable gloves or grease your hands with oil before peeling the bananas as the sap will otherwise stick to your hands. Make sure to get all the thick green skin off the bananas.
2. Slice the bananas into even slices about 1/4cm thick and put them in a saucepan of water. The water should be enough to cover the slices generously. Dissolve the tamarind paste and turmeric powder in the water.
3. Parboil the sliced bananas, then place in a colander to drain off the cooking water. Handle carefully so that the slices don't break up too much.
4. Heat the coconut oil in a wide saucepan, then add the mustard seeds, curry leaves and urad dal. Cover and let the seeds splutter. The urad dal should be golden by now.
5. Now add the chilli powder and black pepper powder, stir it for 20 seconds, then add the parboiled banana slices along with salt to taste. Stir carefully to coat the slices evenly.
6. Cover the pan and let the slices roast for 8-10 minutes on a medium heat, until the slices turn golden and are fully cooked. Turn the slices carefully over and let them roast for about 5 minutes more. Serve hot as a side with rice, rasam or sambar and any South Indian "gravy" like moar kuzhambu, vattha kuzhambu or thengai kuzhambu (recipes for all these are on my blog).
Brussels sprouts are a great favourite with me, especially since I discovered that they could be roasted in the oven. That is definitely my most preferred way to eat these little green cabbagey things. My mother and I are the only two people in my family who would willingly and happily eat sprouts. My husband turns green at the sight of a sprout. Despite that, he always insists on having this vegetable as a side dish at Christmas dinner, and he'll even put a couple of them on his plate - but they remain untouched all through the meal and then they go straight into the bin. I've asked him why he wants sprouts on the table if he hates them so much, and why he puts them on his plate if he never means to eat them. The only answer I've received is a stubborn "There should be Brussels sprouts at Christmas dinner. It's a tradition." Yeah, his Christmas tradition being never to eat sprouts.
Anyway, my mother-in-law, brother-in-law, my niece and I all make up for Pete's boycott of the sprouts, because we all love them.
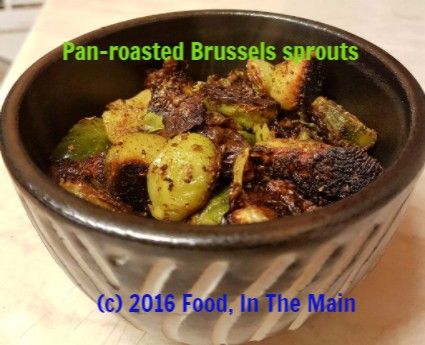
Today, inspired by Masterchef Australia 2016 (which I have been watching diligently and religiously), I decided to pan-fry my sprouts. I usually add a lot of chilli powder to my dry curries, but for some reason I refrained, just limiting myself to a pinch of Jaffna curry powder.
Cooking the sprouts on a slightly higher heat, covered, for 15 or so minutes helped them "caramelise" where they were in contact with the hot pan. Masterchef contestants (and judges) are very big on caramelisation, which I've interpreted as "crisp in places and just very slightly burnt".
Well, whatever the actual definition, the sprouts were absolutely delicious! i'm not joking when I say that I kept eating them straight from the pan - the caramelised bits were lovely and crunchy, the inner bits were soft... seriously, just thinking about it is making me salivate. I still have a few sprouts left and I'm very certain I'll be making this again tomorrow. Thank you, Masterchef Australia, for the caramelisation fixation!
Recipe for: Pan-roasted Brussels sprouts
Ingredients:
15 medium sprouts
1 tbsp oil
1/4 tsp asafoetida powder (optional)
1/2 tsp coriander powder
1/2 tsp Jaffna curry powder (or any curry powder or garam masala you might have)
Salt to taste
Method:
1. Trim the sprouts and cut into quarters.
2. Heat the oil in a pan. Add the asafoetida powder and coriander powder and stir it for 30 seconds. Then add the quartered sprouts, sprinkle the curry powder or garam masala over, and stir to coat the sprouts in the oil and spices.
3. Keep the heat just below medium-high and cover the pan. Let the sprouts cook for 15 minutes undisturbed. Then take off the lid and check to see that they are cooked. They should be beautifully caramelised from the prolonged undisturbed contact with the hot pan. Sprinkle the salt over the cooked sprouts and stir it in.
4. Take the pan off the heat and serve the sprouts hot as a side with rice and sambar. (I ate most of them straight from the pan because they were just that delicious.)
You know, it's really nice not to be the proverbial frog in the well, and it's all the hundreds of food blogs that I have to thank for introducing me to the enticing, amazing world of home-style food recipes... and showing me the thousands of possibilities with everyday vegetables and fruit that would never have occurred to me otherwise.
Take thogayal, for instance - I knew three kinds: Coconut-only, coconut-with-cabbage, and coconut-with-pumpkin-or-chayote squash. I didn't even imagine that thogayal could be made with carrots, beets, bell peppers, spinach, etc... and as for making it without coconut - wow! The first time I made thogayal with just cabbage was such a revelation! All the taste of the dish I loved without loading it up with coconut - I can't tell you how much I loved it.
In that spirit, I decided to make thogayal with a bunch of red radishes with their greens because I didn't feel like eating them raw (they were pretty pungent!).

I was actually a bit worried that the thogayal would be smelly... but as it turned out, you would not have known that it was made with radishes, because the typical smell of the radishes was totally gone. I'm absolutely certain that even radish haters would love this chutney. You could probably even try it with the more typically Indian white radish or mooli - I'm going to do so if and when I get my hands on some. But until then, red radish thogayal will fill its place perfectly.
Recipe for: Radish thogayal/chutney

Ingredients:
10-12 small red radishes or 1 medium white mooli/radish, chopped

1 cup radish greens (or use spinach) (optional)

2 medium onions, chopped
5-6 dried red chillies (or to taste)
2 tbsp tur/toor/tuvar dal
3 tbsp urad dal
1 tbsp tamarind paste
a few fresh/frozen curry leaves
3 tsp oil
1/2 tsp asafoetida powder (optional)
Salt to taste
Method:
1. Heat 1 tsp oil in a pan, add the asafoetida powder and let it sizzle, then add the chopped onions and radish.

Stir-fry over medium heat for 3-4 minutes, until the radish is nearly cooked and the onions are turning soft (6-7 minutes).
 Add the chopped greens and cook till they wilt. Remove from the heat and let cool.
 2. In another small pan, heat the remaining oil and add the red chillies, urad dal, toor dal and curry leaves.
 Fry, stirring, till the dals are golden brown and the red chillies turn a shade darker. Remove from the heat.
3. When all of it is completely cool, transfer to a mixie/grinder, add the tamarind paste and grind it to a fairly smooth mix.
Fry, stirring, till the dals are golden brown and the red chillies turn a shade darker. Remove from the heat.
3. When all of it is completely cool, transfer to a mixie/grinder, add the tamarind paste and grind it to a fairly smooth mix.
 4. Add salt to taste and mix it in. Serve as a side dish with rice, chapaties, bread or as a dip with snacks.
RECIPE: RADISH THOGAYAL/CHUTNEY
4. Add salt to taste and mix it in. Serve as a side dish with rice, chapaties, bread or as a dip with snacks.
RECIPE: RADISH THOGAYAL/CHUTNEY
Ingredients:
10-12 small red radishes or 1 medium white mooli/radish, chopped
1 cup radish greens (or use spinach) (optional)
2 medium onions, chopped
5-6 dried red chillies (or to taste)
2 tbsp tur/toor/tuvar dal
3 tbsp urad dal
1 tbsp tamarind paste
a few fresh/frozen curry leaves
3 tsp oil
1/2 tsp asafoetida powder (optional)
Salt to taste
Method:
1. Heat 1 tsp oil in a pan, add the asafoetida powder and let it sizzle, then add the chopped onions and radish. Stir-fry over medium heat for 3-4 minutes, until the radish is nearly cooked and the onions are turning soft (6-7 minutes). Add the chopped greens and cook till they wilt. Remove from the heat and let cool.
2. In another small pan, heat the remaining oil and add the red chillies, urad dal, toor dal and curry leaves. Fry, stirring, till the dals are golden brown and the red chillies turn a shade darker. Remove from the heat.
3. When all of it is completely cool, transfer to a mixie/grinder, add the tamarind paste and grind it to a fairly smooth mix.
4. Add salt to taste and mix it in. Serve as a side dish with rice, chapaties, bread or even as a dip with snacks.
 Cabbage is one of my favourite vegetables, pretty much no matter how it’s cooked – as long as that doesn’t mean cooking it to a stinky sulphur-y mush. I don’t care much for white cabbage, because (in my opinion) it’s stinkier and sulphur-ier than green cabbage. (It might not be any more or less smelly, you understand - I’m just quoting the opinion put forward by my nose). Purple cabbage is kinda like white cabbage except purple… and because it’s a pretty colour for cabbage, I don’t shun it.
But the cabbage I use the most is a pointy, tear-drop shaped green cabbage marketed under the name “sweetheart cabbage” in the supermarkets here. That said, I quite like the round green kind too. But sweetheart by name, sweetheart by taste – no, ok, that simile doesn’t work. There’s a good reason I’m not a world-famous writer, I suppose.
Anyway, those are the three types of cabbage available - unless you count the round green cabbage as a different variety from the pointy green one… in which case, the cabbage count goes from three to four. I’m sure that, like potatoes, there are hundreds of different varieties of cabbage, all of which have individual names, again like potatoes. I probably just don’t know about them.
Cabbage is one of my favourite vegetables, pretty much no matter how it’s cooked – as long as that doesn’t mean cooking it to a stinky sulphur-y mush. I don’t care much for white cabbage, because (in my opinion) it’s stinkier and sulphur-ier than green cabbage. (It might not be any more or less smelly, you understand - I’m just quoting the opinion put forward by my nose). Purple cabbage is kinda like white cabbage except purple… and because it’s a pretty colour for cabbage, I don’t shun it.
But the cabbage I use the most is a pointy, tear-drop shaped green cabbage marketed under the name “sweetheart cabbage” in the supermarkets here. That said, I quite like the round green kind too. But sweetheart by name, sweetheart by taste – no, ok, that simile doesn’t work. There’s a good reason I’m not a world-famous writer, I suppose.
Anyway, those are the three types of cabbage available - unless you count the round green cabbage as a different variety from the pointy green one… in which case, the cabbage count goes from three to four. I’m sure that, like potatoes, there are hundreds of different varieties of cabbage, all of which have individual names, again like potatoes. I probably just don’t know about them.
So, coming back to what I do know (a much shorter topic, haha), which is that I love cabbage, what I made with a combination of green and purple cabbage was a luvverly rice dish. With added peas. There's hardly anything that doesn't benefit from the addition of peas, unless it's a cake. Although I bet someone somewhere has tried a green peas cake and written about it on their blog... Ok, I'm off to google for green peas cake now, but you please feel free to read my recipe below and try it out, because it's really, really tasty - especially if you're a cabbage enthusiast like me.
Recipe for: Cabbage and peas rice
 Ingredients:
2 cups cooked basmati rice
3 cups cabbage, finely shredded
 1/2 cup peas (fresh or frozen)
1 tsp oil
2 tsp mustard seeds
1/4 tsp asafoetida powder
a few fresh/frozen curry leaves
Salt to taste
Peanuts and chopped coriander leaves for garnish (optional)
1/2 cup peas (fresh or frozen)
1 tsp oil
2 tsp mustard seeds
1/4 tsp asafoetida powder
a few fresh/frozen curry leaves
Salt to taste
Peanuts and chopped coriander leaves for garnish (optional)
For the masala powder:
1/2 tsp oil
1 htsp urad dal
1 htsp tuvar dal
1 htsp chana dal
1 htsp coriander seeds
4-5 dried red chillies (or to taste)
2 tbsp shredded fresh or dry coconut
Method:
1. Heat 1/2 tsp oil in a large pan.  Fry the masala powder ingredients (bar the coconut) over a low flame till the dals turn a pale golden brown, and the chillies are a shiny dark red. Remove to a plate and let cool.
2. Grind the cooled roasted dals along with the coconut to a fairly smooth powder.
Fry the masala powder ingredients (bar the coconut) over a low flame till the dals turn a pale golden brown, and the chillies are a shiny dark red. Remove to a plate and let cool.
2. Grind the cooled roasted dals along with the coconut to a fairly smooth powder. Reserve.
 3. Heat the remaining oil in the same pan and add the asafoetida powder, curry leaves and mustard seeds. Cover the pan and let the seeds pop.
 4. Now add the shredded cabbage and peas and stir well.
Cover the pan tightly and let the vegetables cook on a very low heat for about 7 minutes, till the cabbage is cooked but still retains some bite.
 5. Once the cabbage is done, add the ground coconut masala powder and salt to taste, and mix well.

 6. Then add the rice and mix it in carefully until it is distributed evenly.
Add the chopped coriander (if using) and scatter the roasted peanuts over. Serve hot with cucumber raita and papad or crisps on the side.
RECIPE: CABBAGE AND PEAS RICE
Ingredients:
2 cups cooked basmati rice
3 cups cabbage, finely shredded
1/2 cup peas (fresh or frozen)
1 tsp oil
2 tsp mustard seeds
1/4 tsp asafoetida powder
a few fresh/frozen curry
Salt to taste
Peanuts and chopped coriander leaves for garnish (optional)
For the masala powder:
1/2 tsp oil
1 htsp urad dal
1 htsp tuvar dal
1 htsp chana dal
1 htsp coriander seeds
4-5 dried red chillies (or to taste)
2 tbsp shredded fresh or dry coconut
Method:
1. Heat 1/2 tsp oil in a large pan and fry the masala powder ingredients (bar the coconut) over a low flame till the dals turn a pale golden brown, and the chillies are a shiny dark red. Remove to a plate and let cool.
2. Grind the cooled roasted dals along with the coconut to a fairly smooth powder. Reserve.
3. Heat the remaining oil in the same pan and add the asafoetida powder, curry leaves and mustard seeds. Cover the pan and let the seeds pop.
4. Now add the shredded cabbage and peas and stir well. Cover the pan tightly and let the vegetables cook on a very low heat for about 7 minutes, till the cabbage is cooked but still retains some bite.
5. Once the cabbage is done, add the ground coconut masala powder and salt to taste, and mix well.
6. Then add the rice and mix it in carefully until it is distributed evenly. Add the chopped coriander (if using) and scatter the roasted peanuts over. Serve hot with cucumber raita.
I saw a recipe for cilantro mango chutney on Talimpu foodblog and immediately wanted to try it, because I love mango thokku. I had to wait a few days before I could get the star ingredient for this recipe, of course, but thereafter everything was quicker than quick – a nearly unprecedented turn of events on this blog. (The main reason for the promptness being, of course, that raw green mangoes don’t stay raw for long.)
The chutney was far too sour and not hot enough for my tastes - my fault for using two mangoes rather than one, plus not having enough coriander leaves to offset the extra mango. So I had to resort to frying some red chilli powder in extra oil, then mixing the chutney in it, frying it all for a few more minutes before trying it again. This time around it was perfect – spicy-hot and sour and redolent with the coriander.
Like regular mango thokku except – and I feel obliged to point this out - different. Thanks for your original recipe, Raji!
Recipe for: Green mango and coriander thokku (chutney)
 Ingredients:
 2 green (unripe) mangoes, cubed
 1 tbsp urad dal
1 tsp mustard seeds
5-6 green chillies (or to taste), chopped
1-1/2 cups chopped coriander
1 tsp red chilli powder (or to taste, optional)
1/4 tsp asafoetida powder
2 tbsp oil
Salt to taste
Method:
1. Heat the oil and add the mustard seeds, asafoetida powder, green chillies, urad dal and red chilli powder (if using), and stir-fry for for a minute or two, till the dal turns a light brown and the mustard seeds have popped.
1 tbsp urad dal
1 tsp mustard seeds
5-6 green chillies (or to taste), chopped
1-1/2 cups chopped coriander
1 tsp red chilli powder (or to taste, optional)
1/4 tsp asafoetida powder
2 tbsp oil
Salt to taste
Method:
1. Heat the oil and add the mustard seeds, asafoetida powder, green chillies, urad dal and red chilli powder (if using), and stir-fry for for a minute or two, till the dal turns a light brown and the mustard seeds have popped.
 2. Add the green mangoes and fry them for 4-5 minutes, till they soften.
 3. Add the coriander and fry till the leaves wilt.
 Remove from the heat and let cool.

 4. Grind to a fairly smooth consistency. This is good as a sandwich spread or as a side with idlis, dosa and chapaties.
RECIPE: GREEN MANGO AND CORIANDER THOKKU (CHUTNEY)
Ingredients:
2 green (unripe) mangoes, cubed
1 tbsp urad dal
1 tsp mustard seeds
5-6 green chillies (or to taste), chopped
1-1/2 cups chopped coriander
1 tsp red chilli powder (to taste, optional)
1/4 tsp asafoetida powder
1 tbsp oil
Salt to taste
Method:
1. Heat the oil and add the mustard seeds, asafoetida powder, green chillies, urad dal and red chilli powder (if using), and stir-fry for for a minute or two, till the dal turns a light brown and the mustard seeds have popped.
2. Add the green mangoes and fry them for 4-5 minutes, till they soften.
3. Add the coriander and fry till the leaves wilt. Remove from the heat and let cool.
4. Grind to a fairly smooth consistency. This is good as a sandwich spread or as a side with idlis, dosa and chapaties.
4. Grind to a fairly smooth consistency. This is good as a sandwich spread or as a side with idlis, dosa and chapaties.
RECIPE: GREEN MANGO AND CORIANDER THOKKU (CHUTNEY)
Ingredients:
2 green (unripe) mangoes, cubed
1 tbsp urad dal
1 tsp mustard seeds
5-6 green chillies (or to taste), chopped
1-1/2 cups chopped coriander
1 tsp red chilli powder (to taste, optional)
1/4 tsp asafoetida powder
1 tbsp oil
Salt to taste
Method:
1. Heat the oil and add the mustard seeds, asafoetida powder, green chillies, urad dal and red chilli powder (if using), and stir-fry for for a minute or two, till the dal turns a light brown and the mustard seeds have popped.
2. Add the green mangoes and fry them for 4-5 minutes, till they soften.
3. Add the coriander and fry till the leaves wilt. Remove from the heat and let cool.
4. Grind to a fairly smooth consistency. This is good as a sandwich spread or as a side with idlis, dosa and chapaties.
I’ve always found it difficult to force myself to eat something simply because it’s considered healthy. Health-giving properties alone don’t make the cut, as far as my tastebuds are concerned. I accept that it is entirely my loss. But I am trying to trick my tastebuds into accepting non-rice (or non-white-rice) wholegrains as tasty, mainly by disguising them in familiar recipes.
I don’t know if you’ve heard of how shepherds help orphaned newborn lambs survive, by putting them together with ewes whose own lambs died at birth. Basically, they tie the fleece from the dead lambs onto the orphaned ones, and then introduce them to the mama sheep… and the mama sheep, smelling only their own dead lambs’ smell, accept the orphans as their own. Eventually, they get used to the adopted lambs’ own smell and then there is no need for the fleece to do the tricking job.
In other words:
Shyam (me) = mama sheep, who can’t/won’t accept
other lambs = brown rice, millet, broken wheat, quinoa, etc.,
in place of
her own beloved lamb = white rice.
Did y’awl get that awesome symbolism? Good, isn’t it? I’ve been planning my acceptance speech for the Nobel Prize for Literature ever since I’ve been able to put pen to paper. (Please try not to hurt my feelings by saying I’m baaaaaaaaaad (get the pun! get the pun!) at metaphors.)
So anyway, I think mama sheep was quite reasonably fooled into accepting the millet “curd rice” lamb as a reasonable substitute for her own white rice baby.
I’ve listed a few optional extras in the recipe below to add to the millet, none of which you will see in my photos – but that is because I didn’t have green grapes or cucumber handy, and couldn’t be fagged to grate any carrots because I was doing other things at the time.
One thing I noticed about the cooked millet – how much it resembled cooked quinoa, but luckily without the distinctive taste. The millet took less getting used to than quinoa. Which is a good reason why it worked so well in this recipe. My dinner was millet "curd rice" with 1-1/2 brown rice dosas and molagapodi. Pretty satisfying, all said.
Recipe for:

Ingredients:
1/2 cup millet

Water as required
Yogurt as required (I used Greek-style yogurt)
1 tsp oil
1 tsp mustard seeds
A few curry leaves, torn up
1/4 tsp asafoetida powder
2-3 green chillies (or to taste), sliced into thin rounds
Optional: 2-3 tbsp cucumber cubed small OR 2-3 tbsp grated carrots OR a few halved green grapes
Method:
1. Cook the millet in plenty of boiling water till soft and cooked (takes about 15 minutes, but keep testing the millet during the cooking period to see if it's done).
2. Drain the water off as well as you can and let the millet sit covered for 10 minutes. Let it cool.

3. Add as much yogurt to the millet as required, mixing gently, until it's of a consistency you like.

Ideally, it shouldn't be sloppy/runny, and it should also not be thick and dry.
4. For the tempering, heat the oil in a small pan, add the asafoetida powder, green chillies (if using), mustard seeds and curry leaves. Cover the pan and let the mustard seeds pop.

5. Now pour this tempering over the millet and mix it in gently. You can also mix in the cucumber, carrots or grapes at this point.

Serve cold or at room temperature.

This can be had by itself or with pickles and any vegetable curry.
RECIPE: MILLET "CURD RICE"
Ingredients:
1/2 cup millet
Water as required
Yogurt as required (I used Greek-style yogurt)
1 tsp oil
1 tsp mustard seeds
A few curry leaves, torn up
1/4 tsp asafoetida powder
2-3 green chillies (or to taste), sliced into thin rounds
Optional: 2-3 tbsp cucumber cubed small OR 2-3 tbsp grated carrots OR a few halved green grapes
Method:
1. Cook the millet in plenty of boiling water till soft and cooked (takes about 15 minutes, but keep testing the millet during the cooking period to see if it's done).
2. Drain the water off as well as you can and let the millet sit covered for 10 minutes. Let it cool.
3. Add as much yogurt to the millet as required, mixing gently, until it's of a consistency you like. Ideally, it shouldn't be sloppy/runny, and it should also not be thick and dry.
4. For the tempering, heat the oil in a small pan, add the asafoetida powder, green chillies (if using), mustard seeds and curry leaves. Cover the pan and let the mustard seeds pop.
5. Now pour this tempering over the millet and mix it in gently. You can also mix in the cucumber, carrots or grapes at this point. Serve cold or at room temperature. This can be had by itself or with pickles and any vegetable curry. Millet "curd rice"
I love getting my hands on the “chinna vengayam” (Tamil for “little onions”), also known as sambar onions. I guess they’re a variety of shallots common in India - pungent, purple and perfect for sambar, especially arachuvitta sambar(hence the description “sambar onions”). While I can and do get SOME Indian vegetables from an online Indian grocery site and expect them to be in reasonably good condition, I’ve been wary of buying these little purple fellas – mainly because the site itself warns buyers that “due to bad weather and other unfavourable conditions, the quality of these onions is not good” – or words to that effect. If the sellers themselves describe the onions as “not good”, I figure they’re practically rotting from the inside out (the onions, not the sellers), as onions do.
So a trip to London with Pete is always made the more exciting because I know that I’ll get the chance to visit a Sri Lankan shop and gloat over all the authentic South Indian produce – podalangai (snake gourd), palakottai (jackfruit seeds), chenai kizhangu (elephant yam) and so on. I don’t always buy these vegetables; hell, I may not even like some of them, but I certainly like the fact that, if I suddenly developed a craving for any or all of them, I could indulge myself. The fact that the vegetables are all available is what I find thrilling.
Anyway, I never come away from the Sri Lankan shops without buying about a kilo of the chinna vengayam. As I’ve said in other posts, they’re not fun to peel, being fiddly little things that leave your fingers and nails smelly for a while. But they’re worth the time and effort, because of their flavour and taste. Plus, once they’re peeled, they can be placed in a Ziploc bag in the vegetable compartment of the fridge… and they stay good for at least a month, ready for use. Sambar made with these little shallots is SO special!
They’re also, as I discovered, absolutely lovely in coconut chutney. This is possibly the simplest chutney ever, because it involves no cooking. And if you don’t want to do the tadka or seasoning, it’s simpler still. With these shallots, a little goes a long way so I only needed a few for the chutney… but the delicate flavour and aroma they added was awesome. Yum.
Recipe for: Raw-shallot coconut chutney

Ingredients:
1/4 cup grated fresh or frozen coconut
3-4 green chillies (or to taste)
3 or 4 small shallots
1 tsp oil
1/2 tsp mustard seeds
1/2 tsp urad dal
4-5 fresh or frozen curry leaves
a pinch asafoetida powder
salt to taste
Method:
1. Grind the coconut, shallots and chillies together with a little hot water, till smooth.

Remove to a serving bowl.
2. Heat the oil in a small pan and add the asafoetida powder, mustard seeds, urad dal and curry leaves. Cover the pan and let the mustard seeds pop, then uncover and stir. When the dal is pale golden brown, turn off the heat.
3. Pour over the ground coconut mixture,

add salt to taste and stir till well mixed.
Serve with dosas, idlis, upma, chapaties etc.
RECIPE: RAW SHALLOT COCONUT CHUTNEY
Ingredients:
1/4 cup grated fresh or frozen coconut
3-4 green chillies (or to taste)
3 or 4 small shallots
1 tsp oil
1/2 tsp mustard seeds
1/2 tsp urad dal
4-5 fresh or frozen curry leaves
a pinch asafoetida powder
salt to taste
Method:
1. Grind the coconut, shallots and chillies together with a little hot water, till smooth. Remove to a serving bowl.
2. Heat the oil in a small pan and add the asafoetida powder, mustard seeds, urad dal and curry leaves. Cover the pan and let the mustard seeds pop, then uncover and stir. When the dal is pale golden brown, turn off the heat.
3. Pour over the ground coconut mixture, add salt to taste and stir till well mixed.
Serve with dosas, idlis, upma, chapaties etc.
I don’t understand why the supermarkets start stocking their shelves with Christmas-oriented goods fully three months ahead of the actual occasion. It pisses me off extremely much, not that anyone cares. Any small enthusiasm for the festival that I might otherwise muster goes right down the drain when almost everything is advertised as “perfect as a Christmas present”. I don’t know about everybody else, but if anybody thought to give me an electric toothbrush (for example) as a Christmas present, they would very soon get it jammed up an orifice not situated in the face and not meant for toothbrushes - electric or otherwise.
About the only thing I’m pleased about with regard to Christmas-oriented goods is when the produce shelves are stocked with things that are otherwise not to be found for the remainder of the year – cranberries, chestnuts, redcurrants, etc. Last week I found redcurrants on the shelves on a two-for-one offer, so I bought two boxes on an experimental basis. I’d never tasted redcurrants nor anything made with redcurrants. I thought this would be a good time to see what they were like and what I could make.
Here’s what I discovered: Redcurrants are sour. Mouth-puckeringly sour. Even when they'reinvitingly red and ripe, they're sharp enough to shrivel your fillings. There’s no way they could turn to sweet from that tart extreme - not without artificial help, anyway. They’re the most gorgeous looking berries, though… tiny, shiny and very red, like grape-bunches of little red rubies.

So, anyhow, eating those little rubies raw was out of the question. I googled redcurrant jam recipes and found one that combined redcurrants and strawberries. Perfect, because I had some somewhat squishily overripe strawberries in the fridge. But the recipe called for equal amounts by weight of both berries, and my strawberries were “currantly” (note the pun, note the pun!) outnumbered by about 2-1 in weight-y terms.
That was when I felt the Spirit of Enterprising Culinariness, so long dormant, take possession of me once again. (When one is possessed of this spirit, there’s nothing to do but give in to its directions.) Under its spell, I divided the berries into three more-or-less equal portions of about 1-1/4 cups. With the first portion I made redcurrant thokku/chutney. The thokku was a good use of the redcurrants, but the cooked-down berries retained so much of the tartness that the thokku had to go back on the hob for some repair-work. The ingredient quantities have been modified to reflect the “repair” so that you don’t have to cook the thokku twice like I did. But be warned, this is one sour chutney, best eaten along with dal and rice to give the meal extra zing. I ate it spread on toast, too.
Recipe for: Redcurrant thokku (chutney)

Ingredients:
1-1/4 cups redcurrants, washed and drained
2 tbsp oil
1 tsp cumin-coriander powder
1 htsp brown/black mustard seeds
5-6 fresh curry leaves
1/4 tsp asafoetida powder
1/4 tsp turmeric powder
2 tbsp sugar or jaggery
2 tsp red chilli powder
1/4 tsp roasted fenugreek seed powder
salt to taste
Method:
1. Heat the oil in a pan and add the cumin-coriander powder, curry leaves, mustard seeds and asafoetida powder.

Fry them for about a minute, till the mustard seeds pop.
2. Add the redcurrants to the pan and stir well. Let them cook for 2-3 minutes.
3. Now add the turmeric powder and red chilli powder and stir again.

4. Let the redcurrants come to a gentle boil on medium heat, then stir in the sugar or jaggery.

5. Let the berries cook down on a low simmer for 10-15 minutes until they lose their shape. You can mash them with a spoon.
6. Add salt to taste and finally the roasted fenugreek seed powder. Mix well. The thokku is done when the mixture becomes thick. Let it cool, then store in a tightly covered container. This stays good for 4-5 days.

This redcurrant thokku is best used as a condiment with dal and rice.
RECIPE: REDCURRANT THOKKU (CHUTNEY)
Ingredients:
1-1/4 cups redcurrants, washed and drained
2 tbsp oil
1 tsp cumin-coriander powder
1 htsp brown/black mustard seeds
5-6 fresh curry leaves
1/4 tsp asafoetida powder
1/4 tsp turmeric powder
2 tbsp sugar or jaggery
2 tsp red chilli powder
1/4 tsp roasted fenugreek seed powder
salt to taste
Method:
1. Heat the oil in a pan and add the cumin-coriander powder, curry leaves, mustard seeds and asafoetida powder.
Fry them for about a minute, till the mustard seeds pop.
2. Add the redcurrants to the pan and stir well. Let them cook for 2-3 minutes.
3. Now add the turmeric powder and red chilli powder and stir again.
4. Let the redcurrants come to a gentle boil on medium heat, then stir in the sugar or jaggery. 5. Let the berries cook down on a low simmer for 10-15 minutes until they lose their shape. You can mash them with a spoon.
6. Add salt to taste and finally the roasted fenugreek seed powder. Mix well. The thokku is done when the mixture becomes thick. Let it cool, then store in a tightly covered container. This stays good for 4-5 days.
This redcurrant thokku is best used as a condiment with dal and rice.


