Showing posts with label dark chocolate. Show all posts

Wednesday, September 21, 2016

Orgasmic cocoa walnut brownies

Brownies are my nemesis. I don't make them particularly often, and pretty much every past effort has ended up overbaked, dry and crumbly - not exactly ideal, when I like them chewy on the outside and fudgy in the centre. And with nuts in, to cut through the sweetness. 

Two weeks back I baked brownies again, using fancy dark chocolate, because I wanted to take them to a friend's new apartment where we had been invited for dinner. While those brownies were not too bad, they were still drier than I wanted. Sort of dusty tasting. This was disappointing and annoying, especially because I'd used expensive chocolate to make it. Nobody else seemed to mind and the brownies were gobbled down, but I was still not really happy with the result.

I nearly decided not to bother making them again, but those darned brownies kept bobbing about in the back of my mind, never quite going away. (Well, obviously not the ACTUAL brownies, but the thought of them.) Yesterday around midnight I finally gave in to the compulsion and decided to make them with cocoa powder (and the remainder of the dark chocolate from last time). Just regular cocoa powder (actually Tesco's own brand, so the very opposite of posh!) which had been lurking in the back of the cupboard for ages.

I made the brownies with hope, but no expectation that it would be what I wanted. For once, I managed to ignore my inner voice which was as usual screaming "but it's not FULLY baked yet!" and removed the brownies from the oven when the centre was still slightly shiny. A toothpick inserted into the centre went in with just a little resistance and came out mostly clean - perfect! The brownies were absolutely sensational - orgasmic, even. Just goes to show that expensive ingredients do not necessarily transform into fabulous baked goods. If you have not come across this tattuvam (truth, in Tamil) anywhere else before, or realised it for yourself during your own cooking experiments, then this is where you heard it first. Credit where it's due, after all, haha!

Here's another truth - underbaking a brownie is preferable to overbaking it. If, like me, you've baked cakes but are not particularly experienced with brownies, your instinct will be to ensure that the toothpick comes out clean. This is a good instinct when it comes to cakes, where underbaking would be disastrous, but it does not apply to brownies. Keep that in mind, and you'll be fine! More importantly, so will your brownies.
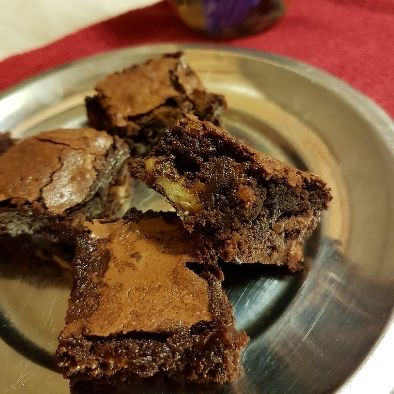
 photo d52aa14a-96c6-4a36-be57-028dff9eed1f_zpsytmsaois.jpg

Recipe for: Orgasmic walnut cocoa brownies

Ingredients:

140gm unsalted butter, cut into cubes
230gm granulated sugar
50gm unsweetened cocoa powder
30gm dark chocolate
1 htsp instant coffee granules
1/4 tsp kosher salt (or regular if you don't have kosher)
1 tsp pure vanilla extract
2 large eggs
65gm all-purpose flour
1/3 cup nuts of choice (I used walnuts), broken into small pieces

Method:

1. Preheat your oven to 170C. Line an 8"square tin with nonstick aluminium foil such that there is an overhang on all sides. This will make removing the brownies from the pan way easy!

2. Put the butter, sugar, salt, coffee granules and chocolate in a microwave safe bowl and heat it on high for 30 seconds, then stir with a wooden spoon. Repeat until the butter and chocolate are completely melted and smooth.

3. Tip in the cocoa powder and vanilla and stir until fully incorporated.

4. Add the eggs one at a time, stirring well. Then the flour, first mixing it in, then beating the mixture vigorously until it is thick and shiny. Stir in the nuts, if using.

5. Pour/scrape the mixture into the prepared tin - it will be quite thick - and level it. Bake for 20 minutes, or until the top of the mixture loses its shine. This may take a little more time in your oven, but after 20 minutes keep a very sharp watch on the brownies. Underbaking is always preferable to overbaking! A toothpick inserted into the center of the mix should come out mostly clean.

Remove the tin from the oven and let the brownies cool completely before cutting. If you can resist temptation, after the brownies are cool, put them in the fridge for 30 minutes. When cutting them, dip your knife in water every so often, to get clean cuts. Or, if you're like me, never mind refrigerating, just dive in!

Wednesday, September 15, 2010

Eggless chocolate orange cake

The orange chocolate cake I’d made previously was so nice that I decided I’d take up a reader’s suggestion (thanks, Shvetha) and try out an eggless version. This time around, I boiled the orange in the microwave for about 10 minutes, in two tranches of 5 minutes each. It could take a couple of minutes more or less, depending on your microwave’s wattage/power, so go easy after the first 5 minutes. Of course, make sure to “drill” the orange through with a skewer, before microwaving it.

I don’t really know first-hand what would happen if you microwaved an orange that was not hole-y (what, did you think I’d pass up the opportunity for a godawful pun?). I don’t think it would explode, at least going by a video I watched on You Tube of three idiotic guys doing exactly that experiment. (I did my research, as you can see.) The orange didn’t explode for them - much to their disappointment - but since I wasn’t sure that my orange would refrain from creating an unhole-y mess in the microwave, it went in sanctified, thereby NOT going kablooey.

Anyway, microwaving the orange is MUCH quicker than cooking it on the hob till it’s soft, and I totally recommend it.

The rest of the ingredients are more or less the same as for the previous cake, sans eggs, of course. I substituted some of the sugar with Splenda, but it's not a "must-do" thing at all.


This cake was actually even better than the eggy version, in my opinion – it tasted gooey and moist while looking quite deceptively fluffy. The cake keeps well for a couple of days under cover. I didn’t make any frosting this time, because I didn’t have any chocolate left, but I added ½ cup mini chocolate chips to the batter to intensify the chocolate experience.

Recipe for: Eggless chocolate orange cake

Photobucket

Ingredients:

2-1/4 cup all-purpose flour
2 tsp baking powder
1 tsp baking soda
120 gm dark chocolate, melted
1/2 tsp salt
3/4 cup splenda
1/2 cup sugar
1/2 cup oil
1 large Seville orange
4 tsp vinegar
1 cup milk
2 tsp orange oil extract
1 tsp vanilla extract
1/2 cup mini chocolate chips


Method:

1. Pierce the orange with a skewer 3-4 times, then place in a bowl of water and microwave it for 8-10 minutes.

Photobucket

Photobucket

Throw away the water, let the orange cool, then puree it finely. Set aside till required.

Photobucket

2. Sift the flour, baking soda, baking sugar and salt.

3. Add the sugar and splenda and mix well.

4. Make a well in the centre, and add the melted dark chocolate, the pureed orange, vinegar and oil.

Photobucket

Stir this well, then add the milk and stir till thoroughly mixed.

Photobucket

5. Add the orange and vanilla extracts and mix them in.

Photobucket

6. Finally, add the chocolate chips and fold them gently into the batter.

Photobucket

7. Pour the batter into a 9” round baking tin

Photobucket

and bake at 180C till the cake tests done – this took about an hour in mine. To be on the safe side, check after 45 minutes.

Photobucket

If desired, split the cake and fill with ganache frosting.


RECIPE: EGGLESS CHOCOLATE ORANGE CAKE

Ingredients:

2-1/4 cup all-purpose flour
2 tsp baking powder
1 tsp baking soda
120 gm dark chocolate, melted
1/2 tsp salt
3/4 cup splenda
1/2 cup sugar
1/2 cup oil
1 large Seville orange
4 tsp vinegar
1 cup milk
2 tsp orange oil extract
1 tsp vanilla extract

Method:

1. Pierce the orange with a skewer 3-4 times, then place in a bowl of water and microwave it for 8 minutes. Throw away the water, let the orange cool, then puree it. Set aside till required.
2. Sift the flour, baking soda, baking sugar and salt.
3. Add the sugar and splenda and mix well.
4. Make a well in the centre, and add the melted dark chocolate, the pureed orange, vinegar and oil. Stir this well, then add the milk and stir till thoroughly mixed.
5. Add the orange and vanilla extracts and mix them in.
6. Finally, add the chocolate chips and fold them gently into the batter.
7. Pour the batter into a 9” round baking tin and bake at 180C till the cake tests done – this took about an hour in mine. To be on the safe side, check after 45 minutes.
If desired, split the cake and fill with ganache frosting.

Thursday, September 02, 2010

Dark chocolate orange cake

Wow, it’s been so long since my previous post that I feel like I’m starting a new blog and certainly the chances that I’ll need to accumulate a new fan base are pretty good, too. Not that I’m accusing anybody of neglect. I mean, I know better than anyone else how I keep pruning my link list according to how long the linked blog has been inactive. It wouldn’t be fair or sensible to expect people to continue to visit my blog over an indefinite period with nothing new to look at or read. Anyway, it’s been a combination of family emergency (all of July) and general sloth (all of August).

I did have a few folders with photographs of recipes I’d made prior to July, but the long gap undid my memory. In other words, I couldn’t remember the ingredient list/substitutions, or the steps involved. That’s the problem with winging it with recipes, exacerbated by a bad memory.

Anyway, to mark my return to the food blogging world, from this recipe on, I’ll be incorporating a small change to the sequence of steps involved in the recipe. This is something that I’ve seen on a
blog that I (and a zillion others) enjoy reading – me mainly for the droll humour of Ree Drummond, but also because I’m fascinated by her cheerful use of vast quantities of butter and cream in practically every recipe. (I haven't yet tried any of her recipes, but chances are very good that when I do, it will be a baking recipe.)

I’ll be the first to admit that I’m not a fanatic about cooking healthy all the time, but she’s something else again. I love her bindaas attitude in the kitchen, but I have to assume that she does not indulge much in her own cooking, otherwise she would be top contender for “fattest woman in the USA”.

Looks like my train of thought has wandered off-track again. So, as I was saying, I’m – finally – going to incorporate something that the Pioneer Woman uses on her blog. No, not her sense of humour. I doubt I could do that. No, it’s the composite recipe that she gives at the end of each post, to make it easy for anyone who’s copy-pasting the recipe into a Word document to save on their computer. Right now, anybody who does that with recipes off my blog would find all the photos used in the recipe also being copied, forcing them to delete each photo from the Word document and all the extra space that the photos occupied for each step. It can be a pain if you want just the recipe and method without the photos (again, I’ve experienced it on other blogs), so I’m going to do as the Pioneer Woman does. Monkey see, monkey do.

I don’t think this is copyright infringement, as it’s not the contents of her blog or blogposts that I’m copying but just one stylistic element. At least, I hope I’m right. If anybody is more informed about this, please let me know.

So, finally, the recipe.

I wanted to make a chocolate-orange cake for my cousin and her husband who were visiting me last weekend, but I didn’t want it to be any recipe that I’d tried. It is always a risky affair to try a new recipe for guests without first doing a trial-run... but then I like to live life dangerously, sometimes (haha). I’d never used a whole cooked orange – peel, pith and all - in any cake, so I decided this would be the perfect occasion to try out the recipe. I didn’t know what a cooked, pureed orange would bring to the cake, but I kinda hoped that it would be a good, strong orange flavour – something I love. As it happened, the cake was nice and moist, but I have to say the orange flavour was not as pronounced as I’d hoped for. And this after I’d used orange oil extract as well! But it was a lovely cake, all the same.

For those who don’t like the taste of 85% cacao content dark chocolate, I suggest you use milk chocolate, or perhaps a lighter dark chocolate (as contradictory as that sounds). The cake as I made it is also on the less sweet side, because I used 90% dark chocolate to flavour the cake as well as for the frosting. If you stick with really dark chocolate, serve the cake with Chantilly cream or vanilla icecream to mellow the darkness a bit.

Recipe for:
Dark chocolate orange cake


Photobucket

Ingredients:

1 large Minneolas or Seville orange
125g 85% dark chocolate , broken into pieces
3 eggs
1 cup caster sugar
1 cup sunflower oil

2 tsp orange oil extract
1-1/4 cup plain flour
1½ tsp baking powder

For the chocolate ganache

200g 85% dark chocolate, broken into pieces

1 tsp orange oil extract
225ml double cream

Method:

Ganache

Make the chocolate ganache first, as it will take time for it to cool to spreading consistency. To make the ganache, put the chocolate in a heatproof bowl. Heat the cream to boiling, then pour over the chocolate. Let it sit for 3 minutes, then stir till the mixture is glossy and smooth. Set aside until firm enough to spread.

Cake

1. Pierce the orange with a skewer (right through).

Photobucket

Cook in boiling water for 30 minutes until soft,

Photobucket

then puree it.

Photobucket

2. Preheat the oven to 180/375F. Spray a round 9" cake tin (or a bundt tin) with Pam.

3. Melt the chocolate in the microwave - 2 minutes on high, stir, then heat for 45 seconds at a time till melted. Let cool.

4. Place the sugar and oil in a large bowl, then add the eggs.

Photobucket

Beat them lightly till amalgamated, but dont whip it all to a froth.

Photobucket

5. Gradually beat in the puréed orange.

6. Sift the flour and baking powder, then add it to the batter.

Photobucket

7. Stir in the cooled melted chocolate

Photobucket

and mix well.

Photobucket

8. Pour into the prepared tin and bake in the centre of the oven until the cake tests done - in my oven it took about 60 minutes. Allow to cool for 10 minutes in the tin, then turn out on to a wire rack to cool completely.

Photobucket

8. Place the cake on a serving plate, then swirl the prepared ganache over the top (and sides if you like).

Photobucket

Serve at room temperature with vanilla icecream or Chantilly cream.


RECIPE: DARK CHOCOLATE ORANGE CAKE


Ingredients:

1 large Minneolas or Seville orange
125g 85% dark chocolate , broken into pieces
3 eggs
1 cup caster sugar
1 cup sunflower oil
1-1/4 cup plain flour
1½ tsp baking powder

For the chocolate ganache
200g 85% dark chocolate , broken into pieces
225ml double cream

Method:

Ganache

Make the chocolate ganache first, as it will take time for it to cool to spreading consistency. To make the ganache, put the chocolate in a heatproof bowl. Heat the cream to boiling, then pour over the chocolate. Let it sit for 3 minutes, then stir till the mixture is glossy and smooth. Set aside until firm enough to spread.

Cake

1. Pierce the orange with a skewer (right through). Cook in boiling water for 30 minutes until soft, then puree it.

2. Preheat the oven to 180/375F. Spray a round 9" cake tin (or a bundt tin) with Pam.

3. Melt the chocolate in the microwave - 2 minutes on high, stir, then heat for 45 seconds at a time till melted. Let cool.

4. Place the sugar and oil in a large bowl, then add the eggs. Beat lightly till amalgamated, but dont whip the eggs to a froth.

5. Gradually beat in the puréed orange.

6. Sift the flour and baking powder, then stir it into the batter.

7. Stir in the cooled melted chocolate and mix well.

8. Pour into the prepared tin and bake in the centre of the oven until the cake tests done - in my oven it took about 60 minutes. Allow to cool for 10 minutes in the tin, then turn out on to a wire rack to cool completely.

9. Place the cake on a serving plate, then swirl the prepared ganache over the top (and sides if you like).

Serve at room temperature with vanilla icecream or Chantilly cream.

Monday, October 19, 2009

Raspberry chocolate muffins

This is a recipe from one of the most flamboyant chefs I've watched on TV - Ainsley Harriot. He called it "Rippled raspberry and chocolate muffins" but I've no idea why "rippled" came into the description, because the muffins didn't look rippled - not when they went into the oven, and not when they came out of the oven. They tasted great, though.

Another thing I've never understood is why raspberries are always paired with white chocolate. Why not dark chocolate? White chocolate isn't even proper chocolate, as I understand it, and I've never liked its sickly look or taste. I substituted dark chocolate drops for the white stuff in this recipe and liked them very much better.

Recipe for:
Raspberry chocolate muffins

Photobucket

2-3/4 cups all-purpose flour
2 tsp baking powder
2/3 cup sugar
1 egg
1 tsp vanilla extract
1 cup milk
4 tablespoons butter, melted
1/2 cup fresh raspberries
1/4 cup dark choc chips

Method:

1. Pre-heat the oven to 400°F. Line a muffin pan (I used a mini muffin pan) with paper cases.

2. Put the flour and baking powder into a large bowl and whisk in the sugar.

3. Crack the egg into a separate bowl and whisk in the vanilla extract and melted butter.

Photobucket

Then add the milk and whisk again.

Photobucket

4. Put the chocolate chips in the flour and stir them in,

Photobucket

then add the raspberries.

Photobucket

Stir the liquid into the dry ingredients with the raspberries and chocolate till just mixed.

Photobucket

Take care not to break up the berries too much.

Photobucket

5. Spoon the mixture into the paper cases and bake for 20 minutes, or so until well risen and a tester comes out clean.

Best served warm with a cup of coffee.

Saturday, May 23, 2009

Eggless triple chocolate buttermilk cupcakes

Not the snappiest of titles for a post - or a recipe - but on the plus side, there's no room for misunderstanding as to what it is, I guess. Perhaps I should have called it "Eggless triple chocolate butterfree buttermilk vanilla scented cupcakes" and done away with the ingredient list altogether...

Never mind, I'll save that ingredients-as-title idea for another post. Never let a good idea go waste. Recycle, recycle, recycle, isn't that the mantra?

The reason I made these cupcakes was because I stopped Pete from buying cupcakes from the supermarket with the promise that I'd make some at home. (Honestly, the list on the back of the package had E-ngredients rather than ingredients! I'm all for Pete having a long, long life - no-one could pray for that more - but I'd rather he retained his human qualities through all of it rather than become an artificial life form through ingesting manufactured chemicals.)

Anyway, since my mother's a chocolate fiend but not one that devours any chocolate derivations with egg in it, I made the cupcakes eggless. The recipe is more or less from
Nic at Baking Bites, with a few changes.

Photobucket

Here's a cupcake before the ganache went on. I took a bite out of it just to see what it was like - and because I'm not terribly fond of icing or frosting. Glad to say that the cupcake was just as delicious in its double-chocolate version as with the final chocolate addition.

Recipe for:
Eggless triple choc buttermilk cupcakes

Photobucket

Ingredients:

1-3/4 cups self-rising flour
¼ cup cocoa powder
¾ cup sugar
1 tsp baking soda
½ tsp salt
1-1/4 cup buttermilk, room temp
¼ cup oil
1 tsp cider vinegar
1 tsp vanilla extract
¼ cup semi-sweet mini chocolate morsels

For the ganache:

4 ounces (110 gms) dark chocolate, cut into small pieces
1/3 cup heavy whipping cream
1 tbsp unsalted butter


Bring the cream to a boil in a heavy-bottom saucepan. Take it off the heat and add the butter and chocolate, stirring till it's all melted and thickened and shiny. Place in the fridge for the ganache to get to a spreading consistency, if preferred.
Photobucket

Method for cupcakes:

1. Preheat oven to 180C. Line two 12-cup cupcake pans with paper cups.

2. In a large bowl, whisk together flour, sugar, baking soda and salt.

Photobucket

3. Pour in the buttermilk, oil, vinegar, vanilla and stir till just combined.

Photobucket

The batter will be quite thick.

4. Put 1 tsp batter in a cup, add about 10 mini morsels,

Photobucket

then cover with another tsp batter. It’s ok if the morsels don’t stay in the centre. Finish up the rest of the batter the same way.

Photobucket

5. Bake for 15 minutes or till done when tested with a thin skewer.

Photobucket

Photobucket

6. Cool, then dip the tops into ganache (or spread the ganache with a small spatula)

Photobucket

and set the cupcakes aside in a cool place till the ganache hardens.

Tuesday, February 03, 2009

Dark chocolate crème caramel

Crème caramel is one of my favourite desserts. Yes, it's basically a moulded egg custard, but calling it crème caramel seems to elevate it to a much more posh level of existence, doesn't it? Custard just doesn’t sound as smooth and velvety as cream or even crème, unfortunately.

I’ve made plain crème caramel a couple of times at home, but since Pete turns green at the mere mention of custard (not even calling it crème caramel can bring back the healthy pink that’s his normal colour!), I don’t get the chance to make it often - not unless I want to be eating it all week by myself.

Last weekend, with two teenagers at home who confirmed that they loved custard, I thought I would try making crème caramel infused with dark chocolate (
original recipe here), to see if the chocolate could disguise the “custard” part of the pudding sufficiently for Pete to try it. Even if he didn’t like it, at least I could enjoy it along with the kids - and I wouldn’t have to eat it over the whole week, an added bonus! I did entertain a few initial doubts about whether the chocolate would pair well with caramel... which was a waste of good brain cells, really, because of COURSE chocolate and caramel go together - Cadbury’s and Nestle have proved that over and over with their éclairs and toffees!

As it turned out, the chocolate crème caramel came out just beautiful – unfortunately (or fortunately) not beautiful enough for Pete... although to his credit, he did try a spoonful. I can only say that he missed out on a good thing, because it was really a dark, rich, smoothly gorgeous chocolate experience.

The crème caramel didn’t last the day, much less the week... which is really the best sort of outcome for everybody, especially the cook.

Recipe for:
Dark chocolate crème caramel

Photobucket

Ingredients:

3 medium eggs
1/2 cup + 1/4 cup sugar
2 tbsp water
2 cups whole milk at room temperature
1 tsp vanilla extract
1/3 cup chopped good quality dark chocolate

Photobucket

Method:

1. Put 1/2 cup sugar in a saucepan and add the 2 tbsp water.

Photobucket

2. Bring the mixture to a boil, stirring 2-3 times to dissolve the sugar.

Photobucket

3. Turn down the heat to medium and let the mixture cook undisturbed until it begins to turn colour.

Photobucket

4. Watch the caramel carefully now, as it can burn really quickly - you need to take the saucepan off the heat as soon as the mixture turns amber in colour.

Photobucket

5. Pour the caramel immediately into a pressure-cooker safe pan (eversilver or steel is good). Swirl it gently so that it evenly coats the sides of the pan. Let the caramel cool.

Photobucket

6. In another saucepan, heat the chopped chocolate along with 1/2 cup milk, till the chocolate melts.

Photobucket

Whisk in the rest of the milk and heat till it's hot, but not boiling.

Photobucket

7. While the milk is heating, whisk together the eggs, 1/4 cup sugar and vanilla

Photobucket

till lightly frothy.

Photobucket

8. Pour the hot milk in a slow and steady stream into the egg mixture, whisking briskly all the while. (My non-slip mat came in very handy here - it held the bowl in place while I did the simultaneous pouring and whisking! No photos of this manoeuvre though - my third hand was inexplicably absent!)

9. Then pour this mixture into the pan containing the caramel.

Photobucket

10. Place the pan in a pressure cooker (without using the weight),

Photobucket

pouring sufficient water in the cooker to steam the pudding (covered) for 35 minutes, first on high heat till you can see the steam coming strongly, then reducing the heat to medium-high.

11. Remove the lid and let the crème caramel come to room temperature. It might look wobbly in the middle while hot, but it will firm up as it cools.

Photobucket

12. Chill in the fridge for 3-4 hours before unmoulding the custard onto a serving dish. (Run a thin knife around the outside edge of the pudding, then place the serving dish over the pan containing the pudding and invert quickly.)

Photobucket