Showing posts with label granulated sugar. Show all posts

Wednesday, September 21, 2016

Orgasmic cocoa walnut brownies

Brownies are my nemesis. I don't make them particularly often, and pretty much every past effort has ended up overbaked, dry and crumbly - not exactly ideal, when I like them chewy on the outside and fudgy in the centre. And with nuts in, to cut through the sweetness. 

Two weeks back I baked brownies again, using fancy dark chocolate, because I wanted to take them to a friend's new apartment where we had been invited for dinner. While those brownies were not too bad, they were still drier than I wanted. Sort of dusty tasting. This was disappointing and annoying, especially because I'd used expensive chocolate to make it. Nobody else seemed to mind and the brownies were gobbled down, but I was still not really happy with the result.

I nearly decided not to bother making them again, but those darned brownies kept bobbing about in the back of my mind, never quite going away. (Well, obviously not the ACTUAL brownies, but the thought of them.) Yesterday around midnight I finally gave in to the compulsion and decided to make them with cocoa powder (and the remainder of the dark chocolate from last time). Just regular cocoa powder (actually Tesco's own brand, so the very opposite of posh!) which had been lurking in the back of the cupboard for ages.

I made the brownies with hope, but no expectation that it would be what I wanted. For once, I managed to ignore my inner voice which was as usual screaming "but it's not FULLY baked yet!" and removed the brownies from the oven when the centre was still slightly shiny. A toothpick inserted into the centre went in with just a little resistance and came out mostly clean - perfect! The brownies were absolutely sensational - orgasmic, even. Just goes to show that expensive ingredients do not necessarily transform into fabulous baked goods. If you have not come across this tattuvam (truth, in Tamil) anywhere else before, or realised it for yourself during your own cooking experiments, then this is where you heard it first. Credit where it's due, after all, haha!

Here's another truth - underbaking a brownie is preferable to overbaking it. If, like me, you've baked cakes but are not particularly experienced with brownies, your instinct will be to ensure that the toothpick comes out clean. This is a good instinct when it comes to cakes, where underbaking would be disastrous, but it does not apply to brownies. Keep that in mind, and you'll be fine! More importantly, so will your brownies.
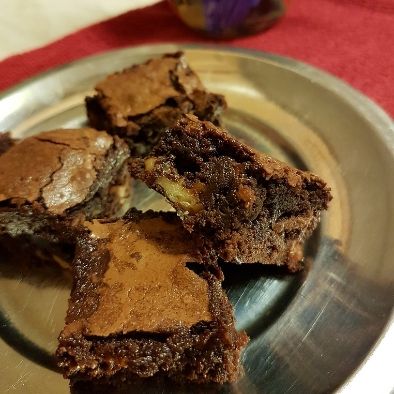
 photo d52aa14a-96c6-4a36-be57-028dff9eed1f_zpsytmsaois.jpg

Recipe for: Orgasmic walnut cocoa brownies

Ingredients:

140gm unsalted butter, cut into cubes
230gm granulated sugar
50gm unsweetened cocoa powder
30gm dark chocolate
1 htsp instant coffee granules
1/4 tsp kosher salt (or regular if you don't have kosher)
1 tsp pure vanilla extract
2 large eggs
65gm all-purpose flour
1/3 cup nuts of choice (I used walnuts), broken into small pieces

Method:

1. Preheat your oven to 170C. Line an 8"square tin with nonstick aluminium foil such that there is an overhang on all sides. This will make removing the brownies from the pan way easy!

2. Put the butter, sugar, salt, coffee granules and chocolate in a microwave safe bowl and heat it on high for 30 seconds, then stir with a wooden spoon. Repeat until the butter and chocolate are completely melted and smooth.

3. Tip in the cocoa powder and vanilla and stir until fully incorporated.

4. Add the eggs one at a time, stirring well. Then the flour, first mixing it in, then beating the mixture vigorously until it is thick and shiny. Stir in the nuts, if using.

5. Pour/scrape the mixture into the prepared tin - it will be quite thick - and level it. Bake for 20 minutes, or until the top of the mixture loses its shine. This may take a little more time in your oven, but after 20 minutes keep a very sharp watch on the brownies. Underbaking is always preferable to overbaking! A toothpick inserted into the center of the mix should come out mostly clean.

Remove the tin from the oven and let the brownies cool completely before cutting. If you can resist temptation, after the brownies are cool, put them in the fridge for 30 minutes. When cutting them, dip your knife in water every so often, to get clean cuts. Or, if you're like me, never mind refrigerating, just dive in!

Sunday, April 24, 2016

Eggless orange almond cookies

My little niece, who is nearly 6 years old, has been allergic to eggs since she was a baby. If she eats anything with even a trace of eggs, within about 15 minutes of ingesting it, she gets very uneasy and then invariably throws up. Once she's evacuated the contents of her little tummy, she's right back to normal, bouncy and happy while people around her deal with the aftermath. 

Obviously an allergy to eggs, while not as terrible as various other food-related allergies that children can have, does mean that she has to be very careful when she eats away from home - especially when it's a kiddie birthday party and there are tempting cakes and cookies on offer. Also because no party-organising parent really wants to have to deal with a kid who's having an allergic reaction that could escalate to life-endangering! However, touch wood, my niece is not fatally allergic to eggs, so her allergy is probably one of the easier types of problems to deal with. After all, it's easy enough to make egg-free food, especially cakes, cookies and ice creams. This holds true especially for home bakers. 


I made these orange almond cookies last week as a trial, to see how they would turn out prior to making them for my sister to take back for my niece when she returns to Seattle next week. The cookies turned out incredibly crisp and orangey and really tasty, and they disappeared really rather quickly. So I'm making a double batch today, because there would be a one-man mutiny if I didn't keep a few cookies back for home consumption. And here's the recipe so YOU can make it too. 

Oh by the way, I've taken to weighing out my ingredients for baking - I have the most basic of Salter kitchen scales that can weigh up to 500gms or 1/2 kilo. What's more, it can be tucked away neatly in its weighing bowl with its own plastic lid. Don't ask what's the big deal here, if you're the kind that weighs things automatically - until now I've not been the sort of person who bothered with all that "fussiness" (as I considered it). I'm not yet 100% on the side of weighing every single time...but I'm far more likely to do it than not. I consider myself to be the new improved version of me. 

Recipe for: Eggless orange almond cookies

Ingredients:

115 gms unsalted butter, softened
100 gms caster or granulated) sugar (I've tried it with both and it doesn't seem to have made any difference to the end result)
155 gms plain flour
1 tbsp orange juice
1/2 tsp pure orange oil (optional)
3-4 drops of orange food colouring (optional)
Zest of one orange
1 tsp vanilla extract (or 1/2 tsp cardamom seed powder if you prefer)
1/4 cup slivered or sliced almonds

Method:

1. Beat the butter and sugar in a large bowl until light and fluffy. By hand will do - I used a wooden spoon.

2. Add the rest of the ingredients apart from the sliced/slivered almonds and mix together until fully incorporated. Place the almonds on a plate. 

3. Chill the dough in the refrigerator for an hour for it to firm up. Line a flat baking sheet with a Silpat mat or with nonstick baking paper. 

4. Break off pieces of dough (about the size of a large marble), roll them into a ball and press them into the almonds. 

5. Place the cookie dough balls on the lined tray (almond side up) and flatten each one slightly. (You may need to wash and dry your hands every so often to stop the dough sticking as it starts to warm up). Leave 2 inches space between cookies as they will spread. Put the remaining dough back in the fridge if you can't use it all in one batch. 

6. Bake the cookies in a 180C oven for 9-12 minutes (or until the edges turn golden brown). Leave the cookies on the sheet for a minute, then transfer carefully with a spatula on to wire cooling racks. They will crisp up as they cool. 

Monday, April 29, 2013

We Knead To Bake #4 - Torcettini di Saint Vincent yeasted cookies

(Adapted from A Baker’s Tour by Nick Malgieri)

 photo 2d45381e-0021-4ab0-8119-5f053742d236_zps6795fdbd.jpg

Cookies are not my thing. I might have tried baking cookies maybe a scant 2 dozen times in the last 10 years (or since I started cooking, anyway). Not always successfully, I might add. There aren't many biscuits that have come out well, except for the multiple batches of ginger biscuits that I baked last Christmas, much to Pete's satisfaction. Pete loves ginger biscuits, but not really any others. As for me, I'm no cookie monster!

Anyway - these yeasted cookies were pretty easy to make. Like most everyone else, we both liked the sugar crust and the caramelised underside of the cookies. They were different from anything I've had before, that's for certain!

And one more thing - I'm glad I've managed to post this recipe before the end of April. I missed the publish date of 24th April because of a combination of circumstances, the most distressing one being a bereavement in the family. Still... it's a part of the cycle of life, I suppose, and life being what it is, it must go on. So... onward to May's challenge!


 photo 46e9092a-4149-47e4-8ff4-9099da2374a1_zpsd90e42a2.jpg

Ingredients:

1/2 cup warm water
1-1/4 tsp active dry yeast (or 1 tsp instant yeast)
1-1/2 cups all-purpose flour
1/4 tsp salt
1 tsp lime/lemon zest or 1 tsp crushed anise seeds
2-1/2 tbsp unsalted butter, cold and cut into small pieces
about 1/3 cup granulated sugar for rolling the cookies

Method:

1. Dissolve the yeast in the warm water, in a small bowl and keep aside.

2. Put the flour and the salt in a large bowl and stir everything together. Add the butter pieces and pulse until the butter is well mixed and the flour-butter mixture looks powdery.

3. Add the yeast-water mixture and knead just till it all comes together as a ball. Place the ball of dough in a oiled bowl, turning it so it is well coated with the oil. Cover the bowl, and let the dough rise. This dough does not really double in volume, but it should look “puffy” after about an hour or so. When you pinch off a bit from the top you can see the interior looking a bit like honeycomb. Press down the dough to deflate it, wrap it in cling wrap and refrigerate it for at least one hour or up to 24 hours.

4. When ready to make the cookies, take the dough out and lightly roll it out into an approximately 6” square. If the dough feels sticky, scatter a little sugar on it. Using a pizza wheel cut the dough into four strips of equal width. Cut each strip into 6 equal pieces, by cutting across, making a total of 24 pieces. The measurements are not very critical in this part because this just makes it easier to have 24 equal sized bits of dough, as compared to pinching of bits of the dough.

5. Roll each piece into a pencil thick “rope” about 5” long. Sprinkle a little sugar on your work surface and roll the “rope” in it so the sugar crusts the dough uniformly. Form the “rope” into a loop crossing it over before the ends.
 photo 1b8ce3c0-48c3-4962-b043-eba7a17cea2d_zpsad93676c.jpg
6. Place the Torcettini on parchment lined baking sheets, leaving 1-1/2" between them. Leave them for about 20 minutes or so till they rise/ puff up slightly. They will not “puff up” much, like bread, but the “puff” will be visible.

7. Bake them at 160C (325F) for about 25 minutes till they’re a nice golden brown.
 photo 8dea603c-2a72-4146-a093-ed662349737b_zps6be2cc48.jpg
Cool the cookies completely, on a rack. Store them in an air-tight container at room temperature.

Sunday, February 24, 2013

We Knead to Bake # 2 - Classic croissants

 photo 596730c7-f2a9-422c-afa7-6ae90f0bc3e3_zpsa17df698.jpg

Original version of the recipe on Fine Cooking

Aparna's post on her blog My Diverse Kitchen

Let's get one thing clear from the start - making croissants was not my first choice, nor even my hundredth choice. In fact, it didn't even figure as a fleeting choice on my "would like to try" list. But I made them. I made them because it was the recipe for February in the "We Knead to Bake" challenge. There is no way that I would have tried this otherwise, none. I cannot stress that enough. I wish I could say that I enjoyed the three-day process so much that I wanted to do it all over gain... I COULD say it, but it would be a big fat lie.

Do you think this might be a bit of a negativity overkill?

Ok, to be fair, I'm glad I tried the recipe. Glad that Aparna made me go way outside my comfort zone (it took me a week to make my way back - ha ha). Glad that I know how much hard work goes into making the flaky, buttery, delicious croissants that I love. Glad that there are bakeries and cafes where I can walk in and simply buy a croissant. And, most of all, glad that faced up to my croissant demon... and if I didn't quite vanquish it, at least I can say truthfully that I didn't just give up.

My croissants were reasonably good, more than edible (jeez, all that butter - why WOULDN'T they be tasty!), and the ones with chopped chocolate filling were actually extremely moreish. I only did a few of those, though, perhaps about 4. The rest were plain croissants. While Pete liked them, and so did I, I just felt that the end result was not good enough for the effort that went into making them. I guess I'm just being picky, and I guess that's because I do love a well-made, fresh, flaky croissant.

I think I need a tame croissant baker who would be at my beck and call for baked goods. Any takers?


 photo f2f168bd-2598-4ee7-86fe-5681113c6a1d_zps5af51b4b.jpg

Recipe for: Classic croissants

Ingredients:


For the dough:
2 cups all-purpose flour, and a little more for dusting/ rolling out dough
1/4 cup plus 1 tbsp cold water
1/4 cup plus 1 tbsp cold milk (I used 2%)
1/8 cup granulated sugar
20gm soft unsalted butter (1.5 tbsp)
1/2 tbsp plus scant 1/4 tsp instant yeast
1 tsp salt

For the butter layer:
125 gm cold unsalted butter
Or 1 egg for egg wash
Finely chopped dark or plain chocolate for filling (optional)


Method:

Day 1 - Make the dough (and refrigerate overnight)
Combine all the ingredients for the dough in the bowl of a stand mixer fitted with the dough hook. You can also use a food processor with the plastic blade, or do this by hand.
Mix everything on low speed for 3 minutes, scraping the sides of the mixing bowl once if necessary. Then mix further on medium speed for 3 minutes. Lightly flour a 10-inch pie pan or a dinner plate. And place the ball of dough on this.
Gently shape the dough into a flat ball by pressing it down before storing it in the fridge, this makes rolling out next morning easier. Making a tight ball will strengthen the gluten which you do not need. Lightly dust the top of the dough with flour and wrap well with plastic so it doesn’t dry out. Refrigerate overnight.

Day 2 - Make the butter layer
The next day, cut out 2 pieces of parchment or waxed paper into 10” squares each. Cut the cold butter into 1/2-inch-thick slabs. Place these pieces on one piece of parchment/ waxed paper so they form a 5- to 6-inch square. Cut the butter further into pieces as required to fit the square. Top with the other piece of parchment/ waxed paper.
Using a rolling pin, pound the butter with light, even strokes. As the pieces begin to stick together, use more force. Pound the butter until it flattens out evenly into a square that’s approximately 7-1/2”. Trim the edges of the butter to make a neat square. Put the trimmings on top of the square and pound them in lightly with the rolling pin. Refrigerate this while you roll out the dough.

Laminate the dough
Unwrap and lay the dough on a lightly floured work surface. Roll it out to a 10-1/2-inch square, and brush off the excess flour. Take the butter out from the refrigerator —it should be cold but pliable. If it isn’t refrigerate it till it is. This so that when you roll out the dough with the butter in ti, neither should it be soft enough to melt, or hard enough to break. Unwrap the butter and place it on the square of dough in the centre, so that it forms a “diamond” shape on the dough.
Fold one flap of dough over the butter toward you, stretching it slightly so that the point just reaches the middle of the butter square. Bring the opposite flap to the middle, slightly overlapping the previous one. Similarly repeat with the other two so that the dough forms an envelope around the butter. Lightly press the edges together to completely seal the butter inside the dough to ensure the butter doesn’t escape when you roll out the dough later.
Lightly flour the top and bottom of the dough. With the rolling pin, firmly press along the dough uniformly to elongate it slightly. Now begin rolling instead of pressing, focusing on lengthening rather than widening the dough and keeping the edges straight.
Roll the dough into an 8” by 24” rectangle. If the ends lose their square shape, gently reshape the corners with your hands. Brush off the excess flour. Mark the dough lightly equally into three along the long side. Using this as a guideline, pick up one short end of the dough and fold 1/3rd of it back over the dough, so that 1/3rd of the other end of dough is exposed. Now fold the 1/3rd exposed dough over the folded side. Basically, the dough is folded like 3-fold letter before it goes into an envelope (letter fold). Put the folded dough on a floured baking sheet, cover with plastic wrap, and freeze for 15 to 20 minutes to relax and chill the dough.
Repeat the rolling and folding, this time rolling in the direction of the two open ends (from the shorter sides to lengthen the longer sides) until the dough is about 8” by 24”. Once again fold the dough in thirds, brushing off excess flour and turning under any rounded edges or short ends with exposed or smeared layers. Cover once again with plastic wrap and freeze for another 15 to 20 minutes.
Roll and fold the dough exactly in the same way for the third time and put it baking sheet. Cover with plastic wrap, tucking the plastic under all four sides and refrigerate overnight.

Day 3 - Divide the dough
The next day, unwrap and lightly flour the top and bottom of the dough. Cut the dough along the longer side into halves. Cover one half with plastic wrap and refrigerate it while working on the other half.
“Wake up the dough up” by pressing firmly along its length with the rolling pin. Don’t widen the dough but simply begin to lengthen it with these first strokes. Slowly roll the dough into a long and narrow strip, approximately 8” by 22”. If the dough sticks as you roll, sprinkle with flour.
Once the dough is about half to two-thirds of its final length, it may start to resist rolling and even shrink back. If this happens, fold the dough in thirds, cover, and refrigerate for about 10 minutes; then unfold the dough and finish rolling.
Lift the dough an inch or so off the table at its midpoint and allow it to shrink from both sides and prevent the dough from shrinking when it’s cut. Check that there’s enough excess dough on either end so that when you trim the edges to straighten them, you have a strip of dough that is 20’ inches long. Now trim the edges so they’re straight. Cut the dough into equal sized triangles, marking them off first if you prefer, before cutting.

Shape the croissants
Now work with one piece of triangular dough at a time. Using your rolling pin, very lightly roll (do not make it thin but only stretch it slightly) the triangle to stretch it a little, until it is about 6” long. This will give your croissants height and layers. You can stretch it by hand too, but if you don’t have the practise, your stretching could be uneven.
Using a sharp small knife, make a 1/2- to 3/4-inch-long notch in the centre of the short side of each triangle. The notch helps the rolled croissant curl into a crescent.
Place the triangle on the work surface with the notched side closest to you. This is the time to add your filling, if you're using any. With one hand on each side of the notch, begin to roll the dough away from you, towards the pointed end.
Flare your hands outward as you roll so that the notched “legs” become longer. Roll the triangle tight enough but not too tight to compress it, until you reach the “pointy” end which should be under the croissant.
Now bend the two legs towards you to form a tight crescent shape and gently press the tips of the legs together (they’ll come apart while proofing but keep their crescent shape).
Shape all the triangles like this into croissants and place them on a greased or parchment lined baking sheet leaving as much space between them as they will rise quite a bit.

Proof the croissants
Brush the croissants with milk (or a mix of milk and cream). If you use eggs, make an egg wash by whisking one egg with 1 tsp water in a small bowl until very smooth. Lightly brush this on each croissant.
Refrigerate the remaining milk/ milk+cream (or egg wash) for brushing the croissants again later. Place the croissants in a cool and draft-free place (the butter should not melt) for proofing/ rising for about 1 1/2 to 2 hours. They might need longer than 2 hours to proof, maybe as much as 3 hours, so make sure to let croissants take the time to proof. The croissants will be distinctly larger but not doubled in size. They’re ready if you can see the layers of dough from the side, and if you lightly shake the sheets, the croissants will wiggle.

Bake the croissants
Just before the croissants are fully proofed, pre-heat your oven to 200C (400F) in a convection oven or 220C (425F) in a regular oven. Brush the croissants with milk/ milk+cream (or egg wash) a second time, and place your baking sheets on the top and lower thirds of your oven (if regular) or bake one tray at a time in the convection oven.
Bake them for about 15 to 20 minutes till they’re done and golden brown on top and just beginning to brown at the sides. In a regular oven, remember to turn your baking sheets halfway through. If they seem to be darkening too quickly during baking, lower the oven temperature by 10C (25F). Cool the croissants on the baking sheets on racks.
Serve warm. This recipe makes 10 mini croissants.