Showing posts with label plain flour. Show all posts

Sunday, November 13, 2016

Triple ginger white-chocolate cookies


Okay, I have a confession to make - I might as well be up front about it. I hate white chocolate. I think it's far too sweet and it isn't even proper chocolate. Another confession: I've kind of gone off chocolate bakes in general, although I did like my orgasmic brownies. More to the point, everybody else liked it a lot more, so they disappeared very quickly. 

The problem of the day was there was half a bar of white chocolate in my cupboard that had been there for absolutely ages - possibly even years, because I can't remember the last time I used white chocolate in anything! Still, I didn't want to throw it away because I'm stingy like that. 

I was toying with the idea of making a white chocolate and raspberry something but wasn't sure what that should be - apart from the small matter of not having any raspberries in the house. My husband tried to convince me to let the white chocolate be and make ginger nut biscuits instead. I make a really mean spicy ginger nut biscuit that he loves, but I wasn't in the mood because they're quite labour-intensive. Also because I didn't want that white chocolate sitting around for a single moment longer. So, as a compromise, I finally decided I would make cookies with ginger AND the white chocolate. And that is how these cookies happened. 

My husband thought the cookies were lovely. Some friends who popped by also thought the same, so they went back home happily accompanied by a dozen. My husband was happy, my friends were happy. I tried a cookie myself and I thought it was ok (considering it contained white chocolate). Still, I was happy too, because no more white chocolate in the house... and no more coming in ever if I have a say in it! 

Recipe for:
Triple-ginger white chocolate cookies
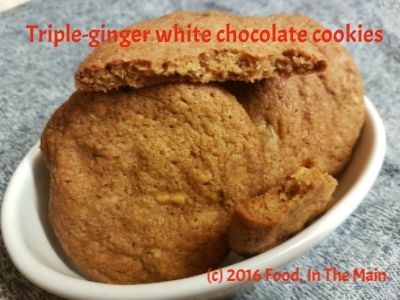
 photo 6fcea889-71aa-4fe5-9764-eff51452c169_zpsrpteivsy.jpg

Ingredients:

2 tsp grated ginger
1 tsp ginger powder
2 tbsp chopped stem ginger
225gm plain flour
3/4 tsp baking soda
1 large egg
150gm butter
100gm light brown sugar
50gm dark brown sugar
150gm white chocolate, chopped into small pieces (or use white chocolate chips)
2 tsp vanilla extract
1/2 tsp nutmeg

Method:

1. In a large bowl, cream together the butter and sugar until light and fluffy. Add the egg and the vanilla and beat until well combined.

2. Now add the flour, grated ginger, nutmeg and ginger powder to the bowl and mix with a wooden spoon until it comes together in a dough. Fold in the chopped stem ginger and the white chocolate until they are evenly distributed. Refrigerate the dough for at least 30 minutes, as it will be too sticky to work with otherwise.

3. Preheat the oven to 180C/350F. While the oven is heating, form walnut-sized balls from the chilled dough and place 1.5 inches apart on a baking sheet lined with non-stick foil. Bake for about 10 minutes or until the cookies are golden brown. (The time will vary a little depending on your oven - mine is a fan-assisted oven.) If you have to bake the cookies in batches like I did (because I only have one baking sheet that I actually like), remember to keep the dough refrigerated between bakes so that it doesn't soften too much.

The cookies will be quite soft at first, so leave them on the tray for 2 minutes before carefully removing them to a wire rack to cool completely. They will crisp up as they cool.

If you like your cookies crisp around the edges but softer in the middle (I do), take them out of the oven after about 8-9 minutes. My husband likes them crisp so I baked his for the full 10 minutes.

Saturday, August 20, 2016

Lime-vanilla sugar cookies

The basic sugar cookie recipe was from a colleague who made hers first from a recipe on the back of some cookie mix or other. She brought some leftover cookies to work just before Christmas break last year, and they were SO delicious that I asked her for the recipe. I'm not really a cookie person - either eating or making - but her cookies really were incredibly moreish. 

The first time I made the plain sugar cookies was last Saturday - they turned out really well, and Pete loved them. He insisted that we should take some to a friend's barbeque party. She had two types of desserts for the guests but her daughter decided that she was going to make herself a dessert with my cookies, layering them with strawberries that been macerated with sugar, and clotted cream (like an ersatz strawberry shortcake) and declared it a superhit. 

In the meantime, my friend's husband was quietly putting away cookie after cookie, looking sheepish when he was rumbled, but not letting it stop him from taking a couple more. There must have been at least 40 cookies in the container, but by the end of the party they were all gone to the last crumb. That was definitely a pleasing result in my eyes, both because the cookies came out so well and because everyone liked them, from the 7-year-old granddaughter to the 70-year old neighbour!

All week since, Pete had been begging me to make some more. Yesterday I chose to make them but give it a citrusy twist, because I love citrus-flavoured things. Lime was my flavouring of choice. Again, the cookies turned out really well - which I guess convinced me that it wasn't a fluke the first time around (really, I'm not famous for baking cookies). 

I liked these lime-flavoured cookies quite a lot myself, and so did Pete. And so did Pete's son and his girlfriend who dropped by. Like me, Andy is not really a cookie person, but he said "these are the best cookies I've ever eaten" and went on to prove it by eating half a dozen in quick succession. As for his girlfriend, she scarfed down a few, and then took charge of the bag containing the 2-3 dozen that I packed for them to take away. I'm not sure Andy will be seeing very much of them, unless he is V E R Y nice to her... 

By the way, I got about 60 cookies from the amount of dough that this recipe makes - but mine were small, about the diameter of an Oreo. If you make bigger cookies, you will get fewer (yes, well, duh). I also toyed with the idea of icing them with a simple lemon icing (lemon juice + icing sugar mixed to a spreadable consistency) but laziness got the better of me. Besides, I didn't really think the icing was essential. 

One last tip - the dough is best worked with when chilled.  

Recipe for: Lime-vanilla sugar cookies


 photo 20e51a30-6f41-48d7-b81b-2b913b8d297b_zpsxsjczgof.jpg

Ingredients:

150gm softened unsalted butter
150gm caster (superfine) sugar
300gm plain (AP) flour
1.5 tsp best-quality vanilla extract
1/2 tsp pure lime oil (optional)
Zest of one lime
1 medium egg, beaten

Method:

1. Cream butter and sugar using a wooden spoon in a large mixing until light and fluffy (I did this by hand, takes about 7-8 minutes).

2. Add the beaten egg, the lime zest, lime oil and vanilla extract and beat it in. 

3. Add the flour in 4-5 installments, mixing just until incorporated. When it comes together into a rough dough, dust your hands with some flour and form the dough into a ball. Place the ball on some clingfilm or a sheet of non-stick foil and flatten it evenly till about 1/2 inch thick. Cover completely and place in the refrigerator to chill for about an hour. 

4. Scatter some flour on your working space. Turn out the chilled dough onto the floured space and gently roll the dough out until it is evenly 3-4mm thick. You may need to dip the rolling pin into flour now and then to stop the dough sticking. You can divide the dough into two before rolling out, to make it easier. Keep the other half chilled in the meantime. 

5. Using a cookie cutter of choice, stamp out the cookies, dipping the cutter into flour each time. Re-roll the remaining dough and cut out until the dough is used up. 

6. Transfer the cookies onto a sheet lined with non-stick foil or baking paper, leaving about an inch in between them as they will spread a little. Place the cookie sheet in the fridge again to chill for 15 minutes. 

7. Preheat your oven to 180C/350F (mine is a fan-assisted oven) and bake the cookies for 10-11 minutes or until they are a pale golden brown. You can turn the sheet around after 5-6 minutes to let them brown evenly, if you like. 

8. Let them cool on the sheet for a couple of minutes, then transfer carefully to a cooling rack until completely cool. Store in an airtight jar. 

Sunday, April 24, 2016

Eggless orange almond cookies

My little niece, who is nearly 6 years old, has been allergic to eggs since she was a baby. If she eats anything with even a trace of eggs, within about 15 minutes of ingesting it, she gets very uneasy and then invariably throws up. Once she's evacuated the contents of her little tummy, she's right back to normal, bouncy and happy while people around her deal with the aftermath. 

Obviously an allergy to eggs, while not as terrible as various other food-related allergies that children can have, does mean that she has to be very careful when she eats away from home - especially when it's a kiddie birthday party and there are tempting cakes and cookies on offer. Also because no party-organising parent really wants to have to deal with a kid who's having an allergic reaction that could escalate to life-endangering! However, touch wood, my niece is not fatally allergic to eggs, so her allergy is probably one of the easier types of problems to deal with. After all, it's easy enough to make egg-free food, especially cakes, cookies and ice creams. This holds true especially for home bakers. 


I made these orange almond cookies last week as a trial, to see how they would turn out prior to making them for my sister to take back for my niece when she returns to Seattle next week. The cookies turned out incredibly crisp and orangey and really tasty, and they disappeared really rather quickly. So I'm making a double batch today, because there would be a one-man mutiny if I didn't keep a few cookies back for home consumption. And here's the recipe so YOU can make it too. 

Oh by the way, I've taken to weighing out my ingredients for baking - I have the most basic of Salter kitchen scales that can weigh up to 500gms or 1/2 kilo. What's more, it can be tucked away neatly in its weighing bowl with its own plastic lid. Don't ask what's the big deal here, if you're the kind that weighs things automatically - until now I've not been the sort of person who bothered with all that "fussiness" (as I considered it). I'm not yet 100% on the side of weighing every single time...but I'm far more likely to do it than not. I consider myself to be the new improved version of me. 

Recipe for: Eggless orange almond cookies

Ingredients:

115 gms unsalted butter, softened
100 gms caster or granulated) sugar (I've tried it with both and it doesn't seem to have made any difference to the end result)
155 gms plain flour
1 tbsp orange juice
1/2 tsp pure orange oil (optional)
3-4 drops of orange food colouring (optional)
Zest of one orange
1 tsp vanilla extract (or 1/2 tsp cardamom seed powder if you prefer)
1/4 cup slivered or sliced almonds

Method:

1. Beat the butter and sugar in a large bowl until light and fluffy. By hand will do - I used a wooden spoon.

2. Add the rest of the ingredients apart from the sliced/slivered almonds and mix together until fully incorporated. Place the almonds on a plate. 

3. Chill the dough in the refrigerator for an hour for it to firm up. Line a flat baking sheet with a Silpat mat or with nonstick baking paper. 

4. Break off pieces of dough (about the size of a large marble), roll them into a ball and press them into the almonds. 

5. Place the cookie dough balls on the lined tray (almond side up) and flatten each one slightly. (You may need to wash and dry your hands every so often to stop the dough sticking as it starts to warm up). Leave 2 inches space between cookies as they will spread. Put the remaining dough back in the fridge if you can't use it all in one batch. 

6. Bake the cookies in a 180C oven for 9-12 minutes (or until the edges turn golden brown). Leave the cookies on the sheet for a minute, then transfer carefully with a spatula on to wire cooling racks. They will crisp up as they cool. 

Sunday, May 06, 2012

Easy peasy Yorkshire puddings

If you're unfamiliar with British cuisine, you'll probably be expecting a recipe for a dessert of some sort - but this is no dessert, even though they're termed "puddings". They're savoury, airy puffs of pure carb and, filled with gravy, they're an indispensable part of "Sunday lunch" along with the roast potatoes, parsnips, carrots and other vegetables that accompany the roast chicken or beef.

I'd never made them before, and while it's not a complicated recipe, the recipes on BBC Food asked for the ingredients to be precisely measured. I was leery of doing this - I hate having to weigh things carefully; the detail work just doesn't appeal to my slapdash nature.

Then I came across a ridiculously simple recipe, and I really doubt this can be made any easier. It's just brilliant! I added some herbs to the batter, but otherwise there's no change to the recipe. Eggs, flour, milk, seasoning. That's it.

If you don't have proper Yorkshire pudding pans, you can make them just as well in muffin pans, like I did. Be warned, these puddings puff up quite a lot. Mine turned out all sizes and shapes because my oven doesn't heat evenly... but the puddings tasted great. They were, if anything, slightly burnt on top, but that was deliberate because that's how Pete likes them.
DSCF8193a
Pete (actually, his hand) trying to sneak a Yorkie from the tin even as I was taking a photograph!

And unless you're competing in Masterchef, the weird sizes and shapes don't matter one bit. Taste is king.

Recipe for: Easy peasy Yorkshire puddings
DSCF8195a

Ingredients:
2 large eggs
Plain flour, equal in volume to the eggs
Milk, equal in volume to the eggs
Salt to taste
Freshly ground pepper to taste
1/2 tsp minced fresh thyme
1/4 tsp dried rosemary
Oil for cooking

Method:
1. Preheat the oven to 220C/425F.
2. Place three glasses of equal size and shape side by side. Break the eggs into one glass. Pour milk in the next glass to come up to the same level as the eggs. In the third glass, put in enough flour to come up to the same level as the eggs/milk.
3. Now put the flour in a medium mixing bowl and add the salt, pepper and herbs. Stir together.
DSCF8183a
4. Make a well in the centre of the flour and pour in the eggs.
DSCF8186a
Beat with a fork till the eggs and flour are well mixed.
DSCF8187a
5. Now pour the milk in a steady, thin stream while whisking the mixture constantly to make a smooth batter.
DSCF8188a
Rest the batter for at least 10 minutes. (According to other recipes I've read, the batter can be stored covered in the fridge for up to 12 hours before baking - but I haven't tried this out and don't know what difference it will make to the puddings.)
6. Take a 12-tray muffin pan. Pour a tsp of oil into each cup to cover the bottom, and grease the sides as well. Heat the muffin pan in the hot oven for 5-6 minutes or till the oil is smoking hot.
7. Pour a small ladleful of the batter into each cup as quickly as possible(fill it no more than half-way),
DSCF8192a
then return the tray to the oven immediately. Let the puddings bake for 10-15 minutes (do not open the oven for the first 10 minutes) or until they are golden brown.
DSCF8194a
Remove and serve immediately.
DSCF8196a
They can also be frozen after they're completely cool.


RECIPE: EASY PEASY YORKSHIRE PUDDINGS
Ingredients:
2 large eggs
Plain flour, equal in volume to the eggs
Milk, equal in volume to the eggs
Salt to taste
Freshly ground pepper to taste
1/2 tsp minced fresh thyme
1/4 tsp dried rosemary
Oil for cooking


Method:
1. Preheat the oven to 220C/425F.
2. Place three glasses of equal size and shape side by side. Break the eggs into one glass. Pour milk in the next glass to come up to the same level as the eggs. In the third glass, put in enough flour to come up to the same level as the eggs and milk. 
3. Now put the flour in a medium mixing bowl and add the salt, pepper and herbs. Stir together. 
4. Make a well in the centre of the flour and pour in the eggs. Beat with a fork till the eggs and flour are well mixed. 
5. Now pour the milk in a steady, thin stream, whisking the mixture constantly until a smooth batter is formed. Rest the batter for at least 10 minutes. (According to other recipes I've read, the batter can be stored covered in the fridge for up to 12 hours before baking - but I haven't tried this out and don't know what difference it will make to the puddings.) 
6. Take a 12-tray muffin pan. Pour a tsp of oil into each cup to cover the bottom, and grease the sides as well. Heat the muffin pan in the hot oven for 5-6 minutes or till the oil is smoking hot. 
7. Pour a small ladleful of the batter into each cup as quickly as possible (fill it no more than half-way), then return the tray to the oven. Let the puddings bake for 10-15 minutes (do not open the oven for the first 10 minutes) or until they are golden brown. Remove and serve immediately. They can also be frozen after they're completely cool. 

Thursday, October 14, 2010

Eggless banana almond fruitcake

My husband loves fruitcake in all forms – heavy and dense, light and fluffy, dry and crumbly, with exotic dried fruit or just with currants, with nuts or without, egg-free or eggful, fancy or homely, buzzing with alcohol or completely teetotal… you name it, he’ll eat it. Of course it goes without saying that he prefers fruitcake that's well-made to one that's second-rate... but in a pinch he'll eat the second-rate one too. In general he can be as nutty as a – pardon me for this – fruitcake when it comes to this variety of cake. Me, on the other hand… I can take fruitcake or leave it. It’s marginally more “take it” if it’s got nuts in it that cut the sweetness of all the dried fruit, so I usually add some to most fruitcakes I make.

And because Pete mostly doesn’t mind how his fruitcake turns out, as long as it’s not turned to coal, I feel free to experiment without worrying about “what ifs” like “what if the cake’s heavy like a brick”, or “what if it’s so crumbly that you choke on fruitcake dust”, and so on. (I’ve even made fruitcake with dark chocolate that needs to see the light of day at some point.)

Anyway, this cake combines the best of what Pete likes (dried fruit) with the best of what I like (banana) with some dried sour cherries (bought in the YewYessYay, naturally) thrown in for that “exotic” touch. The addition of mashed overripe bananas was a touch of genius if I do say so myself, because the flavour it gave the fruitcake – helped by the addition of cardamom powder – was luvverly. It was almost like an Indian fruitcake, if there is such a thing. If there isn’t, there is now.

The cake keeps well and stays moist at room temperature (under cover, that is, not left open to the elements) for at least a week that I can vouch for. We both think it tastes gorgeous too – let me put it this way, we’re all three made for each other because if he’s nutty about banana fruitcake, I’m bananas about nutty fruitcake, and the fruitcake is bananas and nuts anyway. See what I mean?

Recipe for:
Banana almond fruitcake


Photobucket

Ingredients:

2 medium overripe bananas, mashed well
1-1/2 cups plain flour or wholewheat cake flour
1/4 tsp salt
1/2 tsp cinnamon powder
1/4 tsp ground cardamom seeds
1/2 cup butter or margarine, softened
1/2 cup Splenda 1/4 cup sugar
2 cups dried fruit (I used currants, dried sour cherries, chopped mixed citrus peel)
1/4 cup almond slivers
1 cup + 2 tbsp milk (or as needed)
1 tsp bicarbonate of soda 1/2 tsp baking powder

Method:

1. Sift the flour and spices together with the Splenda, sugar and salt. 2. Add the dried fruit

Photobucket

and the dried cherries, mix them into the flour.

Photobucket

3. Make a well in the flour-fruit mix, then add the almond slivers and the mashed banana.

Photobucket

Mix again.

4. Add milk little by little, mixing as you go.

Photobucket

The batter should be thick. It is the correct consistency when it drips slowly off the back of a spoon. Mix in more milk if it's too thick, to get it to the right consistency,

Photobucket

5. Pour the batter into an 8" square or round pan sprayed with Pam or greased with butter.

Photobucket

Bake at 180C for about an hour, or till the cake tests done. Start checking at the 45-minute mark as different ovens work differently. 6. Remove the cake tin from the oven, and let the cake sit in the tin for 10 minutes.

Photobucket

7. Unmould the cake onto a wire cooling rack and let cool completely. This cake stays good at room temperature for a few days.

RECIPE: EGGLESS BANANA ALMOND FRUITCAKE

Ingredients:

2 overripe bananas, mashed
1-1/2 cups plain flour
1/4 tsp salt
1/2 tsp ground cinnamon
1/4 tsp ground cardamom seeds
1/2 cup butter or margarine, softened
1/2 cup Splenda
1/4 cup sugar
2 cups dried fruit (currants, dried sour cherries, chopped mixed citrus peel)
1/4 cup almond slivers
1 cup + 2 tbsp milk (or as needed)
1 tsp bicarbonate of soda
1/2 tsp baking powder

Method:

1. Sift the flour and spices together with the Splenda, sugar and salt.
2. Add the dried fruit and the dried cherries, mix them into the flour.
3. Make a well in the flour-fruit mix, then add the almond slivers and the mashed banana. Mix again.
4. Add milk little by little, mixing as you go. The batter should be thick. It is the correct consistency when it drips slowly off the back of a spoon. Mix in more milk if it's too thick, to get it to the right consistency,
5. Pour the batter into an 8" square or round pan sprayed with Pam or greased well with butter. Bake at 180C for about an hour, or till the cake tests done. Start checking at the 45-minute mark as different ovens work differently.
6. Remove the cake tin from the oven, and let the cake sit in the tin for 10 minutes.
7. Unmould the cake onto a wire cooling rack and let cool completely. This cake stays good at room temperature for a few days.

Wednesday, September 15, 2010

Eggless chocolate orange cake

The orange chocolate cake I’d made previously was so nice that I decided I’d take up a reader’s suggestion (thanks, Shvetha) and try out an eggless version. This time around, I boiled the orange in the microwave for about 10 minutes, in two tranches of 5 minutes each. It could take a couple of minutes more or less, depending on your microwave’s wattage/power, so go easy after the first 5 minutes. Of course, make sure to “drill” the orange through with a skewer, before microwaving it.

I don’t really know first-hand what would happen if you microwaved an orange that was not hole-y (what, did you think I’d pass up the opportunity for a godawful pun?). I don’t think it would explode, at least going by a video I watched on You Tube of three idiotic guys doing exactly that experiment. (I did my research, as you can see.) The orange didn’t explode for them - much to their disappointment - but since I wasn’t sure that my orange would refrain from creating an unhole-y mess in the microwave, it went in sanctified, thereby NOT going kablooey.

Anyway, microwaving the orange is MUCH quicker than cooking it on the hob till it’s soft, and I totally recommend it.

The rest of the ingredients are more or less the same as for the previous cake, sans eggs, of course. I substituted some of the sugar with Splenda, but it's not a "must-do" thing at all.


This cake was actually even better than the eggy version, in my opinion – it tasted gooey and moist while looking quite deceptively fluffy. The cake keeps well for a couple of days under cover. I didn’t make any frosting this time, because I didn’t have any chocolate left, but I added ½ cup mini chocolate chips to the batter to intensify the chocolate experience.

Recipe for: Eggless chocolate orange cake

Photobucket

Ingredients:

2-1/4 cup all-purpose flour
2 tsp baking powder
1 tsp baking soda
120 gm dark chocolate, melted
1/2 tsp salt
3/4 cup splenda
1/2 cup sugar
1/2 cup oil
1 large Seville orange
4 tsp vinegar
1 cup milk
2 tsp orange oil extract
1 tsp vanilla extract
1/2 cup mini chocolate chips


Method:

1. Pierce the orange with a skewer 3-4 times, then place in a bowl of water and microwave it for 8-10 minutes.

Photobucket

Photobucket

Throw away the water, let the orange cool, then puree it finely. Set aside till required.

Photobucket

2. Sift the flour, baking soda, baking sugar and salt.

3. Add the sugar and splenda and mix well.

4. Make a well in the centre, and add the melted dark chocolate, the pureed orange, vinegar and oil.

Photobucket

Stir this well, then add the milk and stir till thoroughly mixed.

Photobucket

5. Add the orange and vanilla extracts and mix them in.

Photobucket

6. Finally, add the chocolate chips and fold them gently into the batter.

Photobucket

7. Pour the batter into a 9” round baking tin

Photobucket

and bake at 180C till the cake tests done – this took about an hour in mine. To be on the safe side, check after 45 minutes.

Photobucket

If desired, split the cake and fill with ganache frosting.


RECIPE: EGGLESS CHOCOLATE ORANGE CAKE

Ingredients:

2-1/4 cup all-purpose flour
2 tsp baking powder
1 tsp baking soda
120 gm dark chocolate, melted
1/2 tsp salt
3/4 cup splenda
1/2 cup sugar
1/2 cup oil
1 large Seville orange
4 tsp vinegar
1 cup milk
2 tsp orange oil extract
1 tsp vanilla extract

Method:

1. Pierce the orange with a skewer 3-4 times, then place in a bowl of water and microwave it for 8 minutes. Throw away the water, let the orange cool, then puree it. Set aside till required.
2. Sift the flour, baking soda, baking sugar and salt.
3. Add the sugar and splenda and mix well.
4. Make a well in the centre, and add the melted dark chocolate, the pureed orange, vinegar and oil. Stir this well, then add the milk and stir till thoroughly mixed.
5. Add the orange and vanilla extracts and mix them in.
6. Finally, add the chocolate chips and fold them gently into the batter.
7. Pour the batter into a 9” round baking tin and bake at 180C till the cake tests done – this took about an hour in mine. To be on the safe side, check after 45 minutes.
If desired, split the cake and fill with ganache frosting.

Friday, June 05, 2009

Naan

Naan naan paNninaen.*

There. A two-language pun. I know, it’s dreadful... but honestly, it was better out than in – specifically because of its awfulness. Imagine the harm it could have done to my system had it not been externalised! If the pun is hurting all y’all who know Tamil, I can only say that it’s just as painful for me.

Because – brace yourself for some very hi-funda philosophy - a bad pun is like using a two-edged razor. It may hurt the wielder as much as it hurts the wieldee(s), but it cannot be left unwielded.

Anyway... the good thing about the naans (that I made naan-ey*sorry*) is that they were as yummy as the puns are gruesome. They disappeared as quickly as I could turn them out – and the coolest thing was that I didn’t need a tandoori oven to make them. In fact, I didn’t even use the regular oven. What I used was my cast-iron skillet. It’s a small one (but mighty expensive for all that, when I bought it!) so the naans were small. Mini “me”s, I guess (because naan = me, bwahahahahahahahahha, and this time I’m not sorry!).

This was the first time I’d made naans, so I wasn’t quite sure about how thick (or how thin) to roll them. I settled on about 1/2-cm thick, but they became somewhat thicker than that when they puffed up on cooking. Everybody (Pete, his two kids and amma) liked them as they were – soft in the centre but crispish and brown around the edges – but I think I would have liked them better thinner. But that’s just me.

I plan to roll the dough thinner the next time I make naans, because I like them to be on the thinner and crisper side... but I’ll also find out if thin naans will still be soft without being doughy.

I used two toppings – sesame seeds and kalonji seeds. Both were great.

Oh yeah, the cast-iron skillet method of making naans on the hob. Nearly forgot about detailing my gratifyingly successful experience with that!

Basically, it HAS to be a cast-iron skillet or tava. Non-stick items are useless for this, even the hard anodized triple-coated last-you-a-lifetime expensive kind. At least, I wouldn’t attempt it with mine because I’m certain that the naans and the naan-stick – er, NON-stick (NOT sorry, so there) – coating would be ruined.

Anyway, what you do is brush one surface of the rolled-out naan generously with water (I used my soft pastry brush so as not to brush the topping right off), slap it wet-side down onto a well heated skillet, cook it with the skillet on the heat for 30-40 seconds, then turn the skillet upside down and hold it over the flame, letting the dry side cook over the direct heat. (Note: a hot-plate or non-gas hob would be spectacularly useless for this method of making naan.)

The naan is (usually) done when it falls off the skillet – (usually) right onto the flame, so keep a pair of tongs handy to grab the naan before it burns too much!

You get the hang of it easily, though – how long to keep the skillet on the flame, and when to turn it upside down so as to cook the naan evenly. And even if you don’t get the hang of it, no harm done (as long as your hob is clean!). Really. I’m not talking naan-sense.

That’s it, I’m done with the puns, and this post.

* Naan = "I" (or me), in Tamil - therefore the pun. Naan naan paNninaen translates to "I made naan" in Tamil

† Naan-ey = "I (did it) myself"

Photobucket
The first naan I ever made - see the four scorch marks from the hob? They happened while I was scrabbling around for a pair of tongs with which to grab the darn thing off the flame!

Recipe for: Naan

Ingredients:

Photobucket

2-1/2 cups whole wheat flour
1/2 cup plain flour
1 tsp salt
1 sachet instant yeast
1/4 cup warm milk
1/2 cup yogurt
Warm water as required

Toppings: 2-3 tbsp sesame seeds, nigella seeds (or as you like - green chillies, garlic, chopped coriander, etc)

Photobucket

1. Dissolve the yeast in the warm milk and let rest covered for 15 minutes till it turns bubbly.

Photobucket

2. Whisk together the whole wheat and plain flours and salt in a deep bowl, and make a well in the centre. Add the yogurt and as much warm water as required (add little by little) to make a soft dough. Place the dough in an oiled bowl and let rise covered in a warm place for 2-3 hours.

Photobucket

Punch the dough down after it has risen, and knead briefly.

3. Pinch off a lime-sized piece of dough and roll it into an oval about 1/2-cm thick. Sprinkle with your topping of choice, and press down gently with the belan (roller) so that the topping is embedded in the naan. This is to stop the seeds or herbs or whatever falling off.

Photobucket
with kalonji (nigella seeds)


Photobucket
with sesame seeds


4. Brush the surface of the naan (the side with the topping) with water and slap it down quickly on the well-heated cast-iron pan. Leave it on the hob for 30-40 seconds, or till the naan puffs up in places.

Photobucket

5. Now turn the skillet upside down over the flame

Photobucket

so that the dry surface of the naan cooks as well, acquiring brown spots.

Photobucket

6. The naan is done when it falls off the skillet. Place in a clean tea cloth and keep warm while you make the rest of the naans. Brush with melted butter or ghee before serving with any gravy curry, if you like.

Friday, November 11, 2005

Sesame-seed and jaggery poli (sweet stuffed chapatis, in other words)

I used to think that poli was a South Indian recipe, until I found out that Maharashtrians make it for Makar Sankranti (harvest festival) - which necessitated a change in my world view somewhat, because people from the four Southern Indian States consider Maharashtra and Mumbai-ites to be North Indians... whereas people from the North India consider Maharashtrians to be more South Indian than north.

It doesnt help that Marathi as a language and its script are so much closer to Hindi and its script and not in the least like Tamil, Malayalam, Kannada or Telugu. All very confusing.

But to get back to the delights of poli... I might have mentioned this before, but I like coconut in very, very few sweet dishes. Poli isnt one of them dishes. So when I came across a recipe for poli that seemed different from the norm because of the stuffing ingredients - it contained sesame seeds but very little gram/chickpea flour and not any chana dal at all (cooked chana dal stuffing is what I've had thus far) - I was pleased. I love the taste of sesame in savoury and sweet dishes, so that was another plus.

I have to say that the poli made this way didnt stay soft for long. The traditional ones I've had, with mashed cooked gram dal & jaggery filling, are meltingly soft and delicious, especially with a dollop of ghee on top. The sesame-seed poli I made were delicious too, but - have I said this before? - not soft. Still, that didnt stop me scarfing them down, so I guess it's worth putting up the recipe.

If anybody wants to know how to make them soft... they'll have to look elsewhere for the answer. And if anybody does find the answer, would they be kind enough to pass on the info to me too, pleeeeeeeeeeeeease?

Recipe for:
Sesame seed and jaggery poli (slightly adapted from Cuisine Cuisine)


Ingredients:

For the stuffing:

1 cup jaggery, powdered
1 htbsp gram/chickpea flour
1 tsp cooking oil
1 tbsp poppy seeds
2 tbsp white sesame seeds
1/4 tsp cardamom seeds, powdered

For the poli:

2 cups plain flour
1 cup wholewheat flour
1 tbsp warmed oil
1/4 tsp salt
Warm water as required for making the dough

Plain flour for dusting
Ghee for shallow-frying

Method:

1. Make a soft but not sticky dough with the poli ingredients. Let it rest covered for about 30 minutes.

2. Heat 1 tsp oil in a little pan and roast the gram flour, stirring constantly, until the raw smell is gone (about a minute). Be careful not to burn the flour. Set aside to cool.

3. Roast the poppy seeds and sesame seeds on dry heat over medium flame till they start to turn golden. Grind these in a spice of coffee mill, together with the cardamom powder, into a fine powder. Mix with the roasted gram flour and reserve.

4. Put the powdered jaggery in a bowl, sprinkle a tsp of water, and melt in the microwave for a 45 seconds. Take it out and give it a stir. If it needs to melt a bit more - ie, if there are any dry bits - put it back in the microwave for 20 seconds. Dont overcook it by microwaving it for too long.

5. Quickly mix the sesame-poppy seed powder with the jaggery, making sure it's thoroughly mixed. Set aside to cool.

To make the poli:

6. Knead the dough well, then make small balls (slightly smaller than a golf ball).

7. Roll out two balls into palm-sized circles.

8. Sprinkle some of the filling all over one dough circle (break up any lumps with your fingers), then cover it with the other circle.

9. Dust the top with flour and gently roll out the dough circle into a slightly larger circle, so that the filling is sandwiched.

10. Then roll it out some more into a thin round.

11. Heat a tava or frying pan (keep it on medium heat) and transfer the poli to it. Cook for a few seconds on one side, turn it over and smear that side with ghee. Flip it over once again and smear the other side with ghee as well. Shallow fry until the poli begins to get golden brown spots on both sides. Serve warm.

Note: The jaggery will melt in the heat and might ooze out - in that case keep an eye on it so that it doesnt burn. A little extra direct heat gives a caramelly flavour that is very nice, but burnt jaggery is quite awful to smell and taste.

Thursday, November 03, 2005

Diwali special sweet 1 - Jilebi

There's a traditional way of making jilebi that I just didnt bother with for two reasons: 1. I didnt have enough time. 2. I wasn't sure I could get the batter to ferment (kinda cold here now, plus see Reason 1 again).

So I followed a recipe (adapted only very slightly) from Bilbo of
Smorgasboard for instant jilebis. I have to say it worked out rather well... Pete loved it (he even said it was as good as those from my favourite sweetshop in Birmingham - which, although not true, was very nice to hear!) and as for Rebecca, his daughter, she couldnt get enough of them.

Cant blame them, I love jilebis as well. They're one of the few Indian sweets that I can go on eating indefinitely... perhaps it's because they're not just tooth-achingly sweet but have a sour tang to them that comes from fermenting the batter.

Jilebis are lovely to eat crisp and hot, of course, but I especially love them the next day - I store them in the refrigerator - by which time they've lost most, but not all, of their crispness and gained a softness (and a sticky sugar glaze) that is just irresistible combined with the tangy/sweet taste. (I'm drooling here.)

Strangely enough, I dont like jangri, IMO jilebi's less attractive cousin, which starts out dripping with syrup and with a soft texture. (If anybody's thinking "jeez, what a fuss-budget she is" by now, I will gracefully admit to being one... sometimes.)

Anyway... back to my Diwali jilebis. Turned out I didnt have a proper jilebi press (press, mold, whatever), and my icing accessories had unaccountably gone AWOL. So I made do with a conical disposable plastic icing bag with the tip cut off, and poured the batter into it. Not the best idea, really - it kind of worked, but a good portion of the batter was wasted as it squirted out of the top and oozed down my hand and down the bag. It also meant that my jilebis turned out a bit wonky in shape. Then again, I'm not a professional halwai (sweet-maker) so they would have been shapeless no matter what I used.

I would suggest using one of the medium-size icing/piping nozzle to make jilebis... havent tried it that way, so I cant be more accurate. Odd, now that I think of it, but I havent actually seen jilebis being made so I dunno how the professionals do it!

Recipe for:
Instant jilebi


Ingredients:

For the jilebi
--------------
1 cup plain flour
1 tsp chickpea/gram flour
1/2 tsp active dry yeast
1 cup water (a few tbsp more or less as required)
2 tablespoons fresh lemon juice
Oil for deep frying

For the sugar syrup
-------------------

2 cups sugar
2 cups water
1 tbsp rosewater
OR
1/2 tsp powdered cardamom seeds

Method:

1. Combine the flours and yeast in a bowl, add enough water to make a fairly thick but pourable batter. Let this sit for 10 minutes, then stir in the lemon juice.

2. To make the sugar syrup, combine the water and sugar in a pan, stirring over medium heat until the sugar dissolves completely.

3. Let the mixture boil briskly for 10-15 minutes and then turn off the heat.

4. Heat the oil in a wok. Fit a medium nozzle (not sure of size, but it shouldnt be one with a big opening, because the batter expands in the oil) onto an icing bag and pour the batter into it.

5. Squeeze the batter directly into the hot oil, looping the stream to make pretzel-shapes. Fry the jilebis one or two at a time (depending on the size of your wok) until a golden brown on both sides.


6. Drain and drop directly into the sugar syrup, soaking the jilebis for about 30 seconds each side.

7. Remove with a slotted spoon and place on a plate. Serve hot, cold or at room temperature.