Showing posts with label AP flour. Show all posts

Saturday, October 22, 2016

Kesar pista nankhatai (Saffron-pistachio cookies)


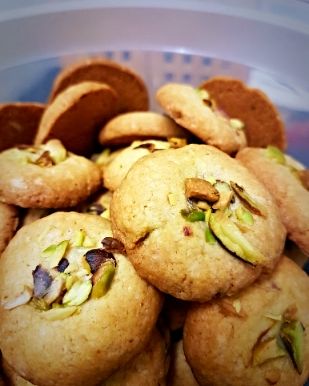
Until yesterday, I'd only ever seen nankhatai in photos on various blogs (most of them very, very beautifully shot photos, I might add). Never seen them in real life, never eaten any (not that I know of and not by that name), never baked any. Since Diwali is next week, and because I'd just bought a lovely big bag of pistachios recently, and also because our friends were going to drop by and I wanted to bake something for them with an Indian touch, I decided to make nankhatai with the pistachios and the last of my stash of saffron. The recipe I followed is on Nandita's Saffron Trail blog. My only two additions were pistachio nuts in the dough itself, and extra milk as the ghee alone was nowhere near enough to bind the mixture together to make a dough. 


And what a good decision it was. I love saffron - although I don't use it often because it's expensive - and I love pistachios, and I know they're a flavour match made in heaven (fictitious place, obvs, but the match is very real and the flavours are very lovely!). These cookies are very moreish - they're not too sweet, the saffron flavour is awesome, the pistachios are delicious and the semolina gives the nankhatai a lovely crunch. Be sure to use fine semolina, though, otherwise, the nankhatai might have a sandy mouthfeel rather than crispness. Happy eating, people!

Recipe for:
Kesar pista nankhatai (saffron pistachio cookies)


 photo f5710913-d2ea-438a-900c-989e2ced8eb0_zps6y1brntg.jpg

Ingredients:

1.5 cups plain flour

2.5 tbsp chickpea flour
1/2 tbsp fine sooji (semolina)
1/2 tsp baking soda
1/4 cup slivered pistachio nuts
2 tbsp finely chopped pistachios (optional)
1/2 cup powdered sugar
1/2 cup melted ghee (clarified butter)
1/4 tsp saffron strands, crushed in a small mortar-pestle
Milk as required

Method:


1. Preheat the oven to 180C/350F.


2. Sift together the flours, semolina and baking soda in a medium bowl. Mix in the slivered pistachio nuts and set aside. Warm 2 tbsp of the milk and let the saffron steep in it for 5 minutes.


3. In a large bowl, mix together the ghee, powdered sugar and saffron-milk until smooth, then add the flour mixture. Add extra milk a tablespoon at a time until you can form a soft dough. Be careful not to add too much liquid.


4. Roll the dough into balls the size of large marbles and place on a cookie sheet lined with non-stick paper or foil, leaving a gap of about 1.5 inches. At this point, if you wish, you can make a dimple in the centre of each cookie with your thumb and sprinkle a pinch of the chopped pistachios. If not, just flatten each ball slightly and place in the preheated oven.


5. Bake for 15-18 minutes or until the cookies are a pale brown, switching the tray around after 10 minutes so that they brown evenly.


6. Remove to a wire cooling rack. The cookies will crisp up as they cool.


7. Try not to eat all the nankhatai yourself.

Wednesday, September 21, 2016

Orgasmic cocoa walnut brownies

Brownies are my nemesis. I don't make them particularly often, and pretty much every past effort has ended up overbaked, dry and crumbly - not exactly ideal, when I like them chewy on the outside and fudgy in the centre. And with nuts in, to cut through the sweetness. 

Two weeks back I baked brownies again, using fancy dark chocolate, because I wanted to take them to a friend's new apartment where we had been invited for dinner. While those brownies were not too bad, they were still drier than I wanted. Sort of dusty tasting. This was disappointing and annoying, especially because I'd used expensive chocolate to make it. Nobody else seemed to mind and the brownies were gobbled down, but I was still not really happy with the result.

I nearly decided not to bother making them again, but those darned brownies kept bobbing about in the back of my mind, never quite going away. (Well, obviously not the ACTUAL brownies, but the thought of them.) Yesterday around midnight I finally gave in to the compulsion and decided to make them with cocoa powder (and the remainder of the dark chocolate from last time). Just regular cocoa powder (actually Tesco's own brand, so the very opposite of posh!) which had been lurking in the back of the cupboard for ages.

I made the brownies with hope, but no expectation that it would be what I wanted. For once, I managed to ignore my inner voice which was as usual screaming "but it's not FULLY baked yet!" and removed the brownies from the oven when the centre was still slightly shiny. A toothpick inserted into the centre went in with just a little resistance and came out mostly clean - perfect! The brownies were absolutely sensational - orgasmic, even. Just goes to show that expensive ingredients do not necessarily transform into fabulous baked goods. If you have not come across this tattuvam (truth, in Tamil) anywhere else before, or realised it for yourself during your own cooking experiments, then this is where you heard it first. Credit where it's due, after all, haha!

Here's another truth - underbaking a brownie is preferable to overbaking it. If, like me, you've baked cakes but are not particularly experienced with brownies, your instinct will be to ensure that the toothpick comes out clean. This is a good instinct when it comes to cakes, where underbaking would be disastrous, but it does not apply to brownies. Keep that in mind, and you'll be fine! More importantly, so will your brownies.

 photo d52aa14a-96c6-4a36-be57-028dff9eed1f_zpsytmsaois.jpg

Recipe for: Orgasmic walnut cocoa brownies

Ingredients:

140gm unsalted butter, cut into cubes
230gm granulated sugar
50gm unsweetened cocoa powder
30gm dark chocolate
1 htsp instant coffee granules
1/4 tsp kosher salt (or regular if you don't have kosher)
1 tsp pure vanilla extract
2 large eggs
65gm all-purpose flour
1/3 cup nuts of choice (I used walnuts), broken into small pieces

Method:

1. Preheat your oven to 170C. Line an 8"square tin with nonstick aluminium foil such that there is an overhang on all sides. This will make removing the brownies from the pan way easy!

2. Put the butter, sugar, salt, coffee granules and chocolate in a microwave safe bowl and heat it on high for 30 seconds, then stir with a wooden spoon. Repeat until the butter and chocolate are completely melted and smooth.

3. Tip in the cocoa powder and vanilla and stir until fully incorporated.

4. Add the eggs one at a time, stirring well. Then the flour, first mixing it in, then beating the mixture vigorously until it is thick and shiny. Stir in the nuts, if using.

5. Pour/scrape the mixture into the prepared tin - it will be quite thick - and level it. Bake for 20 minutes, or until the top of the mixture loses its shine. This may take a little more time in your oven, but after 20 minutes keep a very sharp watch on the brownies. Underbaking is always preferable to overbaking! A toothpick inserted into the center of the mix should come out mostly clean.

Remove the tin from the oven and let the brownies cool completely before cutting. If you can resist temptation, after the brownies are cool, put them in the fridge for 30 minutes. When cutting them, dip your knife in water every so often, to get clean cuts. Or, if you're like me, never mind refrigerating, just dive in!

Saturday, August 20, 2016

Lime-vanilla sugar cookies

The basic sugar cookie recipe was from a colleague who made hers first from a recipe on the back of some cookie mix or other. She brought some leftover cookies to work just before Christmas break last year, and they were SO delicious that I asked her for the recipe. I'm not really a cookie person - either eating or making - but her cookies really were incredibly moreish. 

The first time I made the plain sugar cookies was last Saturday - they turned out really well, and Pete loved them. He insisted that we should take some to a friend's barbeque party. She had two types of desserts for the guests but her daughter decided that she was going to make herself a dessert with my cookies, layering them with strawberries that been macerated with sugar, and clotted cream (like an ersatz strawberry shortcake) and declared it a superhit. 

In the meantime, my friend's husband was quietly putting away cookie after cookie, looking sheepish when he was rumbled, but not letting it stop him from taking a couple more. There must have been at least 40 cookies in the container, but by the end of the party they were all gone to the last crumb. That was definitely a pleasing result in my eyes, both because the cookies came out so well and because everyone liked them, from the 7-year-old granddaughter to the 70-year old neighbour!

All week since, Pete had been begging me to make some more. Yesterday I chose to make them but give it a citrusy twist, because I love citrus-flavoured things. Lime was my flavouring of choice. Again, the cookies turned out really well - which I guess convinced me that it wasn't a fluke the first time around (really, I'm not famous for baking cookies). 

I liked these lime-flavoured cookies quite a lot myself, and so did Pete. And so did Pete's son and his girlfriend who dropped by. Like me, Andy is not really a cookie person, but he said "these are the best cookies I've ever eaten" and went on to prove it by eating half a dozen in quick succession. As for his girlfriend, she scarfed down a few, and then took charge of the bag containing the 2-3 dozen that I packed for them to take away. I'm not sure Andy will be seeing very much of them, unless he is V E R Y nice to her... 

By the way, I got about 60 cookies from the amount of dough that this recipe makes - but mine were small, about the diameter of an Oreo. If you make bigger cookies, you will get fewer (yes, well, duh). I also toyed with the idea of icing them with a simple lemon icing (lemon juice + icing sugar mixed to a spreadable consistency) but laziness got the better of me. Besides, I didn't really think the icing was essential. 

One last tip - the dough is best worked with when chilled.  

Recipe for: Lime-vanilla sugar cookies


 photo 20e51a30-6f41-48d7-b81b-2b913b8d297b_zpsxsjczgof.jpg

Ingredients:

150gm softened unsalted butter
150gm caster (superfine) sugar
300gm plain (AP) flour
1.5 tsp best-quality vanilla extract
1/2 tsp pure lime oil (optional)
Zest of one lime
1 medium egg, beaten

Method:

1. Cream butter and sugar using a wooden spoon in a large mixing until light and fluffy (I did this by hand, takes about 7-8 minutes).

2. Add the beaten egg, the lime zest, lime oil and vanilla extract and beat it in. 

3. Add the flour in 4-5 installments, mixing just until incorporated. When it comes together into a rough dough, dust your hands with some flour and form the dough into a ball. Place the ball on some clingfilm or a sheet of non-stick foil and flatten it evenly till about 1/2 inch thick. Cover completely and place in the refrigerator to chill for about an hour. 

4. Scatter some flour on your working space. Turn out the chilled dough onto the floured space and gently roll the dough out until it is evenly 3-4mm thick. You may need to dip the rolling pin into flour now and then to stop the dough sticking. You can divide the dough into two before rolling out, to make it easier. Keep the other half chilled in the meantime. 

5. Using a cookie cutter of choice, stamp out the cookies, dipping the cutter into flour each time. Re-roll the remaining dough and cut out until the dough is used up. 

6. Transfer the cookies onto a sheet lined with non-stick foil or baking paper, leaving about an inch in between them as they will spread a little. Place the cookie sheet in the fridge again to chill for 15 minutes. 

7. Preheat your oven to 180C/350F (mine is a fan-assisted oven) and bake the cookies for 10-11 minutes or until they are a pale golden brown. You can turn the sheet around after 5-6 minutes to let them brown evenly, if you like. 

8. Let them cool on the sheet for a couple of minutes, then transfer carefully to a cooling rack until completely cool. Store in an airtight jar. 

Saturday, March 22, 2014

Double cherry almond cake

Can you believe it's over 6 months since I last posted anything on this blog? It's amazing how quickly times flies - the truth is that while I've kind of missed posting new recipes, I've also felt some relief to be able to ignore the tyranny of the blog itself. (Kind of. Obviously, since I'm posting a recipe now, I've not exactly totally escaped the tyrant!) Anyway, my husband keeps saying that it would be a shame to shut down this blog, considering how many years I've been keeping it going. I guess that's true, too. 

So, I made this cake because Pete loves maraschino cherries. I'd bought a big bag of these in the run-up to Christmas 2013, and while I did use some in fruit cake and Christmas cake, I've also been half toying with the idea of throwing the remainder of the cherries away. It's their sticky sweetness that puts me off. 


Pete would have been happy if I'd used just those cherries in a cake, but that really did not appear to me one bit. So I compromised by using the maraschinos, but also added Kirsch-soaked Morello cherries (I thought I had some dried sour cherries, but turns out not) that were lurking in my dried fruits container. Again left over from last Christmas, but no complaints there. 


For some crunch, and because I like nuts in my cakes to cut through the sweetness, I used flaked almonds both in the cake batter and in the topping. Of course, since this was baked in a Bundt pan, the "topping" is really the "bottoming", to coin a phrase. Doesn't sound particularly graceful, but that's how it hangs, my friends. In other words, you sprinkle the almonds in the pan, pour the batter on top, bake the cake, invert the baked cake - and voila, the bottoming is now the much nicer topping!


 photo photo12_zps6f5b8a10.jpg

This cake smelt to me like a combination of sweet bread and cake all at once, while baking. No idea why, but it was lovely. The texture of the cake is moist and moreish, and the combination of the dark Morello cherries and the jewel-coloured maraschinos in every slice made the cake look beautiful!


 photo cd891771-ea36-45f7-94c7-ef490bbeb344_zps61502db4.jpg
 
Recipe for: Double cherry almond cake


 photo photo14_zpsb8695ea0.jpg

Ingredients:

1-1/2 cups all-purpose flour
1/2 cup ground almonds
1 cup butter at room temperature
1 cup Quark (you can use cream cheese)
1 cup white sugar
1/2 cup maraschino cherries
1/2 cup kirsch-soaked Morello cherries (or plain dried Bing cherries)
4 eggs
3 tsp baking powder
1/2 tsp salt
2 tsp vanilla extract
1 tsp almond extract
1/3 cup + 2 tbsp flaked almonds

Method:

1. Butter and flour an 8" Bundt pan and knock off the excess flour. Sprinkle the 2 tbsp flaked almonds evenly on the bottom of the cake pan. Preheat the oven to 165 degrees C. 

2. Mix together the flour, salt and baking powder, and set aside.

3. Beat the butter and sugar together until fluffy and light, then beat in the Quark and flavourings. 

4. Beat in the eggs one at a time, then mix in the flour until just combined. Stir in the maraschino and Morello cherries as well as the flaked almonds. 

5. Dollop the cake batter into the prepared Bundt pan. Tie or pin a wet towel around the cake pan. This helps the cake to rise evenly and not "dome" too quickly or crack. 

6. Bake the cake for about 70 minutes, testing with a skewer to see if it is done. If the top of the cake browns too quickly, cover it with a piece of foil. The cake is done when a tester or skewer poked into it comes out clean. 

Leave the cake in the pan for 5 minutes, then turn it out onto a cooling rack. Let ir cool for 15 minutes or so, then slice and serve.

Saturday, March 23, 2013

We Knead to Bake #3 - Hokkaido Milk Bread

 photo 0eb68333-7485-4f50-9e2e-bf9572af6399_zps87ad1e05.jpg

 photo d0af005b-9053-45f3-ab27-adb7cfa86d49_zps13b8df7e.jpg

Last month's baking challenge saw me at my whiny worst, because the croissants that we were supposed to make nearly got the better of me. But I persevered, rather to my surprise, and at least I can say "I tried it". This month's challenge was much more in keeping with my ability and my interest, because I can make bread. I can knead dough. I've been experimenting with different types of bread, with different proportions of strong white, wholewheat, wholemeal spelt and wholemeal rye flours. Mostly they've been successful bakes. 

That is why this Hokkaido bread didn't faze me. Yes, the dough was irritatingly sticky. Yes, I kneaded the dough by hand, because I don't have a machine to do the job... but to be fair, I didn't put my entire being into the kneading. That's because of the technique recommended by Dan Lepard of the Guardian newspaper (jeez, the number of times I've mentioned this man in my posts, he should be paying me a commission!). 

Anyway, I didn't do a 10-second knead with this dough, but I certainly didn't knead for 15 minutes at a time either. It turned out so soft and buttery, it was unbelievable. I made one big loaf, and some Nutella rolls and some with a spicy potato filling. They all turned out incredibly moreish. I'm planning to use the tangzhong technique with regular baking flours rather than just all-purpose. The tangzhong will continue to be made with AP flour, though. However, that's for another post. In the meantime, thank you once again, Aparna Balasubramanian, for introducing me to this bread technique that was completely new to me. 

Recipe for: Hokkaido milk bread
 photo b4229644-0f25-4796-95c3-4a83929b70b9_zpscb27837d.jpg
(Original Recipe from 65 Degrees Tangzhong “65C Bread Doctor” by Yvonne Chen, and adapted from Kirbie’s Cravings)
http://kirbiecravings.com/2011/05/hokkaido-milk-toast.html

Ingredients:
For The Tangzhong (Flour-Water Roux)
1/3 cup all-purpose flour
1/2 cup water
1/2 cup milk


For The Dough:
2 1/2 cups all-purpose flour
3 tbsp sugar
1tsp salt
2 tbsp powdered milk
2 tsp instant dried yeast
1/2 cup milk (and a little more if needed)
1/8 cup cream (25% fat)
1/3 cup tangzhong (use HALF of the tangzhong from above)
1/4 tsp salt
25gm unsalted butter (cut into small pieces, softened at room temperature)
1/2 to 3/4 cup mini chocolate chips if making the rolls

Method:
The Tangzhong (Flour-Water Roux):
Whisk together lightly the flour, water and milk in a saucepan until smooth and there are no lumps. Place the saucepan on the stove, and over medium heat, let the roux cook till it starts thickening. Keep stirring/ whisking constantly so no lumps form and the roux is smooth.

If you have a thermometer, cook the roux/ tangzhong till it reaches 65C (150F) and take it off the heat. If like me, you don’t have a thermometer, then watch the roux/ tangzhong until you start seeing “lines” forming in the roux/ tangzhong as you whisk/ stir it. Take the pan off the heat at this point.
 photo 9478cba3-9d49-4ce1-adcc-1bd93af88891_zpse02e385d.jpg
Let the roux/ tangzhong cool completely and rest for about 2 to 3 hours at least. It will have the consistency of a soft and creamy crème patisserie. If not using immediately, transfer the roux to a bowl and cover using plastic wrap. It can be stored in the fridge for about a day. Discard the tangzhong after that.

The Bread Dough:
I made this bread by hand. This dough dough is a bit sticky and can take some time and effort to knead by hand. If you have some sort of machine which will do the kneading for you, use it. Don’t punish yourself. And do not add more flour to make it less sticky either!

Put the flour, salt, sugar, powdered milk and instant yeast in a large bowl and pulse a couple of times to mix. In another small bowl mix the milk, cream and Tangzhong till smooth and add to the bowl. Mix with a wooden spoon until the dough comes together. Now add the butter and knead till you have a smooth and elastic dough which is just short of sticky.

The dough will start out sticky but kneading will make it smooth. If the dough feels firm and not soft to touch, add a couple of tsps of milk till it becomes soft and elastic. When the dough is done, you should be able to stretch the dough without it breaking right away. When it does break, the break should be form a circle.

Form the dough into a ball and place it in a well-oiled bowl turning it so it is well coated. Cover with a towel, and let the dough rise for about 45 minutes or till almost double in volume.

Place the dough on your working surface. You don’t need flour to work or shape this dough. This recipe makes enough dough to make one loaf (9” by 5” tin), 2 small loaves (6” by 4” tins) or 1 small loaf (6” by 4”) and 6 small rolls (muffin tins). Depending on what you are making, divide your dough. If you are making 1 loaf, divide your dough in 3 equal pieces. If you are making two smaller loaves, divide your dough into 6 equal pieces.

The shaping of the portions, whether for the loaf or the rolls, is the same.

Roll out each portion of the dough with a rolling pin into an oval shape, about 1/8” thick. If you are using a filling, spread it on the dough now, before shaping it into a ball with your hands, bringing the edges to cover the filling.

Roll this folded dough with the rolling pin so the unfolded edges are stretched out to form a rectangle. Roll the rectangle from one short edge to the other, pinching the edges to seal well. Do this with each of the three larger pieces and place them, sealed edges down, in a well-oiled loaf tin.
 photo c757d852-82e8-461c-951a-b4a20a658d37_zpsdbcdcab3.jpg
Cover with a towel and leave the dough to rise for about 45 minutes.
 photo e8dd20bc-4e92-4e03-9217-95b71b07cd5d_zps6ca12d99.jpg
To make the rolls fold them in the same manner described above, but before rolling them up, put in the filling.
 photo 65884c2f-336b-42c7-9421-f042fd27a4ff_zps9f964e3a.jpg
 photo ecb61269-f3ea-400a-8c53-5ebfbcea2332_zps91f0ecbb.jpg
Turn the roll over so the seam side is down, and shape it with both hands, sort of cupping it so that the top is smooth and tight, and the underside is sealed.
 photo 1fae9820-872d-40f4-b118-03419a36c62c_zpsd898dbce.jpg
 photo 86f4b90c-d533-42da-85e0-5498c7ed74e3_zps4f39ef68.jpg

Carefully brush the tops of the rolls and the loaf with milk (or cream) and bake them at 170C (325F) for about 20 to 30 minutes till they are done (if you tap them they’ll sound hollow) and beautifully browned on top.
 photo 22b009b7-4f7b-4c30-8b96-2ffccd986d86_zpsb0e3ee51.jpg
Let them cool on the tray for about 5 minutes and then transfer to a rack till slightly warm or cool.
 photo 038a10f0-7791-4350-8687-bd31fc937235_zpscea6043b.jpg
 photo ec5dc6b1-9eaa-4837-a5ca-20e687caac69_zps244cfff3.jpg
Serve or else store in a bread bin. This bread stays soft and delicious even the next day. This recipe makes enough dough to make one loaf (9” by 5” tin), 2 small loaves (6” by 4” tins) or 1 small loaf (6” by 4”) and 6 small rolls (muffin tins).

Saturday, January 19, 2013

Herby cheese pull-apart bread - Bread #1, January 2013

pull2_zpsfb6ba548 photo pull2_zpsfb6ba548.jpg
This is the first challenge of the monthly baking event started by Aparna Balasubramaniam of My Diverse Kitchen - she of the gorgeous photos and amazing baking ability in particular and lovely recipes in general. When I signed up to join the group, I happened to be in the States, visiting my family in Seattle. It was the perfect opportunity to try the recipe for pull-apart bread, especially as I'd kinda sorta earmarked it for making (at some unspecified point) when I'd seen the original photo on the Huffington Post's selection of photos of pull-apart breads.

The other point was, of course, that there were lots of people at home who would help demolish the bread... whereas at home in Shrewsbury, there's usually just me and Pete. It's difficult to invite people over when you can't be sure that you can provide something edible - I'm a million miles from being the world's best baker, that's the problem.


Happily, family don't fall into the worrisome category, so I was quite pleased to make them my guinea pigs as far as this bread was concerned. As it happened, the dough didn't rise as much as it should have, or as evenly. And since the oven was unfamiliar to me, I didn't really know anything thing about its particular quirks - its hot spots, or cold spots, etc.


But - and this is important - the bread turned out beautifully golden and really tasty with the mushroom-vegetable soup that I'd made.

pull1_zps6d40efe9 photo pull1_zps6d40efe9.jpg

The aroma as it was baking nearly drove us mad, and there was nothing to do but tear into it the moment it came out of the oven! Granted, the texture of the bread was a bit dense, but I don't think anybody cared.


I changed the original recipe just a tad - I used Pepperjack cheese on request from my sister, instead of cheddar, and I used an Italian herb mix, because that's what I had. I hope to make this bread again, with slightly different toppings. If I do, I'll definitely post it here. But for now, here's my tear-and-share bread.

Recipe for:
Herby cheese pull-apart bread

Ingredients:
For the Dough
1/2 cup warm milk
1 tsp sugar
2 tsp active dry yeast
2-3/4 - 3 cups all-purpose flour
1 tsp salt
25gm butter, soft at room temperature
3/4 to 1 tsp garlic paste
3/4 cup milk (+ a couple of tbsp to brush over the bread)
For the Filling:
15 to 20gm melted butter
2 tsp dried Italian-style herb mix
1 tsp crushed cumin seeds
1/2 cup grated Pepperjack cheese

Method:
1. In a small bowl, dissolve the sugar and the yeast in the 1/2 cup of warm milk. Keep aside for about 5 minutes till the yeast mixture bubbles up.


2. Put 2 3/4 cup of flour, salt, softened butter, and garlic paste in a large bowl and mix. Then add the yeast mixture and the 3/4 cup of milk and knead till you have a soft, smooth and elastic/ pliable dough which is not sticky. Add a little extra flour if your dough is sticking, but only just as much as is necessary.


3. Shape the dough into a ball and place it in a well-oiled bowl, turning the dough to coat it completely with oil. Cover and let it rise for about 1 to 1 1/2 hours or until almost doubled in volume.


4. Dust your work surface lightly with flour. Deflate the dough, shape it into a square and roll the dough out into a larger square that is about 12’ by 12”. Brush the surface of the square with the melted butter.


5. Evenly sprinkle the herbs and the cumin seeds and then the grated cheese. Use a rolling pin to very lightly press the topping into the dough to ensure the topping doesn’t fall off when you are stacking the strips.


6. Using a pizza cutter, slice the dough from top to bottom into 6 long and even strips – they do not have to be perfect. Lay each strip on top of the next, with the topping facing upwards, until you have a stack of the strips. You can put the 2 strips cut from the sides in the middle of the stack so it looks neater. Using a pastry scraper or a sharp knife, cut straight down through the stack dividing it into 6 equal pieces (6 square stacks).


7. Grease and lightly flour a 9” by 4” (or 5”) loaf tin. Layer the square slices, cut sides down into the loaf tin. Cover the loaf tin dough with a towel and allow the dough to rise for an hour. Lightly brush some milk over the top of the loaf.


8. Bake the dough at 180C (350F) for about 30 to 40 minutes until it is done and the top is golden brown.


pull3_zps8450eb20 photo pull3_zps8450eb20.jpg
This recipe bakes one 9” by 5” loaf.


9. Serve hot with any soup.

Monday, February 07, 2011

Blueberry nectarine cake

Perfectly ripe nectarines – ready to eat now” is what the label on the package said. HA! The nectarines were anything but perfectly ripe… and unless you like your tongue twisting itself into a knot while your eyes do the Lalita Pawar squint, they most certainly were NOT ready to eat “now” or any time in the near future. Man, were they sour or what!

So there were these four nectarines taking up valuable fridge space and not getting any riper for being in there… and I had to do something with them before I forgot about them. Naturally, the first thing that came to mind was “CAKE”. To my husband’s mind, that is, not mine.

To add to the nutrition quota of fresh fruit cake (and thereby pay lip service to the "healthy" aspect), I threw in a cupful of blueberries left over from a previous muffin making day.

I have only one thing to say about the cake – actually, it’s Pete’s thing I’m going to say because I don’t want to sound like I’m praising my own effort – “It’s sensational”.

I think that about covers my opinion, too.

Recipe for: Blueberry nectarine cake
Photobucket
Ingredients:
1 cup butter/margarine, softened
1 cup sugar
3 large eggs
1/3 cup cream/milk
1-1/2 tsp vanilla extract
2 cups all-purpose flour
4 tbsp flaked almonds
1-1/2 tsp baking powder
1/4 tsp salt
1 cup fresh blueberries
2 large nectarines, chopped
Photobucket
Method:
1. Beat butter/margarine until creamy. Gradually add sugar, beating until light and fluffy.
Photobucket
2. Add eggs, one at a time, beating just until the yolk disappears.
Photobucket
3. Add vanilla, beating just until blended.
Photobucket
4. Sift together flour, baking powder, and salt. Gradually add flour mixture to butter mixture, stirring well.
Photobucket
5. Add cream/milk and stir it in, then beat the batter fo 2 minutes till well blended.
Photobucket
The batter will be fairly thick.
Photobucket
6. Gently fold in nectarines and blueberries. Pour batter into a deep 8" round cake pan.
Photobucket
7. Sprinkle the flaked almonds evenly over the top, then press them in lightly. Not ALL the way in, but just enough that the batter rises over the edges when the cake is in the oven.
Photobucket
8. Bake at 180°C for 40 minutes or so, until a wooden pick inserted in centre comes out clean. Cool the cake in the pan for 10 minutes, then turn it out onto a wire rack.
Photobucket
Serve warm. For a decadent option, serve warm with vanilla-flavoured double cream.
Photobucket
Note: For the best taste, warm every subsequent cake slice for 20-30 seconds in the microwave before serving.

RECIPE: BLUEBERRY NECTARINE CAKE

Ingredients:
1 cup butter/margarine, softened
1 cup sugar
3 large eggs
1/3 cup cream/milk
1-1/2 tsp vanilla extract
2 cups all-purpose flour
4 tbsp flaked almonds
1-1/2 tsp baking powder
1/4 tsp salt
2 large nectarines, chopped
1 cup fresh blueberries


Method:
1. Beat butter/margarine until creamy. Gradually add sugar, beating until light and fluffy.
2. Add eggs, one at a time, beating just until the yolk disappears.
3. Add vanilla, beating just until blended.
4. Sift together flour, baking powder, and salt. Gradually add flour mixture to butter mixture, stirring well.
5. Add cream/milk and stir it in, then beat the batter fo 2 minutes till well blended. The batter will be fairly thick.
6. Gently fold in nectarines and blueberries. Pour batter into a deep 8" round cake pan.
7. Sprinkle the flaked almonds evenly over the top, then press them in lightly. Not ALL the way in, but just enough that the batter rises over the edges when the cake is in the oven.
8. Bake at 180°C for 40 minutes or so, until a wooden pick inserted in centre comes out clean. Cool the cake in the pan for 10 minutes, then turn it out onto a wire rack. For a decadent option, serve warm with vanilla-flavoured double cream.
Note: For the best taste, warm every cake slice for 20-30 seconds in the microwave before serving.

Wednesday, January 19, 2011

Overnight blueberry muffins

I first heard of Paul Hollywood, the chef, when I watched a recent TV show/competition to determine Britain’s best amateur baker. The contestants were amazing, their skills superb – they were absolutely NOT amateurs. I mean, if at all they were “amateurs” it was only in that they were not famous “professional” chefs, running restaurants or publishing cookbooks. Otherwise, in terms of skills, talent and imagination, I’m pretty certain they would have given any “professional chefs” a run for their money if they (the professionals) were in the competition rather than merely judging it!

Anyway, Paul Hollywood is an expert on baking, and I came across his recipe for blueberry muffins on the BBC Food website. According to him, they were the best muffins ever. I would probably have just glanced at the recipe and continued browsing, had it not been for a couple of things – the minimal number of ingredients and the simple instructions and, more intriguingly, his advice to refrigerate the batter, preferably overnight, before baking the muffins.

Refrigerate? OVERNIGHT? And here I’d been under the impression, courtesy the gazillion muffin recipes on the Net, that the biggest selling point of this particular type of baked goody was that it was practically instantaneous – basically, make the batter (don’t even stop to break up the lumps) and bake the muffins.

He said his recipe would make 12 muffins. I thought that the batter wouldn’t stretch to 6 muffins never mind 12, there was so little of it. But it did, just... although the 12 muffins were the size of small cupcakes. (I never like to specify the number of muffins, in any case. It’s such a subjective thing, depending very much on how small or how large you wish to make them.)

I made only one change to Mr Hollywood’s recipe – I added some vanilla extract because I love it, because I simply can’t help myself, and because I’m not entirely sure that I would ever love just nutmeg as a flavouring.

And so to the muffins... Oh. My. God. They were not so much muffins as fairy cakes, so light and lovely that I was quite happy there were others in the house to eat ‘em, or I would have demolished them all myself. They were THAT good. I dunno if it was the overnight resting, or the butter in the recipe (it’s been a while since I used butter in a muffin recipe) but the muffins were sensational!

I try to learn a new technique or ingredient from every recipe I try, familar or unfamiliar. The abiding lesson from this recipe was: Always stud the batter with blueberries after putting the batter into the cake cases (this goes for any berry or soft fruit), rather than mix them in with the batter and THEN fill the cases. That way you can control where the berries go so they don’t burst messily against the side of the cases while cooking; they stay in the centre, where they were placed, making for a neat result. This really is a brilliant tip, one to always remember. I don’t know why I couldn’t have come up with the idea myself, it's so simple. But sadly I didn't, and a vote of thanks is definitely due Mr Hollywood!

Recipe for:
Overnight blueberry muffins

Photobucket

Ingredients:

1/2 cup plain flour
1/2 cup butter
1/4 cup caster sugar
2 free-range eggs
1-1/2 tsp baking powder
1/2 cup fresh blueberries
pinch nutmeg
1 tsp good quality vanilla extract

Method:

1. Cream the butter and sugar together till fluffy.
Photobucket

2. Then add the eggs one by one.

3. Mix for three minutes. Then add the flour, baking powder and nutmegPhotobucket,
stir to combine into a thick batter. Do not beat.
Photobucket

4. Refrigerate the batter for at least an hour, preferably overnight. Just before baking, stir in the vanilla.

5. Place paper cases in a muffin pan. Place a spoonful of muffin mixture into each muffin case, filling each to just over half way.
Photobucket

6. Stud each muffin with 5-8 blueberries, pushing them very lightly into the batter.
Photobucket

7. Bake in an oven set at 200C/400F for 20 minutes, or until golden on top.
Photobucket
Serve warm.
Photobucket

RECIPE: OVERNIGHT BLUEBERRY MUFFINS

Ingredients:

1/2 cup plain flour
1/2 cup butter
1/4 cup caster sugar
2 free-range eggs
1-1/2 tsp baking powder
1/2 cup fresh blueberries
pinch nutmeg
1 tsp good quality vanilla extract

Method:

1. Cream the butter and sugar together till fluffy.
2. Then add the eggs one by one.
3. Mix for three minutes. Then add the flour, baking powder and nutmeg, stir to combine. Do not beat.
4. Refrigerate for at least an hour, preferably overnight.
5. Place paper cases in a muffin pan. Place a spoonful of muffin mixture into each muffin case, filling each to just over half way.
6. Stud each muffin with about five blueberries.
7. Bake in an oven set at 200C/400F for 20 minutes, or until golden on top. Serve warm.

Sunday, January 02, 2011

Flaxseed orange cake with hazelnuts

Happy new year 2011, everybody! My first post of the new year is an eggless cake, using flaxseed powder as a substitute for the egg in the original recipe - and goodness knows where I got that from. Anyway, it works! Flaxseed as a substitute for eggs really does work! There's no reason it SHOULDN'T, because this particular substitution has been recommended and tried by plenty of others. It's just that I needed to try it for myself before I could actually believe it. And I'm pretty sure I don't need to feel lonely in this respect, I'm sure I have plenty of company.
Photobucket
I'd dry roasted a lot of flaxseeds earlier, and it was a simple job to grind one tablespoon of the seeds to powder and mix it with water.
Photobucket
It's one thing to be told that 1 tbsp flaxseed powder + 3 tbsp water = one egg. It's quite another thing to realise that the flaxseed powder simply SUCKS up the water,
Photobucket
and when the mixture is added to cake batter, it makes the batter really really gooey. In fact, the batter felt so gooey that I wondered if the cake would turn out a disaster, but hooray for flaxseeds, it didn't!

If you look at the photos of the cake, you'll see that the hazelnuts are practically powdered. That was not the effect I was after. I wanted the nuts chopped, not ground to dust. Sadly, one moment's distraction while running the nuts in the grinder is all it takes to pulverise rather than chop - so take note.

In short, if you DO make this cake, be sure to chop the nuts (whichever nuts you may substitute) a bit chunky; they're best not pulverised.

Recipe for: Flaxseed orange cake with hazelnuts
Photobucket
Ingredients:

1/3 cup oil
pinch salt
1 tbsp grated orange rind
1/2 cup sugar
1 tbsp flaxseed powder + 3 tbsp water
1-1/3 cups flour
1/2 teaspoon baking powder
1/2 teaspoon baking soda
1/4 cup cream or yogurt
1/3 cup dried berries
3-4 tbsp milk (if required)
3 tbsp Grand Marnier or Cointreau liqueur (or orange juice)
1/4 cup finely chopped hazelnuts

Method:

1. Preheat oven to 350°C.

2. Mix oil, salt, orange rind, Grand Marnier and sugar in a large bowl.
Photobucket
3. Beat in the flaxseed mixture along with the cream or yogurt.
Photobucket
4. Sift together the flour, baking soda and baking powder. Add to wet mixture in three or four stages, stirring well in between,
Photobucket
then add the dried berries and mix them in well.
Photobucket
The batter will be quite sticky and gooey. Beat in some milk if the batter feels too thick.

5. Pour the batter into a 7" round or square pan which has been sprayed with Pam.

6. Spread the chopped nuts on the surface, pressing them in gently so that they are partly sunk in the batter.
Photobucket
7. Bake till the cake is done - about 45-50 minutes, although it's best to check from 30 minutes onwards, depending on your oven.
Photobucket
8. Cool the cooked cake for 10 minutes in the pan, then remove to a wire cooling rack to cool completely.
Photobucket
Cut when cool.
Photobucket

RECIPE: FLAXSEED ORANGE CAKE WITH HAZELNUTS

Ingredients:

1/3 cup oil
pinch salt
1 tbsp grated orange rind
1/2 cup sugar
1 tbsp flaxseed powder + 3 tbsp water
1-1/3 cups flour
1/2 teaspoon baking powder
1/2 teaspoon baking soda
1/4 cup cream or yogurt
1/3 cup dried berries
3-4 tbsp milk (if required)
3 tbsp Grand Marnier or Cointreau liqueur (or orange juice)
1/4 cup finely chopped hazelnuts

Method:

1. Preheat oven to 350°C.
2. Mix oil, salt, orange rind, Grand Marnier and sugar in a large bowl.
3. Beat in the flaxseed mixture along with the cream or yogurt.
4. Sift together the flour, baking soda and baking powder. Add to wet mixture, then add the dried berries and mix them in well. The batter will be a bit sticky and gooey. Beat in some milk if the batter feels too thick.
5. Pour the batter into a 7" round or square pan which has been sprayed with Pam.
6. Spread the chopped nuts on the surface, pressing them in gently so that they are partly sunk in the batter.
7. Bake till the cake is done - about 45-50 minutes, although it's best to check from 30 minutes onwards, depending on your oven.
8. Cool the cooked cake for 10 minutes in the pan, then remove to a wire cooling rack to cool completely.