skip to main |
skip to sidebar
Arent they CUTE? :)
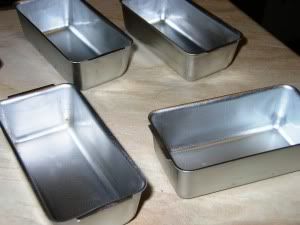
With such adorable mini-loaf pans, is it any surprise that I wanted to make banana bread very very extremely much? They were a gift from my brother-in-law's girlfriend and I fell in love with the little things right away. There was also a recipe for bana-carrot cake from Cooking Light that I badly wanted to try. What else could I do but bring the two together and make banana-carrot mini loaves. Or rather, 6 mini loaves and one square cake that I cut into bars. Voila! - banana-carrot cake bars!
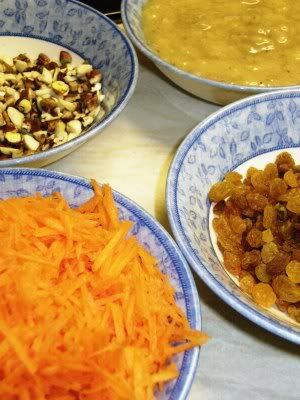
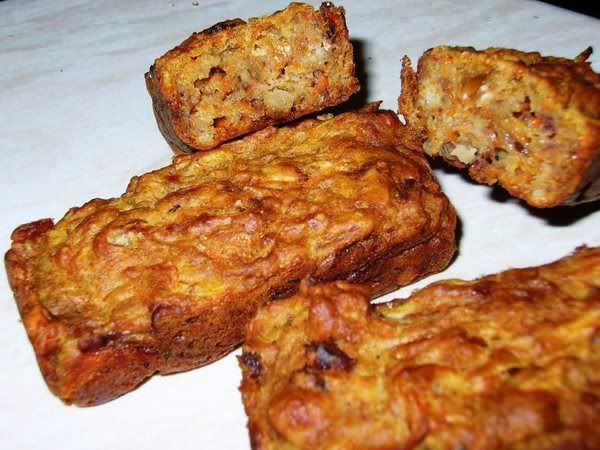
I will confess right away, I didn't expect this cake to turn out so heavy... but considering it uses no eggs and only 1/2 cup oil for the batter, I guess I should not have been quite so surprised. However, I was more than pleased with the flavour, and I loved the texture, dense and chewy, made even more so by the chopped nuts I used. The loaves were more like flapjacks, really. Yum-MEE! We just couldnt stop eating them, believe me.
I guess this would have been a really low-calorie recipe but for the nuts... but I wouldnt have left them out for the world. Sorry, Cooking Light magazine!
Recipe for: Banana-carrot cake bars (adapted from Cooking Light magazine)
Ingredients:
Three large bananas, mashed smooth
2 generous cups grated carrot
2-1/4 cups flour (I used 1 cup white, 1-1/4 cup wholewheat)
1/2 cup oil
up to 1 cup brown sugar (I used 1/2 cup Splenda and 1/4 cup brown sugar)
1/2 tsp crushed/powdered cardamom seeds
1 tbsp baking soda
1/2 cup mixed chopped nuts (I used pecans, pistachios and almonds)
1/2 cup golden sultanas
1/4 tsp salt
Method:
1. Preheat the oven to 180C (350F), and grease an 8" square cake pan (or about a dozen mini pans, if you have them).
2. Sift the flour, salt and baking soda in a large bowl.
2. Add the rest of the ingredients to the flour and cut in lightly, the mix until the batter is moistened. Add a few tbsp milk if the batter is very thick.
3. Pour the batter in the greased pan and bake for 45-50 minutes or until the cake tests done.
4. Cool in the pan for 10 minutes, then turn the cake out onto a wire rack. Cut into bars when cool. Store in an airtight tin.
I used to think that poli was a South Indian recipe, until I found out that Maharashtrians make it for Makar Sankranti (harvest festival) - which necessitated a change in my world view somewhat, because people from the four Southern Indian States consider Maharashtra and Mumbai-ites to be North Indians... whereas people from the North India consider Maharashtrians to be more South Indian than north.
It doesnt help that Marathi as a language and its script are so much closer to Hindi and its script and not in the least like Tamil, Malayalam, Kannada or Telugu. All very confusing.
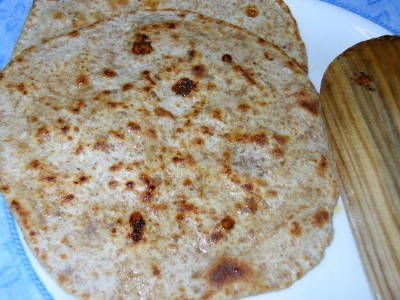
But to get back to the delights of poli... I might have mentioned this before, but I like coconut in very, very few sweet dishes. Poli isnt one of them dishes. So when I came across a recipe for poli that seemed different from the norm because of the stuffing ingredients - it contained sesame seeds but very little gram/chickpea flour and not any chana dal at all (cooked chana dal stuffing is what I've had thus far) - I was pleased. I love the taste of sesame in savoury and sweet dishes, so that was another plus.
I have to say that the poli made this way didnt stay soft for long. The traditional ones I've had, with mashed cooked gram dal & jaggery filling, are meltingly soft and delicious, especially with a dollop of ghee on top. The sesame-seed poli I made were delicious too, but - have I said this before? - not soft. Still, that didnt stop me scarfing them down, so I guess it's worth putting up the recipe.
If anybody wants to know how to make them soft... they'll have to look elsewhere for the answer. And if anybody does find the answer, would they be kind enough to pass on the info to me too, pleeeeeeeeeeeeease?
Recipe for: Sesame seed and jaggery poli (slightly adapted from Cuisine Cuisine)
Ingredients:
For the stuffing:
1 cup jaggery, powdered
1 htbsp gram/chickpea flour
1 tsp cooking oil
1 tbsp poppy seeds
2 tbsp white sesame seeds
1/4 tsp cardamom seeds, powdered
For the poli:
2 cups plain flour
1 cup wholewheat flour
1 tbsp warmed oil
1/4 tsp salt
Warm water as required for making the dough
Plain flour for dusting
Ghee for shallow-frying
Method:
1. Make a soft but not sticky dough with the poli ingredients. Let it rest covered for about 30 minutes.
2. Heat 1 tsp oil in a little pan and roast the gram flour, stirring constantly, until the raw smell is gone (about a minute). Be careful not to burn the flour. Set aside to cool.
3. Roast the poppy seeds and sesame seeds on dry heat over medium flame till they start to turn golden. Grind these in a spice of coffee mill, together with the cardamom powder, into a fine powder. Mix with the roasted gram flour and reserve.
4. Put the powdered jaggery in a bowl, sprinkle a tsp of water, and melt in the microwave for a 45 seconds. Take it out and give it a stir. If it needs to melt a bit more - ie, if there are any dry bits - put it back in the microwave for 20 seconds. Dont overcook it by microwaving it for too long.
5. Quickly mix the sesame-poppy seed powder with the jaggery, making sure it's thoroughly mixed. Set aside to cool.
To make the poli:
6. Knead the dough well, then make small balls (slightly smaller than a golf ball).
7. Roll out two balls into palm-sized circles.
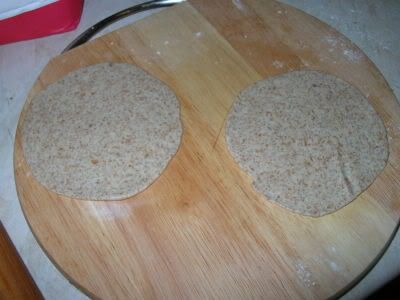
8. Sprinkle some of the filling all over one dough circle (break up any lumps with your fingers), then cover it with the other circle.
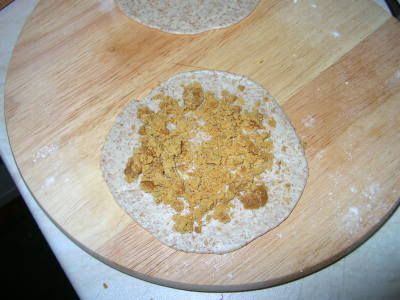
9. Dust the top with flour and gently roll out the dough circle into a slightly larger circle, so that the filling is sandwiched.
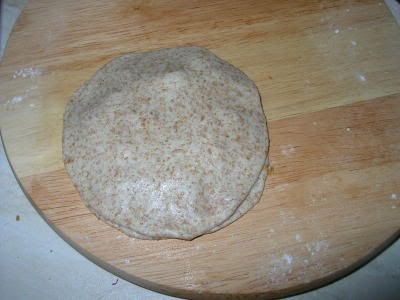
10. Then roll it out some more into a thin round.
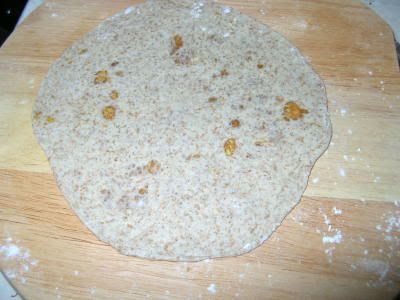
11. Heat a tava or frying pan (keep it on medium heat) and transfer the poli to it. Cook for a few seconds on one side, turn it over and smear that side with ghee. Flip it over once again and smear the other side with ghee as well. Shallow fry until the poli begins to get golden brown spots on both sides. Serve warm.
Note: The jaggery will melt in the heat and might ooze out - in that case keep an eye on it so that it doesnt burn. A little extra direct heat gives a caramelly flavour that is very nice, but burnt jaggery is quite awful to smell and taste.
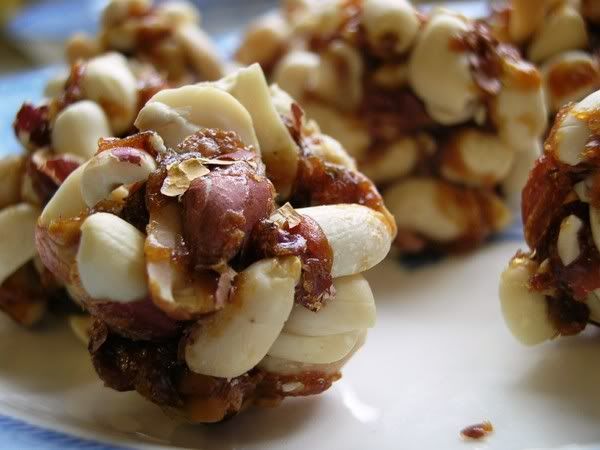
I've never liked the ready-made kadalai urundai available in India... the home-made ones are so much nicer, especially the ones made by my mother. The ready-made ones were rock-hard - so hard that when you bit into them, you had to double-check to make sure it wasnt your teeth that had splintered. I had the private conviction that they were held together with superglue.
Making kadalai urundai at home - especially in a microwave - should be the simplest of procedures... and in theory, it is. I mean, all it requires is two ingredients - jaggery (raw unrefined sugar) and de-husked peanuts... three, at the most, if you include a dash of powdered cardamom. It's even easier if you can get pre-roasted unsalted peanuts. My mother makes them perfectly in the microwave but could I follow suit? Could I hell.
The first trial batch turned out okay - just about. The second batch was a flop because the jaggeried (new word here, folks) peanuts refused to stick together to form balls. I guess that was because the jaggery didnt melt evenly in the microwave.
I'm not sure, but I think the quality of the jaggery matters a lot here. I had a little bit of dark brown jaggery and a packet light jaggery, ready-powdered. The two unfortunately didnt mix well. The dark brown jaggery melted really quickly while the powdered stuff had only just started to. Any longer in the microwave and the dark brown jaggery would have burned.
Anyway... here's the basic recipe that I got from my mother. Good luck trying it (if anybody does try it) because the results will probably vary based on the quality of the jaggery and the wattage of the microwave oven.
TIP: Add a tsp or two of water to the jaggery before microwaving it.
Recipe for: Kadalai urundai (peanut balls)
Ingredients:
1 cup de-husked, unsalted peanuts (ready-roasted, if possible)
3-4 tbsp jaggery, smashed into small pieces
1/4 tsp powdered cardamom seeds - optional
Method:
1. Roast the peanuts (if unroasted) in the microwave for 2-3 minutes (depending on the wattage). Let the peanuts cool and check that they're crisp. If not, roast them for another minute. Check again for crispness.
2. Melt the jaggery in a shallow dish - this should take a minute or two. Again, this depends on the oven's wattage and the quality of the jaggery, so start with one minute's worth.
3. Drop a bit of the jaggery in water - if it forms a ball, it's ready.
4. Very quickly mix the peanuts and the powdered cardamom with the melted jaggery (it cools incredibly fast) and form little balls while still warm.
5. Store in an airtight box.
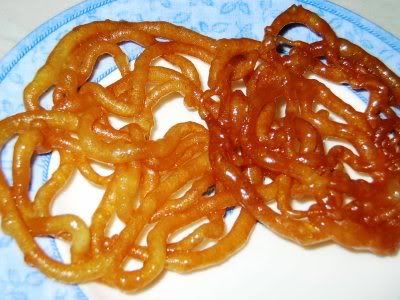
There's a traditional way of making jilebi that I just didnt bother with for two reasons: 1. I didnt have enough time. 2. I wasn't sure I could get the batter to ferment (kinda cold here now, plus see Reason 1 again).
So I followed a recipe (adapted only very slightly) from Bilbo of Smorgasboard for instant jilebis. I have to say it worked out rather well... Pete loved it (he even said it was as good as those from my favourite sweetshop in Birmingham - which, although not true, was very nice to hear!) and as for Rebecca, his daughter, she couldnt get enough of them.
Cant blame them, I love jilebis as well. They're one of the few Indian sweets that I can go on eating indefinitely... perhaps it's because they're not just tooth-achingly sweet but have a sour tang to them that comes from fermenting the batter.
Jilebis are lovely to eat crisp and hot, of course, but I especially love them the next day - I store them in the refrigerator - by which time they've lost most, but not all, of their crispness and gained a softness (and a sticky sugar glaze) that is just irresistible combined with the tangy/sweet taste. (I'm drooling here.)
Strangely enough, I dont like jangri, IMO jilebi's less attractive cousin, which starts out dripping with syrup and with a soft texture. (If anybody's thinking "jeez, what a fuss-budget she is" by now, I will gracefully admit to being one... sometimes.)
Anyway... back to my Diwali jilebis. Turned out I didnt have a proper jilebi press (press, mold, whatever), and my icing accessories had unaccountably gone AWOL. So I made do with a conical disposable plastic icing bag with the tip cut off, and poured the batter into it. Not the best idea, really - it kind of worked, but a good portion of the batter was wasted as it squirted out of the top and oozed down my hand and down the bag. It also meant that my jilebis turned out a bit wonky in shape. Then again, I'm not a professional halwai (sweet-maker) so they would have been shapeless no matter what I used.
I would suggest using one of the medium-size icing/piping nozzle to make jilebis... havent tried it that way, so I cant be more accurate. Odd, now that I think of it, but I havent actually seen jilebis being made so I dunno how the professionals do it!
Recipe for: Instant jilebi
Ingredients:
For the jilebi
--------------
1 cup plain flour
1 tsp chickpea/gram flour
1/2 tsp active dry yeast
1 cup water (a few tbsp more or less as required)
2 tablespoons fresh lemon juice
Oil for deep frying
For the sugar syrup
-------------------
2 cups sugar
2 cups water
1 tbsp rosewater
OR
1/2 tsp powdered cardamom seeds
Method:
1. Combine the flours and yeast in a bowl, add enough water to make a fairly thick but pourable batter. Let this sit for 10 minutes, then stir in the lemon juice.
2. To make the sugar syrup, combine the water and sugar in a pan, stirring over medium heat until the sugar dissolves completely.
3. Let the mixture boil briskly for 10-15 minutes and then turn off the heat.
4. Heat the oil in a wok. Fit a medium nozzle (not sure of size, but it shouldnt be one with a big opening, because the batter expands in the oil) onto an icing bag and pour the batter into it.
5. Squeeze the batter directly into the hot oil, looping the stream to make pretzel-shapes. Fry the jilebis one or two at a time (depending on the size of your wok) until a golden brown on both sides.
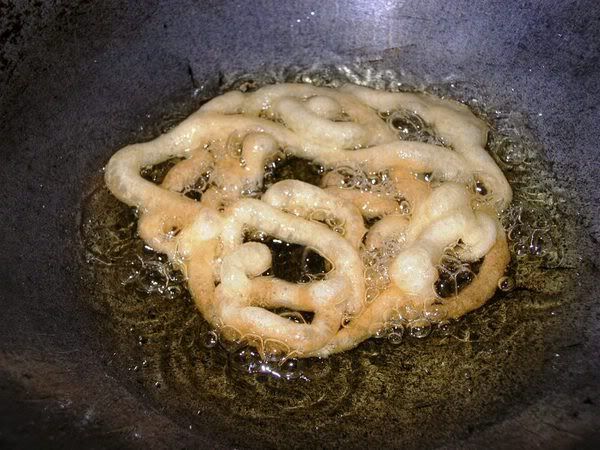
6. Drain and drop directly into the sugar syrup, soaking the jilebis for about 30 seconds each side.
7. Remove with a slotted spoon and place on a plate. Serve hot, cold or at room temperature.
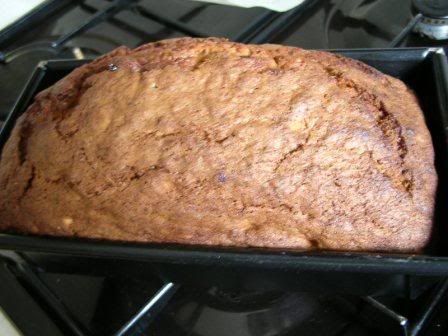
I dont know why banana bread is usually baked like actual bread, in a loaf shape. I've tried it baking it in a round tin and in a square tin and really they taste exactly the same, except that you get wedge-shaped slices from a round cake, square or rectangular slices from a square cake - and slices from a loaf, obviously. I dont know why it isnt called banana cake - but it isnt, for some obscure reason.
Anyway, this time I opted to bake it in a loaf tin, as tradition seems to call for. Of course, I added cardamom powder again - I cant resist it. It smells so heavenly along with the banana smell as the cake cooks in the oven. And man, were my bananas ripe! They were so ripe that I think it was only the skins holding the pulp in. Yucky to eat and rather gross to look at, but in a cake or a smoothie, overripe bananas are so aromatic and add so much sweetness. I hardly even had to mash them :)
Recipe for Easy Banana Bread
Ingredients:
3 overripe bananas, mashed
2 cups plain or cake flour
1-1/2 cups caster or granulated sugar (I used 1 cup light sugar and 1/2 cup Splenda)
1 tsp baking powder
1/2 tsp bicarbonate of soda
1/4 tsp salt
1/2 cup butter or margarine, softened but not melted
2 eggs
1 tsp powdered cardamom seeds
1/2 cup pecans/walnuts/macadamias/brazils, roughly chopped (any or all of these is ok to use)
Method:
1. Cream the butter and sugar together until fluffy.
2. Add the eggs one at a time, beating well after each addition
3. Add the mashed bananas and mix well.
4. Sift the flour, baking powder, baking soda and salt together.
5. Add the flour, nuts and cardamom powder to the banana mix, stirring only to mix. DO NOT BEAT.
6. Bake in a well-greased loaf tin for about an hour, or till done, in a 180 C oven (350 F).
7. Let the bread remain in the tin for a couple of minutes, then turn out onto a wire rack and cool. It can be eaten warm (rather nice that way).
Another orange cake recipe, because I've got so many at home. Oranges, I mean. I think there must be at least a dozen-plus oranges left even after I ate two, and Rebecca a few more (good thing she was here yesterday)... that's what comes of taking up the "Buy one dozen, get the next dozen free" offer at the supermarket. Pete doesnt stop to think if we can use whatever's going cheap - he's just so entranced by the bargain that he just grabs them (which is why I prefer to do the shopping!). Then they sit around at home, quietly going rotten while I frantically try to use them up somehow, ANYhow.
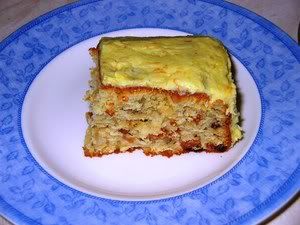
Which brings me to the cake. It's a much more moist affair than the orange-chocolate marble cake, with lots of golden sultanas and nuts. The best thing about it is that there's no complicated beating and adding and care involved in making the batter. Just assemble the ingredients and mix 'em up. My kind of cake!

I usually dont chop up the sultanas for any cake, but this time I did - sat in front of the TV watching sitcoms while I snipped the sultanas up with my spare embroidery scissors (my kitchen scissors unaccountably having disappeared). I also used three kinds of nuts in the cake - brazils, pecans and macadamias.The traditional way is to use vanilla extract as flavouring, but I decided to substitute that with about a teaspoon of powdered cardamom seeds.
The cake smelt gorgeous - there's nothing as wonderful as the sweet aroma of cardamom - and the cardamom brought to mind (and tongue) the memory of the rava kesari that I love... very nice indeed!The icing with fresh orange juice (what else!) and grated orange peel just topped the cake off nicely, adding the extra sweetness that Pete requires.
Recipe for: Nut-and-sultana orange cake flavoured with cardamom
Ingredients:
2-1/2 cups all-purpose or cake flour
2 tsp baking powder
1/4 tsp baking soda
1/2 tsp salt
1-1/2 cups sugar (I used 1 cup light sugar, 1/2 cup Splenda granular
1 tbsp orange zest
1 cup golden sultanas, snipped to pieces (can be left whole too
1/2 cup mixed nuts (I used pecan, macadamia and brazil), chopped
1-1/2 cups buttermilk
2/3 cup margarine or butter
3 eggs
1/2 tsp cardamom seeds, powdered fine
OR
2 tsp vanilla extract
For the icing
1/3 cup margarine or butter, softened but not melted
2-3 cups icing sugar
1 tbsp orange zest
Fresh orange juice (about 1/2 a medium orange squeezed, more if required
Method
1. Sift the flour with the baking powder, soda and salt in a big mixing bowl
2. Add the rest of the ingredients to the flour, making sure that the batter is well mixed
3. Put the batter in a greased 9" cake tin (round or square) lined with silicone paper. Bake in a moderate oven (180 degrees C or 350 Fahrenheit) for 45-50 minutes, or till done. Poke a cake tester in the middle to see if it's done.
4. Let the cake sit for 5 minutes in the tin, then unmould and cool completely on a wire rack.
Icing: Put the icing ingredients in a bowl and mix well, adding as much orange juice as required to make the icing spreadable. Ice the top and sides of the cake.


