Sunday, July 31, 2005

Deep dark chocolate cake

I've tried out quite a few chocolate cake recipes in the last 2-3 years, but this is the one that I like best and make the most often. It's not a complicated recipe (the most important criterion for me as I'm not a naturally gifted baker), so there's no need to faff about with separating eggs and beating the whites separately, or melting chocolate pieces over a double boiler, and other fiddly procedures like that. It's a straightforward, easily followed recipe.

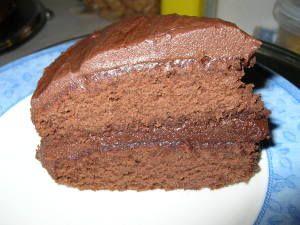
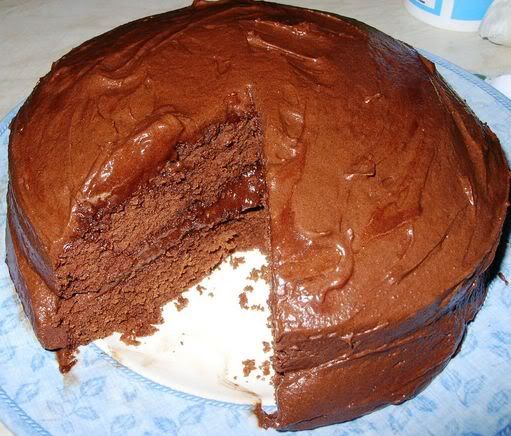
And the end result is superb... dark and very chocolatey without being cloying, with a lovely moist interior that doesnt even require cream or icecream. Not that you CANT serve up a slice with clotted cream or icecream... it's just that it would be rather like gilding a lily!

Image hosted by Photobucket.com

What's probably the most difficult thing to believe - I dont eat much of it myself! I cant - my sweet tooth is not particularly pronounced, so this cake in particular is always made with Pete as the end-user, so to speak. He's only too pleased that I only ever cut the thinnest slice for myself... it leaves him all that much more!

It's also the cake with which I've been trying to entice some dear friends from India into visiting me... perhaps this post will finally persuade them. You reading this, girls?

Recipe for:
Deep dark chocolate cake


Image hosted by Photobucket.com

Ingredients:

2 cups plain flour
1-1/4 cups sugar
1 tsp baking soda
1/2 tsp baking powder
1/4 tsp salt
1/2 cup butter
3/4 cup cocoa powder
2 tsp vanilla extract
2 eggs
1 cup hot water

For the frosting:

1/3 cup butter
1/2 cup cocoa powder
1/3 cup milk
2-1/2 cups icing sugar
1 tsp vanilla extract

Method:

1. Generously grease two 7-inch round cake pans. Pre-heat the oven to 180C (350F).

2. In a small bowl, whisk together the hot water and cocoa until smooth. Let cool.

3. Sift the flour, salt, baking powder and baking soda together and set aside.

4. Beat the butter and sugar in a large bowl until fluffy and light. Add the eggs one at a time, beating well after each addition. Beat in the vanilla extract.

5. Add the flour and the cocoa alternately to the butter-and-egg mix, mixing well after each addition. Start and end with the flour.

6. Divide the batter even between the two cake pans and cook for 30 minutes or until a toothpick or cake tester inserted in the centre comes out dry.

7. Turn off the oven and let the cakes rest in the pans for 5 minutes. Carefully remove the cakes from the pans and let cool completely on wire racks before frosting them.

Frosting:

1. Beat the butter and cocoa powder till well mixed. Add the vanilla essence as well.

2. Add 1/2 cup of the icing sugar and mix carefully, then add a tbsp of the milk to the icing mix and beat again.

3. Continue adding the icing sugar and milk alternately until it's all used up.

4. Beat the frosting until it is thick enough to spread.

5. When the cakes are cold, first sandwich them together with a third of the frosting, then spread the rest of it over the top and sides.

This cake tastes even better on the second day - if there's anything left of it, that is.

Friday, July 08, 2005

Mangoes with minted sugar

I love flavoured sugar, and vanilla sugar is one of my favourites - the smell of vanilla is just so homely yet heavenly. And today I came across a cooking tip in a baking book which I had borrowed from my mother-in-law. It called for pounding mint with granulated sugar to make minted sugar, which could be sprinkled over fruit such as pineapple. well, I just HAD to try that! (It tastes lovely by itself, too - I couldnt resist trying it out.)

I didnt have any pineapple, but there was this not-quite-ripe mango in my fridge, which I had cut up out of sheer impatience and then regretted the haste, because it was a fair bit more sour than it was sweet, and also not particularly soft in texture.

So I decided to try my newly minted sugar (to coin a phrase, haha) on it. The mango pieces tasted absolutely wonderful sprinkled with the minted sugar, I must say... the sourness almost but not quite negated by the sugar's sweetness, with the freshness of the pounded mint the last thing to register on the tongue.

Image hosted by Photobucket.com

Then I wondered what it would be like to roast the mango pieces. So I did. They turned out quite nice, and the roasting made the pieces a lot softer. For some reason, it also seemed to take away the sourness. I guess if the mango had been riper and softer, the pieces might have become almost mushy in the oven. But mine were quite hard to start with, so it wasnt a disaster. I waited for the pieces to cool to a mouth-friendly warmth, then sprinkled them with more minted sugar and gobbled 'em ALL up!

I do have to say, though, that though the roasted mangoes tasted nice enough, they're best ripe and unroasted. Especially with mint sugar.

Recipe for: Mangoes with minted sugar

Ingredients:

1 large mango (ripe but not mushy-soft), cut into inch-size pieces (de-skinned if the skin is bitter)
2 tbsp granulated sugar
10-15 large fresh leaves of peppermint, spearmint and/or plain mint (I used a mix of all three)

Method:

Pound the sugar and mint in a mortar-and-pestle until the leaves are well broken up and incorporated with the sugar.

Sprinkle over the cut mango pieces in a bowl, give the pieces a good shake to distribute the mint sugar evenly, and serve.