skip to main |
skip to sidebar
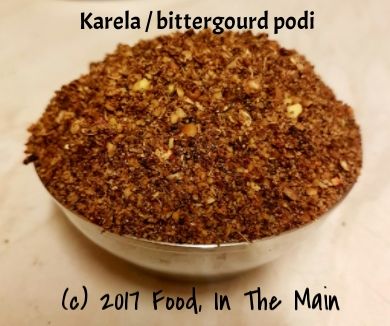
I may have mentioned once or twice or a few dozen times that, or the first 30 or so years of my life, I hated parakkai (also known as pavakkai, karela, bittermelon or bittergourd - or, if you're my husband, as "green rats"). If you're a karela lover, today's recipe will be right up your street. If you're not a karela lover, this recipe will still be quite a way up your street because you will not taste the bitterness from the vegetable at all.
If you know your karela at all, you would think it's hard to mask the bitterness, but because everything is roasted and there are lots of other ingredients, the resultant powder has no discernible bitterness. At least, none that I could taste. And I didn't even peel the skin or discard the seeds (although if they're red and hard, DO scoop them out and discard) or salt the cut bittergourd to reduce the bitterness. Because I'm lazy and that's the way I roll, baby.
I ate this mixed with rice and ghee, I ate it sprinkled over roasted vegetables, I ate it as a side with kootu and roti, I ate it mixed with yogurt both as a dip and as a salad dressing - it's my most favourite thing at the moment, and it seems to work with everything.
Best of all, since the karela is oven roasted with only a mimimal amount of oil, it's a healthy podi. There are versions where the vegetable is deep fried until crisp, but - while I love deep fried foods with a deep and abiding love - I see no need to load this podi with unnecessary calories.
Recipe for: Bittergourd / pavakkai / karela podi
Ingredients:
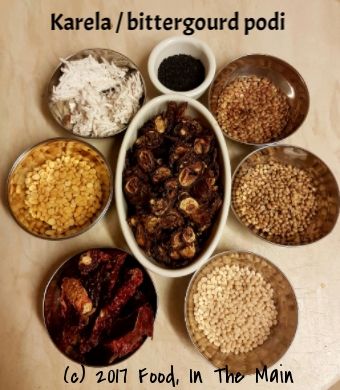
3-4 medium size tender karela
10 dried red Kashmiri chillies
2 tbsp coriander seeds
2 tbsp whole urad dal
2 tbsp chana dal
2 tbsp kollu or horsegram
2 tbsp fresh or frozen grated unsweetened coconut
1 tbsp black sesame seeds (regular will probably also do)
Handful of curry leaves (fresh or frozen)
2-3 cloves of garlic, halved
1 small gooseberry sized ball of tamarind (seeds and strings removed if any)
1/2 tsp asafoetida powder
1/2 tsp + 1 tbsp oil
Salt to taste (or about 1.5 tsp)
Method:
1. Thinly slice the karela, mix with 1 tbsp oil and roast in a 180C/350F oven until the slices are brown with very little green showing. This should take about 30 minutes, but be sure to stir them around every 10 minutes so that they crisp evenly. Let them cool completely.
2. Heat the oil in a wok and add the red chillies. Roast on a medium-low flame, stirring often until the chillies turn a darker shade, about 5 minutes. Be careful not to burn them or you'll regret the fumes! Remove to a plate and cool.
3. Add the coriander seeds, the sesame seeds and all the dals. Dry roast them, stirring often, until they are toasted and fragrant, and turn a darker shade. Again, don't burn them or the podi will taste bitter. Add to the roasted chillies and let cool.
4. Finally, add the coconut, curry leaves, garlic and tamarind and toast in the pan, stirring frequently, until the coconut has turned golden brown and has no more moisture in it - yet again, be careful not to burn it.
5. Once all the ingredients are cool, grind them into a slightly coarse powder. Add salt and asafoetida powder and mix well. Store in an airtight container.
This post has been languishing since Christmas 2016, and I think it's time it saw the light of day.
For Christmas lunch, I made roast chicken for Pete (and Pete alone, as the sole non-vegetarian). The rest of the menu consisted of a large tray of roasted vegetables with lots of roasted garlic, cauliflower cheese, pulao, dal, rmint and cauliflower parathas, rasam, yogurt rice and plain rice. And boondi raita.
There were three desserts - gulab jamun cheesecake brought by a friend, cranberry and orange pies made by my sister (spectacular with cream) and this pudding pie that I made. With two non-ovo people in the family (my mother doesn't eat eggs, and my older niece is allergic to eggs so ditto), I wanted to make a dessert that everyone could eat. It had to be chocolate flavoured on request from my sister-in-law because she is a chocolate fiend and will eat practically anything if it has chocolate in it. As an added bonus, my niece is almost as crazy about chocolate. The icing on the cake (in a matter of speaking, that is) was that my niece's best friend ... but you know what I was going to say, right?
So chocolate pudding it was, a non-baked version made with cornflour. To be absolutely honest, I didn't care for it much - I can take or leave chocolate, and I don't really like moussey desserts. It's the texture of mousse that puts me off, mostly.
Anyway, everybody who mattered liked it, and that's all I wanted. Be warned though, this pudding pie doesn't keep well, even refrigerated.
(As for me, I had no room for dessert, but I did have cranberry-orange pie for breakfast the next morning.)
Recipe for: Chocolate pudding pie
Ingredients:
1 9-inch pie crust, readymade or prepared at home
3 cups whole milk (almond milk if you want it to be vegan)
1/4 cup cornflour
1/3 cup sugar
3 tbsp cocoa powder
3 tbsp chocolate chips (semi-sweet if you have it)
1 tsp vanilla extract
pinch of sea salt
Method:
1. Whisk together the cornflour and one cup of the milk to a smooth mixture in a medium saucepan. Then add the remaining milk and cocoa powder, the sugar and the salt. (Note: The cocoa powder will not combine with the milk until you start to whisk the mixture over heat.)
2. Bring the mixture to a boil over medium heat, whisking occasionally. Once it comes to a boil, lower the heat and keep it to a slow rolling boil, whisking constantly until it thickens, about 5 minutes or so.
3. Take the pan off the heat and add the chocolate chips and vanilla, stirring until the chips have dissolved. Pour the filling into the pie shell and let it cool for about 3 minutes, then place a sheet of non-stick paper over the top to form a skin from forming. After 10 minutes, put the pie in the refrigerator and leave it there for a minimum of 3 hours.
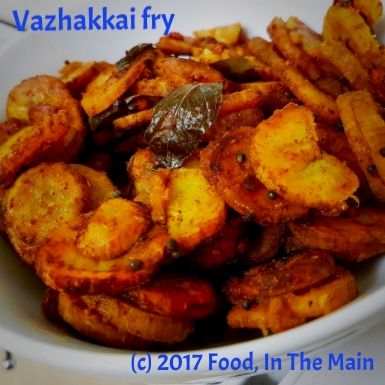
My entire family likes this vegetable, but my sister and I, we're "lattoo" (Hindi slang for "crazy") when it comes to vazhakkai. If we were asked to eat it every day for a year, we would probably beg to have it twice a day! The recipe below is how my mother makes it, and I see no reason to mess with something that I think is perfect. The flavour that the coconut oil gives this vegetable is unbelievable. The two just go together, no question.
That said, if when I get my hands on vazhakkai again, I hope to make a recipe that I've had in my folder for literally years, involving fresh mustard paste. You would think I could hold back at least one vazhakkai for the mustardy recipe... but no. I haven't yet made it because each time I end up making this same one. This dry fry with my mother's thengai kuzhambu (South Indian coconut-and-fenugreek-seed gravy)and steamed rice - I couldn't want for more!
Recipe for: Vazhakkai fry
Ingredients:
3 green (raw) bananas
2 tbsp coconut oil
A few fresh/frozen curry leaves (optional)
1/4 tsp turmeric powder
1/8 tsp asafoetida powder (optional)
1/2 tsp urad dal
1 tsp mustard seeds
1/4 tsp black pepper powder
Red chilli powder to taste
Salt to taste
1 tsp tamarind paste
Method:
1. Wear disposable gloves or grease your hands with oil before peeling the bananas as the sap will otherwise stick to your hands. Make sure to get all the thick green skin off the bananas.
2. Slice the bananas into even slices about 1/4cm thick and put them in a saucepan of water. The water should be enough to cover the slices generously. Dissolve the tamarind paste and turmeric powder in the water.
3. Parboil the sliced bananas, then place in a colander to drain off the cooking water. Handle carefully so that the slices don't break up too much.
4. Heat the coconut oil in a wide saucepan, then add the mustard seeds, curry leaves and urad dal. Cover and let the seeds splutter. The urad dal should be golden by now.
5. Now add the chilli powder and black pepper powder, stir it for 20 seconds, then add the parboiled banana slices along with salt to taste. Stir carefully to coat the slices evenly.
6. Cover the pan and let the slices roast for 8-10 minutes on a medium heat, until the slices turn golden and are fully cooked. Turn the slices carefully over and let them roast for about 5 minutes more. Serve hot as a side with rice, rasam or sambar and any South Indian "gravy" like moar kuzhambu, vattha kuzhambu or thengai kuzhambu (recipes for all these are on my blog).

