Cookies are not my thing. I might have tried baking cookies maybe a scant 2 dozen times in the last 10 years (or since I started cooking, anyway). Not always successfully, I might add. There aren't many biscuits that have come out well, except for the multiple batches of ginger biscuits that I baked last Christmas, much to Pete's satisfaction. Pete loves ginger biscuits, but not really any others. As for me, I'm no cookie monster!
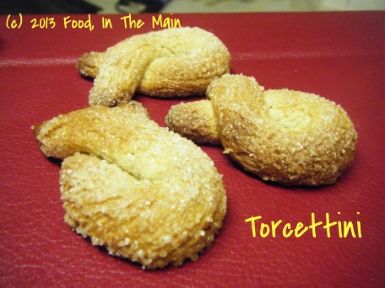
Anyway - these yeasted cookies were pretty easy to make. Like most everyone else, we both liked the sugar crust and the caramelised underside of the cookies. They were different from anything I've had before, that's for certain!
And one more thing - I'm glad I've managed to post this recipe before the end of April. I missed the publish date of 24th April because of a combination of circumstances, the most distressing one being a bereavement in the family. Still... it's a part of the cycle of life, I suppose, and life being what it is, it must go on. So... onward to May's challenge!
Ingredients:
1/2 cup warm water
1-1/4 tsp active dry yeast (or 1 tsp instant yeast)
1-1/2 cups all-purpose flour
1/4 tsp salt
1 tsp lime/lemon zest or 1 tsp crushed anise seeds
2-1/2 tbsp unsalted butter, cold and cut into small pieces
about 1/3 cup granulated sugar for rolling the cookies
Method:
1. Dissolve the yeast in the warm water, in a small bowl and keep aside.
2. Put the flour and the salt in a large bowl and stir everything together. Add the butter pieces and pulse until the butter is well mixed and the flour-butter mixture looks powdery.
3. Add the yeast-water mixture and knead just till it all comes together as a ball. Place the ball of dough in a oiled bowl, turning it so it is well coated with the oil. Cover the bowl, and let the dough rise. This dough does not really double in volume, but it should look “puffy” after about an hour or so. When you pinch off a bit from the top you can see the interior looking a bit like honeycomb. Press down the dough to deflate it, wrap it in cling wrap and refrigerate it for at least one hour or up to 24 hours.
4. When ready to make the cookies, take the dough out and lightly roll it out into an approximately 6” square. If the dough feels sticky, scatter a little sugar on it. Using a pizza wheel cut the dough into four strips of equal width. Cut each strip into 6 equal pieces, by cutting across, making a total of 24 pieces. The measurements are not very critical in this part because this just makes it easier to have 24 equal sized bits of dough, as compared to pinching of bits of the dough.
5. Roll each piece into a pencil thick “rope” about 5” long. Sprinkle a little sugar on your work surface and roll the “rope” in it so the sugar crusts the dough uniformly. Form the “rope” into a loop crossing it over before the ends.
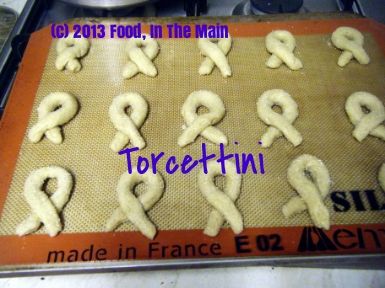
6. Place the Torcettini on parchment lined baking sheets, leaving 1-1/2" between them. Leave them for about 20 minutes or so till they rise/ puff up slightly. They will not “puff up” much, like bread, but the “puff” will be visible.
7. Bake them at 160C (325F) for about 25 minutes till they’re a nice golden brown.

Cool the cookies completely, on a rack. Store them in an air-tight container at room temperature.