skip to main |
skip to sidebar
Tell you what, I'm really enjoying baking bread. I can say quite definitively that I'm no longer afraid of working with yeast - instant or fresh. I've actually got into the rhythm of baking two loaves of bread (sometimes three) pretty much every other Saturday. They're mostly a mix of white and wholewheat bread for everyday use, and sometimes I bake a third loaf which might be a flavoured one, to go with soups and suchlike.
The bread loaves get sliced - and I'm getting pretty good at cutting even, thin slices, even if I do say so myself - divided into half-loaves and fed to the freezer, stored in bags labelled with the date of baking. That way I get to rotate recycle use up the bread, oldest ones first. Yep, I'm THAT organised. It's kind of disconcerting, even to me. Or especially to me, because only I know just how alien this behaviour is to me.
Now that you've all been made aware of my weekend baking activities and the resulting follow-ons - which information I'm sure has been of great interest, by the way - let's get to the sundried tomato and roasted garlic bread that is today's recipe. By rights it should have been posted two months back, because that's about when I made it... but never mind that. The bread is really nice with soup, but I was happy to eat it by itself, with no adornments, because it was that tasty. Can't say better than that, can I?
By the way, if you don't like a strong garlic flavour, use less of the roasted garlic paste... and if your thing is to wilt every living thing within a 10-metre radius with your breath, by all means use MORE garlic paste, as much as you want. At least Dracula won't get you.
Recipe for: Sundried tomato and roasted garlic bread

Ingredients:
3-1/2 cups (15 oz) strong white bread flour
2-3 tbsp olive or other oil of choice
2 tbsp double concentrated tomato paste
1 tbsp roasted garlic, roughly mashed
1/4 cup chopped sundried tomatoes in oil (but leave out the oil)
1 htsp salt
About 300 ml warm water
1/2 tbsp instant yeast
Method:
1. Place the flour in a deep bowl and mix in the instant yeast and salt.
2. Then add the roasted garlic, tomato paste, and chopped sundried tomatoes
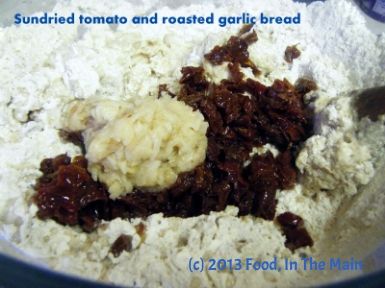
along with 250 ml of the warm water and mix together till the flour begins to form a rough dough. Cover and let it rest for 10 minutes to absorb the water.
3. Now knead again, adding as much of the remaining 50ml water as required, to make a dough that is not exactly sloppy but also not hard or dry either.
4. Pour 1 tbsp olive oil on your worktop (make sure your worktop is clean first!) or kneading board and spread it around a bit. Turn the dough out onto the oil and start kneading, pushing the dough away from you with the heel of your hand, turning it a quarter, then repeating the pushing/turning movement. Add more oil to the worktop if the dough starts sticking again, and continue kneading. Occasionally scrape your hand clean of dough.
5. After about 8-10 minutes, the dough should be elastic and only a little tacky. Now grease a large bowl (I use Pam spray, but you can use more oil if you like) and place the dough in it, turning it around to completely coat it in the oil. Cover the bowl and place in a warm place for the dough to rise and more or less double in volume. This can take between 1-2 hours, or even longer - there's no way to accurately predict how long it might take, so I can't give you a precise time.
6. Once the dough is risen, punch it back down. Sprinkle a couple of tbsp extra flour on your workspace and put the dough on it. Shape it into a round ball, place on a baking tray (flour the top of the dough lightly if you like) and cover with a clean tea-towel. Let the dough rise again for 45 min to an hour. Use a sharp knife to slash a 1-cm deep cross into the top.
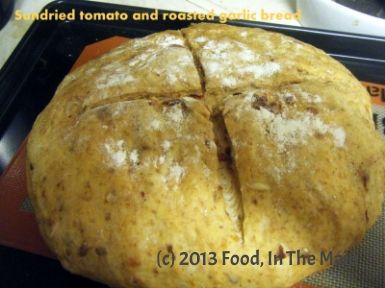
7. Preheat your oven to 180C/350F and put the dough in to bake. Let it bake for 25-30 minutes - the top should be a nice golden brown and the bottom should sound hollow when tapped.
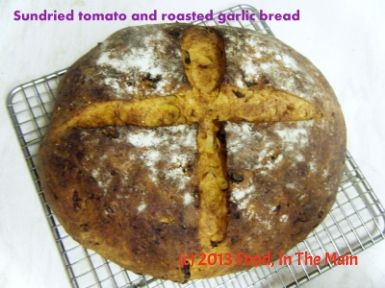
Remove the loaf to a wire cooling rack and let cool completely. Serve sliced, with soup.
(Adapted from King Arthur Flour)
First off, I have to apologise for the delay in posting my version of this month's challenge - actually, last month's, now. In my defence, my laptop was on a dreadful go-slow, and on top of that, the Internet connection at home was unavailable all of last week as we'd changed over from AOL to BT... and the engineer from BT could only come last Friday to actually install whatever he needed to install for us to go online. So now we have a superfast connection... but my laptop has not received the memo yet, methinks. It's extremely frustrating to work on photographs when it takes 5 minutes to save every change that's made. But this post had to be published, and I didn't want to risk being thrown out of this group for a perceived lack of participation. (I but jest, I know Aparna is very forgiving!)
Anyway, those of you who are still dropping by my blog might be wondering who's been writing my posts for me. I wonder that myself, because the last few posts show every sign of having been dashed off by someone who didn't know how to write, who didn't want to write in the first place and who had a dozen different distractions. That was me. Distracted and reluctant. And it showed in my writing - hastily done for the sake of doing it, not because I was enjoying the process. I'm still in the reluctant phase, so this probably isn't going to be a long post. I just wanted to make my excuses for the quality of my posts lately. I know I can do better, and I probably eventually will.
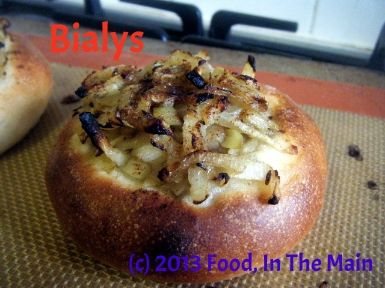
On to the bialys. I've made them twice - they're pretty easy to make, but the reason I made them the second time is because the onion filling got burnt practically to cinders. My first mistake was to cook the onions for too long on the hob, and my second mistake was to leave the overcooked onions to cool in the frying pan itself. That was a rookie mistake, really. So the already overcooked onion simply got incinerated when they spent 20 minutes in a 230C oven. The bialys tasted great, so Pete and I ate the bready part after I'd chiselled off the charred onions.
This anecdote is merely to emphasise that it's very important to cook the onions till just soft and no more. And remove the cooked onions to a bowl where they can cool.
The second batch of bialys was spectacularly tasty. You can add chopped, cooked smoked bacon to the onion mix for the non-vegetarians, like I did. Believe me, those bacon bialys just vanished.
Recipe for: Bialys
Ingredients:
For the dough:
1 teaspoon instant yeast
1 tbsp sugar
1 1/4 cup warm water
3 cups all-purpose flour (use bread flour if you can find it or all-purpose flour + 1 tbsp vital wheat gluten)
1 tsp salt
Milk for brushing the dough
For the Onion Filling:
1 tbsp oil
3 medium onions, finely chopped
1 1/2 tsp cumin seeds
3/4 tsp garam masala
Salt to taste
Method:
1. Make the dough first. Put the yeast, sugar, salt and flour in a large bowl. Mix well and then add the warm water in a steady stream. Knead until the dough comes together as a mass and then let the dough rest for 10 minutes. This will help the dough absorb water. Knead again, adding a little more water or flour (not too much) if you need it, until your dough is smooth and elastic but not sticky.
2. Shape tre dough into a ball and put it in a well-oiled bowl, turning the dough till it is well coated. Cover and let it rise till about double. This should take about 2 hours. If you’re not making the bialys right away, you can refrigerate the dough overnight at this point. When ready to make them, keep the dough at room temperature for about half an hour and then proceed with the rest of the recipe.
3. In the meantime, make the filling. Heat the oil in a pan, and add the cumin seeds. When the crackle, add the onions, and sauté over low to medium heat. Sprinkle a little salt and continue sautéing until they become soft and turn golden brown in colour. Add the garam masala and stir well. Keep the caramelised onions aside to cool.
4. Sprinkle your work surface lightly with flour and place the dough on it. Divide it into 8 equal pieces and shape each one into a roll by flattening it and then pinching the ends together to form a smooth ball. Place the rolls on a lightly greased baking sheet and cover them with a towel. Let them rise for about one hour (about 1 1/2 to 2 hours for refrigerated dough) till pressing with a finger on the top leaves a dent.
5. Work on one piece at a time, while you keep the others covered so they don’t dry out. When the rolls are ready, pick them up one at a time and using your fingers, form the depression in the middle. Hold the roll like a steering wheel with your thumbs in the middle and your fingers around the edges. Pinch the dough between your thumb and fingers, rotating as you go and gradually making the depression wider without actually poking a hole through.
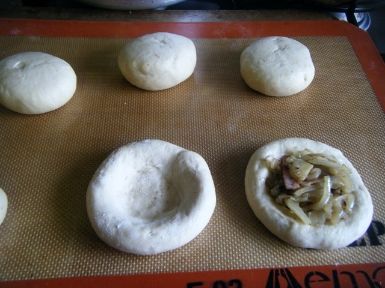
6. Remember not to press on the edges, or they will flatten out. Once shaped, you should have a depression about 3” in diameter with 1” of puffy dough around the edge, so your Bialy should be about 4” to 5” in diameter. Prick the centre of the bialys with a fork so the centre doesn’t rise when baking.
7. Place the shaped dough on a parchment lined (or greased) baking tray leaving about 2 inches space between them. Place the caramelised onion filling in the depressions of each Bialy. Brush the outer dough circle with milk. Bake the bialys at 230C (450F) for about 15 minutes till they’re golden brown in colour.

Cool them on a rack. Serve slightly warm or at room temperature.

