skip to main |
skip to sidebar
 This is a wonderful recipe for green beans. I made it for Pete with the idea that it would make a nice side dish to go with his prawn stir-fry (that I cooked, but the recipe for that doesn't feature here because this is a vegetarian - well, eggitarian - blog), but in the event, he only got the smallest taste of it, because I scarfed most of it myself.
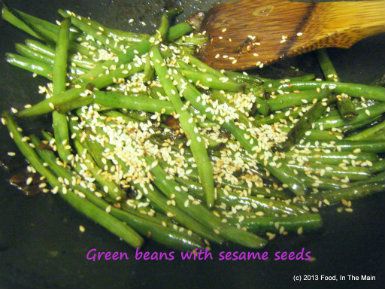
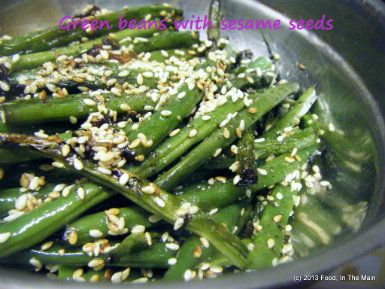
I may have mentioned in previous posts about my love for tender fresh green beans. For someone who can eat a large bowl of plain boiled green beans, sometimes lightly salted, sometimes tossed with good olive oil and sea salt, or in any number of gorgeous Indian ways... this recipe, with its salty umami sesame seed-y garlicky flavours, was just too good to resist. Pete's not crazy about green beans (they're GREEN, man, they're VEGETABLE-Y!) but he made a pretty good effort at taking them away from me. Too bad for him that nobody - nobody! - gets between me and my green beans. Not even Pete. Try this and see if you don't feel the same way about them.
Recipe for: Green beans with sesame seeds
Ingredients:
1/4 kg (250gm) green beans, topped and tailed
1 tsp peanut/vegetable oil
1 tbsp sesame oil
1-2 tbsp soy sauce
1 fat clove garlic, thinly sliced
1 tablespoon sesame seeds
Method:
1. Place the green beans in a saucepan and pour boiling water over to cover, then continue to cook them over high heat for 3-4 minutes till parboiled. Drain the water and reserve the green beans (you can use the cooking water for making soup with, or to make chapati dough).
2. Toast the sesame seeds in a little pan until they puff up and start turning colour. They may pop all over the place while toasting, so if you have a splatter shield, use it. Reserve the toasted seeds.
3. Heat a large pan or wok over medium heat. Pour in the peanut/vegetable oil and add the sliced garlic, cook for about a minute on medium heat, but don't let it brown.
4. Toss in the parboiled green beans and sesame oil. Stir the beans to coat with oil.
5. Cook for about 5 minutes, then add soy sauce and stir frequently on high heat for about 5 minutes.
6. Stir in toasted sesame seeds and serve immediately. This is very good as a side with Chinese-style meals. Or just eat as a snack.
I recently read a book called "The Secret Supper Club" by Dana Bate, which was about this woman who worked as a research assistant, but whose dream was to become a cook - or chef, I suppose (which is really just a posh word for "cook"). It was a good if light read, just what I'd wanted at that point.

I'm not really going to do a book review, but I had to mention the book because there were a few recipes at the end, of things that she'd made for her secret supper club guests, and the first of them was a recipe for deviled eggs. The rest of the recipes I was not interested in because they were rather too elaborately non-vegetarian. But this one seemed doable, so I did.
I made a couple of minor changes, but mostly this recipe is as the book had it. The filling turned out to be much more lemon-sharp than I'd anticipated, and I think it's because I used perhaps a tablespoon's worth of lemon juice rather than the 1/2 tsp called for. It wasn't really a huge mistake for us, in any case, because Pete and I both love the sourness.
Recipe for:
Curried devils (deviled eggs)

Ingredients:
8 large eggs
1/4 cup mayonnaise
1 tsp Dijon mustard
1/2 tsp medium or mild curry powder (or use 1/4 tsp garam masala)
1/2 tsp lemon juice
1 tbsp finely chopped fresh chives
1/4 tsp smoked hot paprika/cayenne pepper
Kosher salt & freshly milled black pepper, to taste
1/2 tsp sweet paprika for garnish
Method:
1. Place the eggs carefully in a large saucepan and fill with cold water to come up to 1" above the eggs.
2. Bring to a bubbling boil, then turn the heat off, cover the pan and leave for exactly 14 minutes.
3. Then drain off the water and fill the pan again with very cold water, to stop the eggs cooking any further. Set aside for 10 minutes, then peel the eggs and slice them in half vertically.
4. Remove the yolks to a small bowl. Mash them smooth with a fork, then add the mayonnaise, Dijon mustard, curry powder/garam masala, lemon juice, chives and hot paprika and mix thoroughly. Taste the mixture, adding a bit more of whatever you feel is lacking. Add salt (careful with this as the mayonnaise will already have salt) and pepper to taste and mix one final time.
5. Spoon the egg yolk mixture into a sealable sandwich bag or Ziploc bag (or use a disposable pastry bag) piling the filling as far as possible into one corner. Snip off the corner of the bag with scissors, then pipe the mixture into the egg whites. Sprinkle with a little sweet paprika to garnish, and serve at room temperature or cold.
Note: If you have any mixture left over (and going by my experience, you will), use it in a sandwich, or as a spread on toast. You can store the unused mixture in a sealed container in the refrigerator for a day.
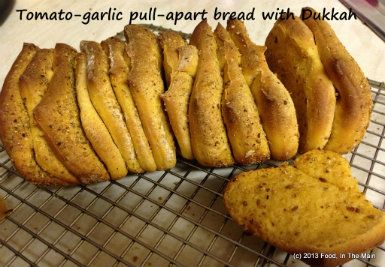
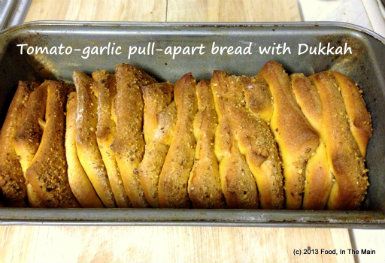
I just wanted to try the pull-apart recipe again, to see if I could manage the miraculous "second rising" of the bread dough. I started this before I checked to see if I had any cheese - and sure enough, when I did get around to checking the fridge, there was no cheese - no, not even a bog-standard Cheddar *sigh*. I couldn't go out to get cheese because of all the snow (it's been snowing all day) and because I didn't want to venture out into the freezing cold.
This should have been a CHEESY bread... ideally I was hoping to use feta, as a Mediterranean cheese to go with the somewhat Mediterraneanish Dukkah (Sainsbury's finest version, I'll have you know).
(Ok, yeah, I know Dukkah is Egyptian, but it's kinda sorta close to Mediterranean cuisine, no? Work with me here, people... I suppose you could say that Dukkah and feta are about as compatible as Dukkah and cheddar - but that's for YOU to say. I say different.)
Anyway... I halved the quantity of ingredients in the original recipe because I'm back home and there are fewer than half the people that were there when I made my first attempt in Seattle earlier this month. I'm glad to say that, on the plus side, the second rising in my second attempt was successful. Unfortunately, while I turned the former negative into a present positive, a couple of other negatives arose in the present version - one being, as mentioned earlier, a lack of cheese; the second being that the tomato flavour was at best only mild. I guess 1 tbsp of concentrated tomato paste was not enough even though the ingredients were halved. Next time I'd probably double the amount of paste and use finely chopped sun-dried tomatoes in oil too.
Oh well, live and learn.
The bread, by the way, was good, but it would have been better with cheese (a friend of mine at work insists that most things are better with cheese).
Recipe for: Tomato-garlic pull-apart bread with dukkah
 Ingredients:
For the Dough
1/4 cup warm milk
1/2 tsp sugar
1 tsp active dry yeast
1.5 cups bread flour (+ a couple of tbsp more for dusting if necessary)
1/2 tsp salt
1 tbsp butter, soft at room temperature
1 tbsp concentrated tomato paste
2 fat cloves garlic, grated (use only 1 clove or 1/2 tsp garlic paste if you want a milder flavour)1/3 cup milk
1 tbsp milk for brushing
For the Filling
1 tbsp melted butter
2 tsp Dukkah (I pounded it with a mortar and pestle to make it more uniformly sized)
Method:
1. In a small bowl, dissolve the sugar and the yeast in the 1/4 cup of warm milk. Keep aside for about 5 minutes till the yeast mixture bubbles up.
2. Put 1.5 cup of flour, salt, softened butter, and grated garlic in a large bowl and mix. Then add the yeast mixture and most of the 1/3 cup of milk and mix together. If there is more than a tbsp of flour that keeps dropping off from the dough (i.e, it isn't coming together) and the dough itself seems dry, add the remainder of the milk and knead it in.
Transfer the dough to a non-stick mat (lightly flour your kneading area if it is not non-stick) and knead away till you have a soft, smooth and elastic/ pliable dough which is not sticky (about 10 minutes of energetic kneading). Add a little extra flour if your dough is sticking, but only just as much as is necessary.
3. Shape the dough into a ball and place it in a well-oiled bowl, turning the dough to coat it completely with oil. Cover and let it rise for about 1 to 1 1/2 hours or until almost doubled in volume.
4. Dust your work surface lightly with flour. Deflate the dough, shape it into a square and roll the dough out into a square that is about 8" by 8". Brush the surface of the square with the melted butter.
5. Evenly sprinkle the Dukkah mix. Use a rolling pin to very lightly press the topping into the dough to ensure the topping doesn’t fall off when you are stacking the strips.
6. Using a pizza cutter, slice the dough from top to bottom into 4 long and even strips – they do not have to be perfect. Lay each strip on top of the next, with the topping facing upwards, until you have a stack of the strips. You can put the 2 strips cut from the sides in the middle of the stack so it looks neater. Using a pastry scraper or a sharp knife, cut straight down through the stack dividing it into 3 or 4 equal pieces.
7. Grease and lightly flour a small loaf tin that will fit the pieces comfortably (or any other baking container you like). Layer the slices, cut sides down into the loaf tin. Cover the loaf tin dough with a towel and allow the dough to rise for an hour. Lightly brush some milk over the top of the loaf.
8. Bake the dough at 180C (350F) for about 25-30 minutes (but check from 25 minutes, as every oven differs in its performance) until it is done and the top is golden brown, and the bread sounds hollow when tapped on the bottom.
9. Serve hot with soup.
 This is the first challenge of the monthly baking event started by Aparna Balasubramaniam of My Diverse Kitchen - she of the gorgeous photos and amazing baking ability in particular and lovely recipes in general. When I signed up to join the group, I happened to be in the States, visiting my family in Seattle. It was the perfect opportunity to try the recipe for pull-apart bread, especially as I'd kinda sorta earmarked it for making (at some unspecified point) when I'd seen the original photo on the Huffington Post's selection of photos of pull-apart breads.
The other point was, of course, that there were lots of people at home who would help demolish the bread... whereas at home in Shrewsbury, there's usually just me and Pete. It's difficult to invite people over when you can't be sure that you can provide something edible - I'm a million miles from being the world's best baker, that's the problem.
Happily, family don't fall into the worrisome category, so I was quite pleased to make them my guinea pigs as far as this bread was concerned. As it happened, the dough didn't rise as much as it should have, or as evenly. And since the oven was unfamiliar to me, I didn't really know anything thing about its particular quirks - its hot spots, or cold spots, etc.
But - and this is important - the bread turned out beautifully golden and really tasty with the mushroom-vegetable soup that I'd made.
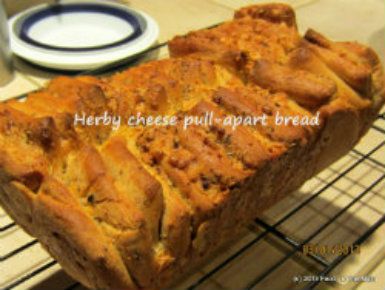
The aroma as it was baking nearly drove us mad, and there was nothing to do but tear into it the moment it came out of the oven! Granted, the texture of the bread was a bit dense, but I don't think anybody cared.
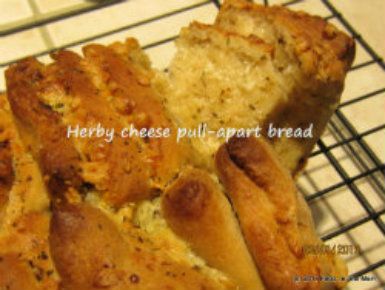
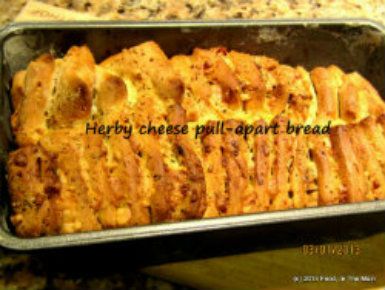
I changed the original recipe just a tad - I used Pepperjack cheese on request from my sister, instead of cheddar, and I used an Italian herb mix, because that's what I had. I hope to make this bread again, with slightly different toppings. If I do, I'll definitely post it here. But for now, here's my tear-and-share bread.
Recipe for: Herby cheese pull-apart bread
Ingredients:
For the Dough
1/2 cup warm milk
1 tsp sugar
2 tsp active dry yeast
2-3/4 - 3 cups all-purpose flour
1 tsp salt
25gm butter, soft at room temperature
3/4 to 1 tsp garlic paste
3/4 cup milk (+ a couple of tbsp to brush over the bread)
For the Filling:
15 to 20gm melted butter
2 tsp dried Italian-style herb mix
1 tsp crushed cumin seeds
1/2 cup grated Pepperjack cheese
Method:
1. In a small bowl, dissolve the sugar and the yeast in the 1/2 cup of warm milk. Keep aside for about 5 minutes till the yeast mixture bubbles up.
2. Put 2 3/4 cup of flour, salt, softened butter, and garlic paste in a large bowl and mix. Then add the yeast mixture and the 3/4 cup of milk and knead till you have a soft, smooth and elastic/ pliable dough which is not sticky. Add a little extra flour if your dough is sticking, but only just as much as is necessary.
3. Shape the dough into a ball and place it in a well-oiled bowl, turning the dough to coat it completely with oil. Cover and let it rise for about 1 to 1 1/2 hours or until almost doubled in volume.
4. Dust your work surface lightly with flour. Deflate the dough, shape it into a square and roll the dough out into a larger square that is about 12’ by 12”. Brush the surface of the square with the melted butter.
5. Evenly sprinkle the herbs and the cumin seeds and then the grated cheese. Use a rolling pin to very lightly press the topping into the dough to ensure the topping doesn’t fall off when you are stacking the strips.
6. Using a pizza cutter, slice the dough from top to bottom into 6 long and even strips – they do not have to be perfect. Lay each strip on top of the next, with the topping facing upwards, until you have a stack of the strips. You can put the 2 strips cut from the sides in the middle of the stack so it looks neater. Using a pastry scraper or a sharp knife, cut straight down through the stack dividing it into 6 equal pieces (6 square stacks).
7. Grease and lightly flour a 9” by 4” (or 5”) loaf tin. Layer the square slices, cut sides down into the loaf tin. Cover the loaf tin dough with a towel and allow the dough to rise for an hour. Lightly brush some milk over the top of the loaf.
8. Bake the dough at 180C (350F) for about 30 to 40 minutes until it is done and the top is golden brown.
This recipe bakes one 9” by 5” loaf.
9. Serve hot with any soup.

