skip to main |
skip to sidebar
I've got a glut of recipes to post, but I've just been unable to make myself do anything to put them on my blog. Especially the ones that need more elaborate instructions than I feel like dealing with at the moment. Obviously I'm a dedicated foodie but my blogging muscle sometimes wilts a bit and doesnt want to hold itself up.
So here's a simple recipe, just to ease myself back into the food blogging world. Didnt help that Pete and I made a quick 6-day trip to Seattle last week... it only served to increase my laziness in the blogging department because I felt so utterly enervated. It wasnt a bad week but boy, the travelling to and fro really sapped my energy!
Anyway, I didnt feel like cooking either, yesterday, and Pete only wanted eggs and chips.

So I made the chips from scratch, based vaguely on Aunt Bessie's lightly battered oven chips (which we get here and which are tastier than regular oven chips - and less healthy, goes without saying). Mine is a much simpler version. Also, I didnt make a wet batter for the potatoes, just shook them up with some seasoned gram flour and baked them till golden and done. Pete dipped his wedges into sunny-side up eggs and I had mine with a yogurt dip - that is, I mixed idli podi with yogurt and used that as a dip. It was yummy!
Recipe for: "Dry batter" oven baked potato wedges

5-6 medium red-skin potatoes, washed and cut into wedges
2 generous tbsp gram/chickpea flour
1 tsp red chilli or cayenne powder (adjust to taste)
1/2 tsp coriander powder
1/2 tsp jeera/cumin powder
1/2 tsp freshly milled black pepper powder
Salt to taste
2 tsp oil
Method:
1. Mix the chickpea flour and the various seasonings (bar the salt) together.
2. Put the wedges in a large ziploc bag (or a large dry bowl), pour in the 2 tsp oil, close the bag and shake the potatoes well. Then add the seasoned chickpea flour and shake it all aain until the potatoes are coated as evenly as possible.

3. Spray a shallow baking sheet with Pam or line with silicone paper. Spread the seasoned wedges in a single layer and bake at 200C for 15 minutes.
4. After 15 minutes, pull the sheet out, sprinkle the wedges with salt, stir the wedges about and put back into the oven until golden brown and done.

5. Serve hot, with dips if preferred.
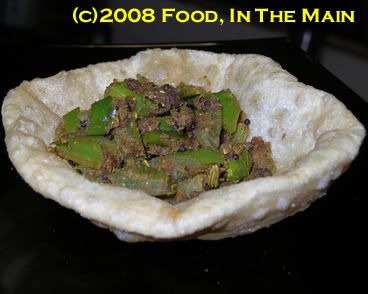
I came across the recipe for taporia/besan mirch on Vyanjanaa by chance, fairly recently, and was hooked. For once I didnt just mark the recipe and sit on it for a few months waiting for my cooking instinct to grow up and become an adult - I acted pretty much rightaway.
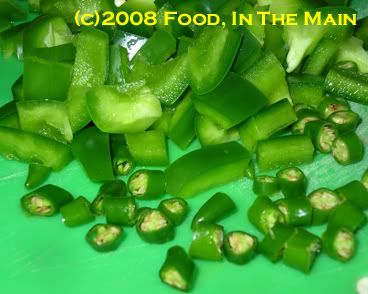
G of Vyanjanaa says to use chillies that arent very hot, but I didnt have any such beasties - my choices were fiery long green chillies or the completely gentle bell peppers. Being too chicken to use just the green chillies for this recipe, I decided to use a combination of the chillies and a green bell pepper which, if I may say so myself, was a Very Good Idea.
For those who are TOTAL wimps, omitting the chillies entirely and using just a green bell pepper will give you at least an idea of the taste of this really simple, quick recipe from Rajasthan.
Other than some more changes to the ingredients - omission of saunf (fennel seed) powder, increasing the quantity of besan, omission of red chilli powder as I know from experience that the green chillies I used are VERY hot - I followed G's cooking instructions to the letter. I have to agree with what she said in her post about this recipe: "simple ingredients, short cooking time and immense flavor and heat". I couldnt have put it better.
PS. G was going to get married in November 2007. Wherever you are, G, congrats and here's hoping that you have a long, happy and successful married life! I hope you'll come back to your food blog at some point.
Recipe for: Taporia with bell pepper
Ingredients:
3 tbsp besan/chickpea flour
5 hot green chillies, chopped into 1/2-cm thick chunks
1 large green bell pepper, de-seeded and cut into 1-cm pieces (about 1 cupful)
2 tbsp oil
1 tsp mustard seeds
1 tsp cumin seeds
1 tsp whole saunf (fennel) seeds
1/4 tsp heeng/asafoetida powder
1 tsp fennel powder
2 tsp coriander powder
2 tsp amchur (dried raw mango) powder
1/2 tsp turmeric powder
Salt to taste
3-4 tbsp water
Method:
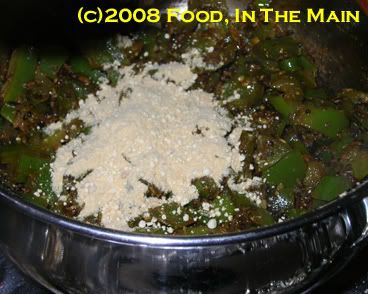
1. Dry-roast the gram flour in a heavy-bottomed pan for 4-5 minutes on medium-low heat, stirring it all the while. You'll be looking for the flour to turn slightly darker in colour - it will also smell nice.
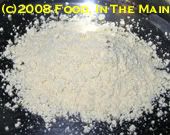 |  |
(Be very careful while roasting because the flour burns VERY quickly. Stir it thoroughly all the time.) Take the pan off the heat when the flour is done, and tip the flour onto a plate to cool.
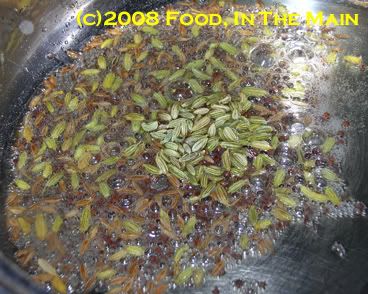
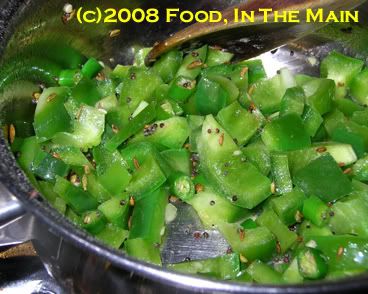
2. In the same pan, heat the oil. Add the mustard seeds, cover, and let the seeds splutter. Then add the cumin and fennel seeds and let them fry for 20 seconds in the hot oil.
3. Add the chopped chillies and bell pepper and stir till the ingredients are well mixed.
4. Now add 2-3 tbsp water,
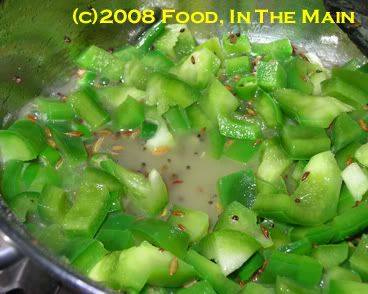
cover the pan, turn the heat back down to medium-low and let the peppers cook for 4-5 minutes.
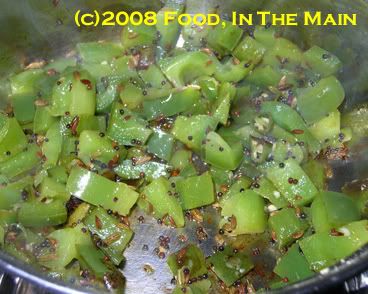
5. Remove the lid and add the various powders now, along with salt to taste. Stir till they are well incorporated with the peppers. (Add another tsp water now if the vegetable looks very dry.)
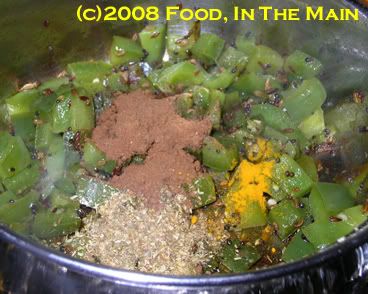
6. After 3 minutes, add the roasted gram flour and stir it in.
It will absorb any excess water in the pan. Keep scraping the bottom of the pan while stirring to dislodge any gram flour that is sticking to it.
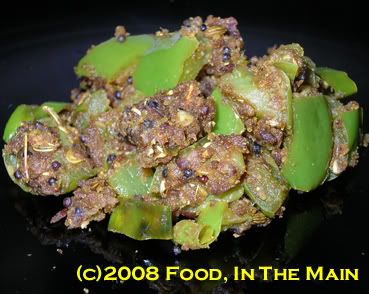
7. After a couple of minutes stirring, serve the taporia hot with chapaties or puris.
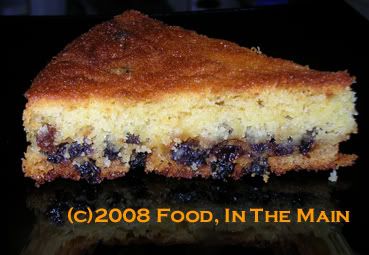
I made this cake for Christmas specially for my mother-in-law, as she couldnt eat the Christmas fruit cake because of her serious nut allergy. She has to be very careful what she eats - and by extension I have to be even more careful when she stays with us, making sure that everything I cook doesnt even have a hint of nuts. The recipe for this cake is from a book called "Cakes and Bakes" which I bought just before Christmas from a discount book store - man I LOVE those places! You can get such great bargains.
Anyway, the book has simple recipes with stunning photos... and this recipe caught my eye because it was different. It was called "Crunchy fruit cake", made with mixed exotic (read: dried pineapple, mango, etc) dried fruit and pine nuts. I fully intended to use the exotic mix because I had a bagful of it. (Had to leave out the pine nuts for obvious reasons.)
Just before I actually added the fruit to the cake mix, I glanced at the ingredient list and below that the allergy advice, not really expecting to see anything other than "dried mango, pineapple, papaya" and so on, and totally expecting it to only contain fruit. What else would you expect in a dried fruit mix, right?
I should have known better, though, because the pack said the contents were not suitable for nut allergy sufferers even though - get this - the recipe contained no nuts, the product was made in a nut-free area, but the contents could not be guaranteed nut-free as nuts might have been used elsewhere in the factory.
ARRRGH!
This is something that most food manufacturers seem to be stating nowadays as a way of covering their backside - just in case some nut allergy sufferer tries to sue them after a bad reaction to their product, I suppose. The thing is, no nut allergy sufferer can afford to take the risk of assuming that the manufacturers are only warning them off as a CYA (Cover Your Ass) procedure. So it makes it really difficult for people to buy ready-made food stuffs, even if it's only dried fruit for a cake!
I was really, really, REALLY glad that I happened to check the ingredients - perhaps there might not have been any nut traces in the dried fruit, but on the other hand, there might have been... and that could very well have been fatal for my mother-in-law. I have nightmares just thinking about what might have been, and I'm even more paranoid now about checking the labels on everything when she's with us, or if I make anything for her.
Anyway, because I couldnt use the exotic dried fruit, I checked to see if any of the regular sultanas or raisins could take their place. Nope. Same stupid warning on those packages as well. Luckily, there was a bag of dried currants which, amazingly, believe it or not, only contained dried currants! *gasp* Talk about Christmas miracles!

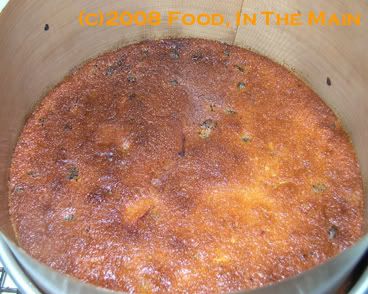
So that's why the fruit cake became a currant cake - and it was a lovely one. The amount of lemon juice used in the recipe gave a sharp flavour to the sweetness of the currants, adding zing to every bite. The currants sank to the bottom of the cake, but that didnt matter one whit, it made a lovely mouthful at the end! (It reminded me of a Famous Five adventure - cant remember which one - in which Dick says that he loves fruit cake where the fruit has all sunk to the bottom, making for a fruity last mouthful. For some reason that stuck in my head - sorry, I just HAD to mention it, irrelevant though it is!)
Pete's mother loved the cake, and so did I. So did Pete. Unfortunately for non-egg-eating folks, I'm afraid this required two eggs. The cake didnt rise much even with the two eggs and 1 tsp baking powder, so I doubt it would be possible to make it eggless. All I can say is, the cake was simple, and lovely! I'm almost tempted to give up Christmas fruitcakes, and I probably would too, but for Pete's howl of distress at the very thought. Did I mention he just lurrves fruitcake?
Recipe for: Polenta currant cake
Ingredients:
5 tbsp butter
1/3 cup + 1 tbsp caster sugar
2 eggs, beaten
4 tbsp self-raising flour
1/2 cup polenta or cornmeal
1 tsp baking powder
1 cup currants
grated rind of one lemon
4 tbsp lemon juice
2 tbsp milk
Method:
1. Preheat oven to 180C/350F. Grease a 7" round cake tin with Pam (or use butter) and line the base with baking parchment.
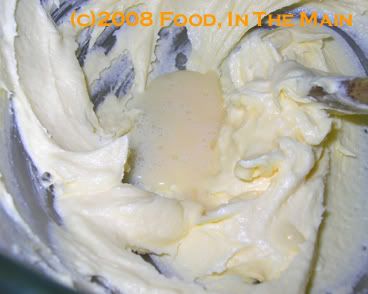
2. Put the butter and sugar in a bowl and whisk together till light and fluffy.
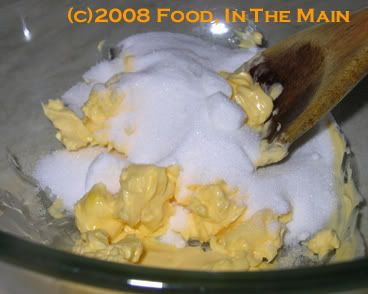
3. Then whisk in the beaten eggs, a little at a time, whisking thoroughly after each addition.
3. Gently fold the flour, baking powder and polenta into the mixture until thoroughly blended.
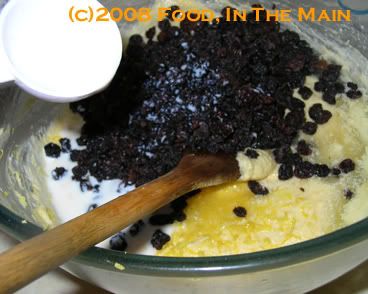
4. Stir in the currants, grated lemon rind, lemon juice and milk.
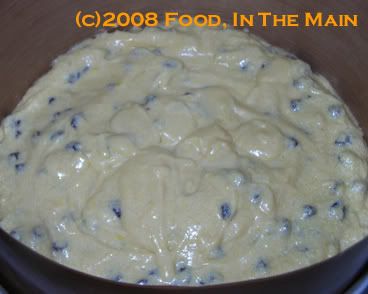
5. Spoon the mixture into the cake tin and level the surface.
6. Bake in a preheated oven until the cake is golden on top, and a fine metal skewer inserted into the centre of the cake comes out clean.
7. Leave the cake to cool in the tin before cutting.
I've never been to the Deep South, but just mention the word "jambalaya" to me, and my imagination immediately finds itself in deepest darkest Louisiana - or as deep and dark as Gonzales is, that is. I dont know what it's like, you see, because while my imagination has set foot in the Jambalaya Capital of the World, my foot has not.
Actually, if ever I DO manage to be there (in person, that is) for the Jambalaya Festival, it would be the most pointless exercise in terms of my ability - or rather, inability - to eat this renowned Creole/Cajun dish... the reason being that I'm 99.99% vegetarian and prefer my food not to have been sentient at any point in its lifetime. I guess I could always savour the experience, if not the food...
Anyway, I decided to make jambalaya at home, as the first dish made on the first day of the new year. I had some vegetarian sausages (made of soya) that Pete had kindly bought for me on an impromptu shopping trip. While on the subject of vegetarian sausages and other meat-replacement attempts, do you know just how difficult it is for non-vegetarians to understand that genuine Indian veggies like me do NOT crave for meat substitutes, whether in texture OR taste? The mock-meats and soya/tofu products are all for former carnivores who miss their carne. It's by turns tiring or boring - sometimes both - trying to explain, and even in these enlightened days, I get the occasional baffled "But what do you eat?" question.
Digression aside, the jambalaya recipe that served as the basis of my inspiration was Jag's, posted on his blog, Route 79. Jag's recipes are painstakingly photographed and captioned and believe me, I go there sometimes just to read his recipes and drool a little. (Ok, drool a lot. Dammit, this honesty thing is overrated.) As far as I'm concerned, everything vegetarian he has on his blog is on the list of "my favourite foods", all of them crowding for first position.
I say that Jag's recipe is the basis of mine because I had to make some substitutions and omissions for the usual reasons. For instance, I didnt have celery (mainly because I dont like it!), so I used a little 21-seasoning mix that's strong on celery seed, as a substitute. I didnt use chicken or prawns or chorizo sausage either. What I followed were the actual cooking instructions from Jag's recipe. A good thing too, because the rice was cooked to perfection. Not dry, not mushy, not clumpy - just perfect.
Recipe for: Jambalaya
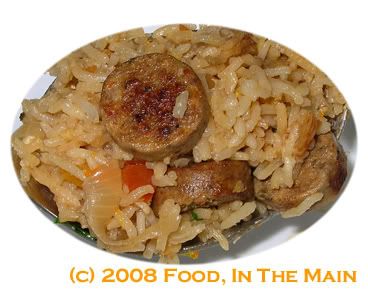
Ingredients:
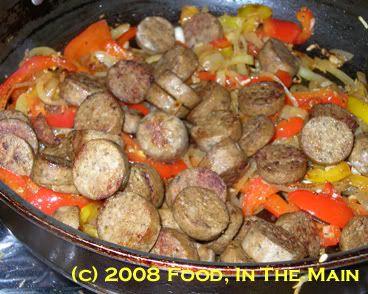
1 cup vegetarian sausages cut into 1-cm rounds
2 medium onions, sliced into long thin pieces
1 large green (or any other colour) bell pepper, sliced long and thin
1/2 tsp celery seed (or use 1 celery stick, sliced thin)
1" piece ginger, grated
3 cloves of garlic, chopped or grated
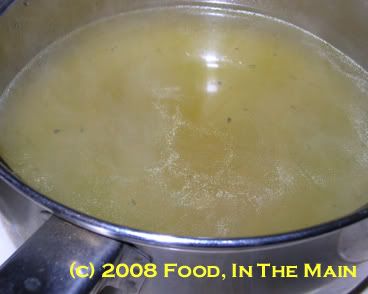
1 chicken or vegetable stock cube
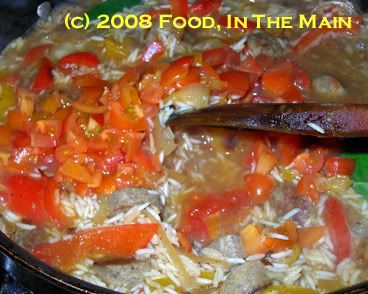
2 medium tomatoes, finely chopped
2 tbsp periperi, tabasco, habanero or any other spicy sauce (or as per taste)
2 cups basmati rice, washed and drained
4 cups boiling water
2 tbsp oil
2 bay leaves
1 tbsp chopped flat-leaf parsley
2 tbsp chopped spring onions for garnish
Method:
1. Prepare the stock using the stock cube and the 4 cups of boiling water. Stir in whichever spicy sauce you're using. Reserve.
2. Pour 1 tsp oil in a large pan (make sure it's one with a lid that fits correctly) and fry the "sausage" pieces, stirring often, till golden.
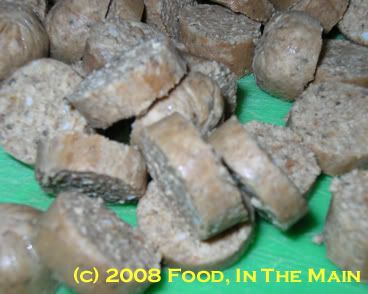
Remove from the pan and reserve.

3. Now pour the remaining oil into the pan and add the onions.
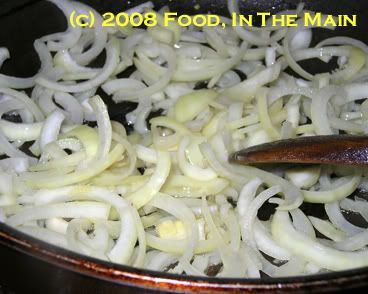
4. When they start softening slightly, add the sliced bell peppers.
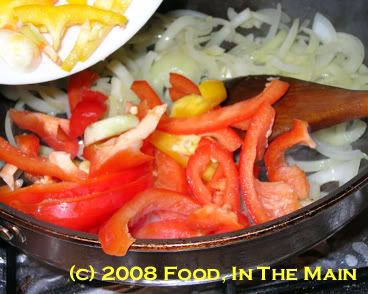
5. Turn the heat up to high and stir fry till the onions and peppers begin to acquire brown edges.
6. Now add the chopped garlic and ginger and stir fry for a minute or so.
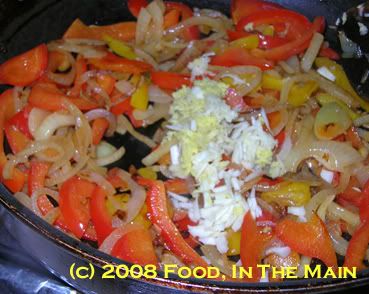
If you're using celery, add it now and stir it all around for a couple of minutes more.
7. Toss in the fried "sausage" pieces and stir it in, making sure the pieces are coated with whatever oil is left in the pan.
8. Then add the drained soaked rice, stirring it in till well distributed.
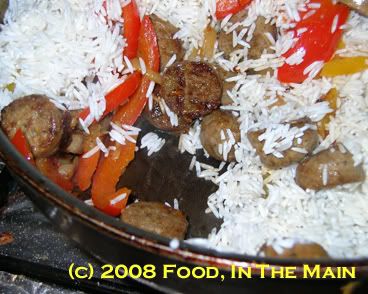
Pour in the prepared stock and stir, letting the liquid come to a bubbling boil.
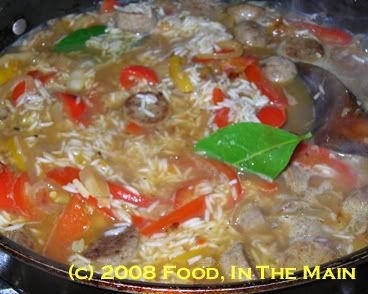
9. When the stock is bubbling, add the bay leaves and the chopped tomatoes. Stir them in.
10. Cover the pot and turn the heat down as low as possible. Leave the rice to cook covered and undisturbed for 20 minutes. Do NOT lift the lid or you will lose precious steam and the rice will not cook well.
11. After 20 minutes, turn off the gas and let the jambalaya sit covered for 10 minutes in the pan. Then take off the lid (ahhhh the aroma!),
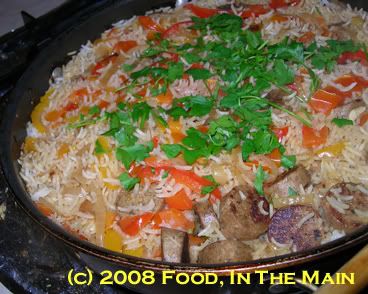
sprinkle the chopped parsley and spring onions over, and serve the jambalaya hot.

