skip to main |
skip to sidebar
(Caution to my squeamish readers: Disgusting imagery alert! Read from Para 4 if you have a weak stomach.)
Although I quite like mushrooms, I’m not really crazy about them – I think it’s to do with their texture. I love mushroom soup, because it has the flavour without the texture. I absolutely cannot stand mushrooms in a cold curry because to me they taste like floppy rubber bands, and look like something that died but inexplicably didn’t get a decent burial.
Hm. After that appetizing description, I have no doubt that non-mushroom eaters will be rushing en masse to try the delights of cold cooked mushrooms for themselves. Oh well… I figure that people who dislike mushrooms will continue to dislike them (and perhaps agree with me) and those who love ‘em will continue to love ‘em no matter what I say. (It’s what I call a win-win situation for my writing skills.)
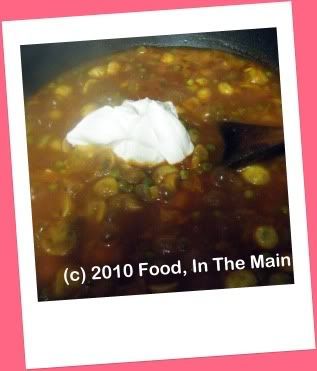
Anyway, it’s been a looooooong time since I cooked with mushrooms last, mainly because the low-fat yogurt I’d used curdled in the sauce to rather gross effect – in fact, binge-drinkers outside nightclubs on a Friday night could not have reproduced anything worse-looking. The effect, basically, was to make me shy away from putting yogurt anywhere near boiling sauce that contained mushrooms.
As I learnt from my disastrous episode with heating very low-fat yogurt, it’s best to use full-fat or regular yogurt, or at worst 2%, if you’re planning to cook with it. Otherwise, reheating leftovers could pose the same problems as heating while cooking.
The Greek yogurt I used was a branded one which I had been asked to try out, and although I’d been assured that the 2% yogurt would not curdle, I must admit I was a bit nervous when adding it to the hot sauce. But it was no lie, the yogurt didn’t “turn” and the finished dish was deeelish, thankfully dislodging the images that had attached themselves to my inner eye after the previous experience.
Recipe for: Mushroom peas yogurt curry
 Ingredients:
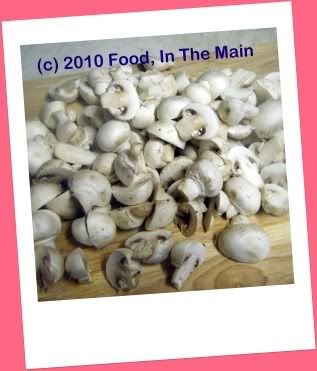 3 cups baby button mushrooms, halved
1 cup frozen petit pois
1/2 cup thick Greek yogurt (I used Total Greek yogurt)
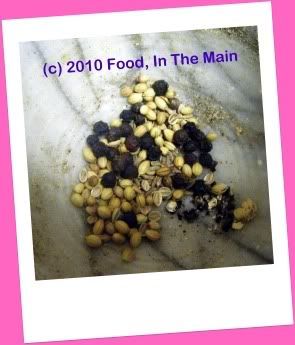
3/4 tsp whole black peppercorns
1/2 tsp cumin seeds
1/2 tsp coriander seeds
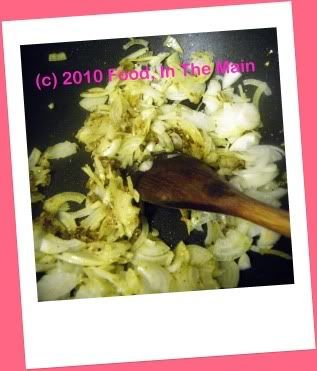
1/2 cup thinly sliced onions
1/2 cup thick pureed tomatoes (I also used a few baby cherry tomatoes)
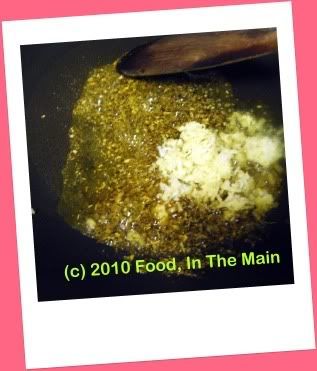
1 tsp grated ginger root
1/4 tsp garam masala
2 tsp oil
Salt to taste
Coriander leaves for garnish
Method:
1. Pound the black peppercorns, coriander seeds and cumin seeds to powder in a mortar and pestle.
3 cups baby button mushrooms, halved
1 cup frozen petit pois
1/2 cup thick Greek yogurt (I used Total Greek yogurt)
3/4 tsp whole black peppercorns
1/2 tsp cumin seeds
1/2 tsp coriander seeds
1/2 cup thinly sliced onions
1/2 cup thick pureed tomatoes (I also used a few baby cherry tomatoes)
1 tsp grated ginger root
1/4 tsp garam masala
2 tsp oil
Salt to taste
Coriander leaves for garnish
Method:
1. Pound the black peppercorns, coriander seeds and cumin seeds to powder in a mortar and pestle.
 2. Heat the oil, add the masala powder and let fry for 15 seconds, then add the grated ginger.
 3. Throw in the sliced onions and mix well. Skip Step 4 if you are not using cherry tomatoes.
 4. When the onions start softening, add the halved cherry tomatoes (if using).
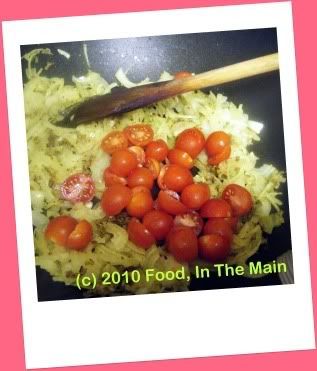 Cook until the tomatoes are mushy.
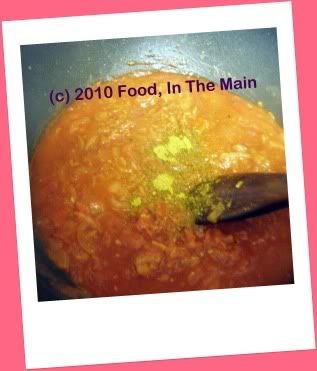
 5. When the onions are soft, pour in the tomato puree and add the garam masala, then add 1/2 cup water.
 6. Let it simmer for 3-4 minutes, then add the mushrooms.
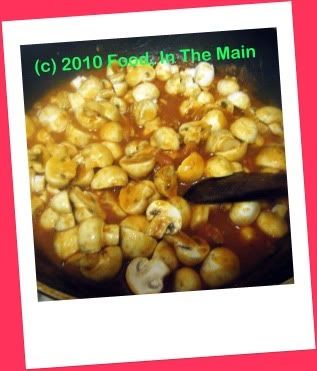 Let the mushrooms cook for 3-4 minutes until they release their liquid and shrink in size.
7. Now add the frozen petit pois and mix them in.
Let the mushrooms cook for 3-4 minutes until they release their liquid and shrink in size.
7. Now add the frozen petit pois and mix them in.
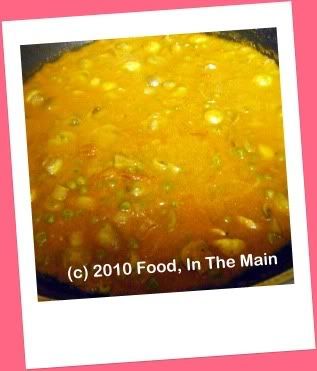
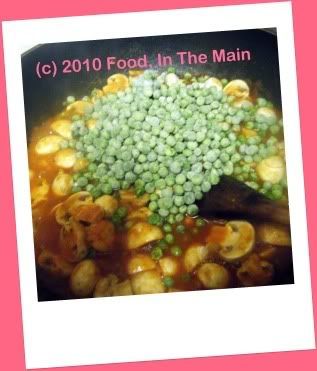 8. Cover the pan and let the mixture simmer for 5 minutes. If the gravy is watery, boil it on high for 2-3 minutes. When the gravy has reduced to your liking, add the Greek yogurt.
 9. Add salt to taste and stir in the Greek yogurt. Let the curry simmer for another 3-4 minutes, then turn off the heat.
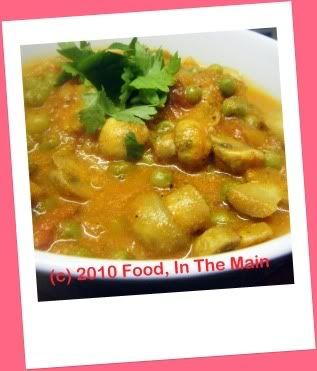
 10. Garnish with coriander leaves and serve hot with plain rice or as a side dish for pulao and biriyani.
 RECIPE: MUSHROOM PEAS YOGURT CURRY
Ingredients:
3 cups baby button mushrooms, halved
1 cup frozen petit pois
1/2 cup thick Greek yogurt (I used Total Greek yogurt)
3/4 tsp whole black peppercorns
1/2 tsp cumin seeds
1/2 tsp coriander seeds
1/2 cup thinly sliced onions
1/2 cup thick pureed tomatoes (I also used a few baby cherry tomatoes)
1 tsp grated ginger root
1/4 tsp garam masala
2 tsp oil
Salt to taste
Coriander leaves for garnish
Method:
1. Pound the black peppercorns, coriander seeds and cumin seeds to powder in a mortar and pestle.
2. Heat the oil, add the masala powder and let fry for 15 seconds, then add the grated ginger.
3. Throw in the sliced onions and mix well. Skip Step 4 if you are not using cherry tomatoes.
4. When the onions start softening, add the halved cherry tomatoes (if using). Cook until the tomatoes are mushy.
5. When the onions are soft, pour in the tomato puree and add the garam masala, then add 1/2 cup water.
6. Let it simmer for 3-4 minutes, then add the mushrooms. Let the mushrooms cook for 3-4 minutes until they release their liquid and shrink in size.
7. Now add the frozen petit pois and mix them in.
8. Cover the pan and let the mixture simmer for 5 minutes. If the gravy is watery, boil it on high for 2-3 minutes. When the gravy has reduced to your liking, add the Greek yogurt.
9. Add salt to taste and stir in the Greek yogurt. Let the curry simmer for another 3-4 minutes, then turn off the heat. Let the curry sit covered for 5 minutes.
10. Then garnish with coriander leaves and serve hot with plain rice or as a side dish for pulao and biriyani.
RECIPE: MUSHROOM PEAS YOGURT CURRY
Ingredients:
3 cups baby button mushrooms, halved
1 cup frozen petit pois
1/2 cup thick Greek yogurt (I used Total Greek yogurt)
3/4 tsp whole black peppercorns
1/2 tsp cumin seeds
1/2 tsp coriander seeds
1/2 cup thinly sliced onions
1/2 cup thick pureed tomatoes (I also used a few baby cherry tomatoes)
1 tsp grated ginger root
1/4 tsp garam masala
2 tsp oil
Salt to taste
Coriander leaves for garnish
Method:
1. Pound the black peppercorns, coriander seeds and cumin seeds to powder in a mortar and pestle.
2. Heat the oil, add the masala powder and let fry for 15 seconds, then add the grated ginger.
3. Throw in the sliced onions and mix well. Skip Step 4 if you are not using cherry tomatoes.
4. When the onions start softening, add the halved cherry tomatoes (if using). Cook until the tomatoes are mushy.
5. When the onions are soft, pour in the tomato puree and add the garam masala, then add 1/2 cup water.
6. Let it simmer for 3-4 minutes, then add the mushrooms. Let the mushrooms cook for 3-4 minutes until they release their liquid and shrink in size.
7. Now add the frozen petit pois and mix them in.
8. Cover the pan and let the mixture simmer for 5 minutes. If the gravy is watery, boil it on high for 2-3 minutes. When the gravy has reduced to your liking, add the Greek yogurt.
9. Add salt to taste and stir in the Greek yogurt. Let the curry simmer for another 3-4 minutes, then turn off the heat. Let the curry sit covered for 5 minutes.
10. Then garnish with coriander leaves and serve hot with plain rice or as a side dish for pulao and biriyani.
Recently - although not THAT recently - I was asked if I would like to try out a particular brand of Greek yogurt. Now, Greek yogurt being my most favourite type of yogurt for its thickness and sweetness – by which I mean that it’s not sour like home-made yogurt gets after a few days – I was only too pleased to accept.
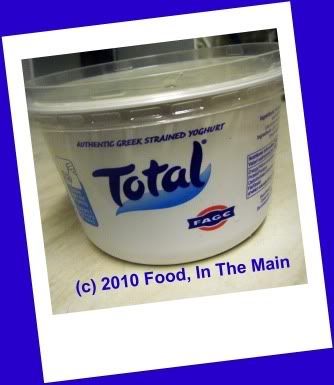
And so a short while later I was contemplating a big box containing all variants of Total Greek yoghurt - nonfat, 2%, regular and 2% with honey, in small- and large-sized containers. There was way too much for just me (even at my most enthusiastic) and Pete to finish up before the use-by date, so I shared some with my favourite neighbour, and some – mainly the 2% with honey – with Pete’s office colleagues.
I have to say that the 2% with honey was favourite with everybody. The yoghurt was creamy and smooth, and the quality of the honey was excellent too – not to mention generous in quantity. I tried the non-fat yoghurt and can’t really say that I was impressed by it – it had a chalky sort of texture/mouthfeel and it just didn’t taste right to me. But then again, I doubt you could do a totally non-fat product that tasted better than the regular product, or even the low-fat product.
The 2% yoghurt and regular yoghurt were lovely. I always buy greek yogurt, because I love the stuff - but I usually get the supermarket brand. (I've tried Tesco, Sainsbury and Asda, with Tesco's winning by a good margin.) I have to admit, though, that the supermarket brands of Greek yogurt are not a patch on Total. Total Greek yogurt is the creamiest, thickest version I've ever had. My mother thinks that the supermarket yogurt I buy is too thick, but the next time she comes here, I'm going to spring Total on her.
I made a few dishes using Total Greek yoghurt , with great success. The 2% yogurt lent itself to being thoroughly heated. The regular Total yogurt can be heated without the danger of it curdling - a big plus, because curdled yogurt in gravy looks indescribably disgusting. Curdled yogurt is edible enough despite looking like baby sick - but I find it very difficult to put it anywhere near my mouth because my eyes reject its appearance.
The non-fat yogurt, though... that was awful. I found the texture and the taste unpleasant, sort of chalky, I suppose. Even thinned with a bit of water to make yogurt-rice, it didnt taste right to me. It might be ok to eat with fresh fruits and honey drizzled, but I couldn't. That's just me, though. I'm sure that health and fitness freaks would go for the non-fat Greek yogurt.
Did you know that this week is "National Curry Week" in the UK? I didn't, till a short while back. A week of celebrating a type of cuisine that is quintessentially British, having been shaped and given identity over the last 200 years. Did you know the first curry house in the UK was opened waaaaay back in 1810?
Purists may not approve of the British "curry", considering it a lopsided growth of something that has its origins in the north of India... but like it or shun it, curry is definitely a part of British culture now. It's not Indian, it's "Brindian". And Cobra beer is apparently THE drink to go with a spicy Brindian curry. (Me, I prefer lassi... but I'm not much of a drinker and I HATE beer.)
Anyway, Cobra teamed up with Pat Chapman, a cookbook writer, and undertook a survey to identify the 10 top favourite regional foods. And then they "Brindianised" those foods in celebration of Cobra National Curry Week 2010.
The ten new recipes – including ‘Devonshire cream chai’, a spice-infused take on the teatime classic served with chilli jam; ‘ha-ghee-s’, traditional haggis served with curry sauce; and ‘pie, madras & liquor’, an Eastern twist on the East end favourite - will be sold in participating regional Indian restaurants across the country throughout Cobra National Curry Week 2010.
So if you're British, a lover of curry and a connoisseur of Cobra beer , Christmas might have come early, mateys! And you won't need to "curry" favour for a bargain (pardon the very intended pun), as Cobra has teamed up with 500 restaurants across Britain to offer a two for one promotion on main meals from Monday 21st November to Thursday 25th November with the purchase of Cobra Beer. Go for it, guys!
My Deepavali preparations this year were sketchy and very last minute. About the only thing that didn’t fall into that "last-minute" category was one of the sweets that I made in celebration - and that mainly because I'd been thinking about making it at home at some point. The other sweet I made merely to keep up the momentum, even though I’d long held the opinion that it was best left to professionals to make. (Which was more or less proved correct, but that's for the next post.)
This kulfi was the first of the two sweets. I knew it was dead easy to make (having researched various blogs on the 'net), but just couldn’t be fagged to do it. The reason – lethargy. Pure, unrefined lethargy, completely innocent of adulteration by any justifiable excuse. (Aren’t you all glad to see ONE thing in this world that retains its original, if unworthy, quality? I knew you would be.)
Anyway, because Pete doesn’t like cardamom-flavoured milky sweets, I went with rosewater as the only flavouring for my hazelnut-rich kulfis. A good choice, although I ended up adding about ¼ cup rosewater to be able to taste it over the hazelnuts in the kulfi mixture.
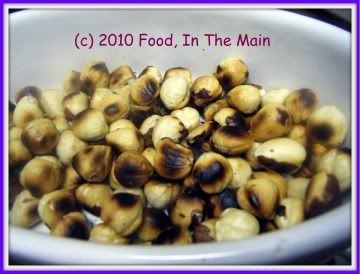
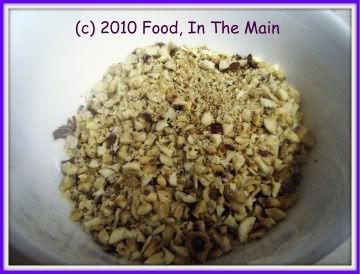
By the way, I started out with raw skin-on hazelnuts. I roasted them, then rubbed off most of the skin before chopping them. If you’d like to avoid the deskinning process, use skinned hazelnuts to start with. If you don’t want the hassle of roasting the nuts, get skinned and roasted hazelnuts. And if you don’t want the annoyance of chopping the roasted skinned hazelnuts... can anybody guess where I’m going with this? Yep – get pre-skinned, pre-roasted, pre-chopped hazelnuts.
Just avoid the pre-eaten, pre-digested ones.
Recipe for: Hazelnut rosewater kulfi pops
 Ingredients:
1 can low-fat evaporated milk (to make 1-1/2 cups)
1/2 cup sweetened condensed milk (or to taste)
1/4 cup rosewater
1/3 cup hazelnuts
8 popsicle moulds
Method:
1. Roast the hazelnuts over medium-low heat, stirring often, till they turn a pale gold. Be careful not to burn them.
Ingredients:
1 can low-fat evaporated milk (to make 1-1/2 cups)
1/2 cup sweetened condensed milk (or to taste)
1/4 cup rosewater
1/3 cup hazelnuts
8 popsicle moulds
Method:
1. Roast the hazelnuts over medium-low heat, stirring often, till they turn a pale gold. Be careful not to burn them.
 2. When they are cool, chop them finely. A few larger pieces are ok for crunch. You can powder them if you want the flavour in the kulfi without the texture.
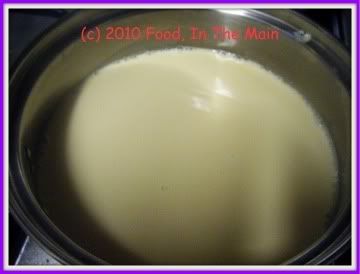
 3. Bring the evaporated milk to a gentle boil, then turn off the heat and let cool.
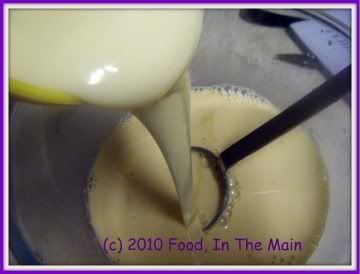
 4. When the evaporated milk is at room temperature, add the rosewater and the condensed milk.
 5. Then stir in all but 2 tbsp of the hazelnuts.
 6. Sprinkle some chopped hazelnuts at the bottom of the kulfi mould.
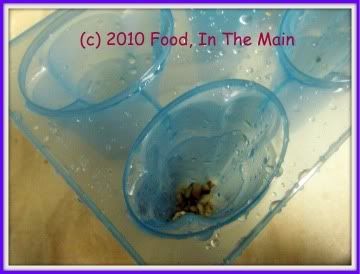 Then fill with the kulfi mixture.
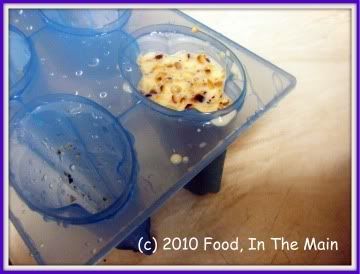 7. Place the filled kulfi moulds in the freezer for at least 8 hours or until frozen. To remove the frozen kulfi from the moulds, run them under hot water for a moment or two, then loosen carefully. Serve immediately.
RECIPE: HAZELNUT ROSEWATER KULFI POPS
Ingredients:
1 can low-fat evaporated milk (to make 1-1/2 cups)
1/2 cup sweetened condensed milk
1/4 cup rosewater
8 kulfi moulds
1/3 cup hazelnuts
8 popsicle moulds
Method:
1. Roast the hazelnuts over medium-low heat, stirring often, till they turn a pale gold. Be careful not to burn them.
2. When they are cool, chop them finely. A few larger pieces are ok for crunch. You can powder them if you want the flavour in the kulfi without the texture.
3. Bring the evaporated milk to a gentle boil, then turn off the heat and let cool.
4. When the evaporated milk is at room temperature, add the rosewater and the condensed milk.
5. Then stir in all but 2 tbsp of the hazelnuts.
6. Sprinkle some chopped hazelnuts at the bottom of the kulfi mould. Then fill with the kulfi mixture.
7. Place the filled kulfi moulds in the freezer for at least 8 hours or until frozen. To remove the frozen kulfi from the moulds, run them under hot water for a moment or two, then loosen carefully. Serve immediately.
7. Place the filled kulfi moulds in the freezer for at least 8 hours or until frozen. To remove the frozen kulfi from the moulds, run them under hot water for a moment or two, then loosen carefully. Serve immediately.
RECIPE: HAZELNUT ROSEWATER KULFI POPS
Ingredients:
1 can low-fat evaporated milk (to make 1-1/2 cups)
1/2 cup sweetened condensed milk
1/4 cup rosewater
8 kulfi moulds
1/3 cup hazelnuts
8 popsicle moulds
Method:
1. Roast the hazelnuts over medium-low heat, stirring often, till they turn a pale gold. Be careful not to burn them.
2. When they are cool, chop them finely. A few larger pieces are ok for crunch. You can powder them if you want the flavour in the kulfi without the texture.
3. Bring the evaporated milk to a gentle boil, then turn off the heat and let cool.
4. When the evaporated milk is at room temperature, add the rosewater and the condensed milk.
5. Then stir in all but 2 tbsp of the hazelnuts.
6. Sprinkle some chopped hazelnuts at the bottom of the kulfi mould. Then fill with the kulfi mixture.
7. Place the filled kulfi moulds in the freezer for at least 8 hours or until frozen. To remove the frozen kulfi from the moulds, run them under hot water for a moment or two, then loosen carefully. Serve immediately.
One of the things I do very well is daydream. The more important it is for me to pay attention, the easier I find it to slip into my own world – not to mention, the daydream is correspondingly detailed. One recurring bare-bones daydream is to have a cook at home. The actual details vary depending on my prevailing mood, but on different occasions I’ve day-dreamed about having a live-in cook (only briefly), someone who would make what I wanted the way I wanted it made, someone who would be a trained nutritionist and make healthy but superbly tasty dishes… the permutations are many and varied.
But the one daydream that keeps occurring with monotonous regularity is the one where I have a cook who does the necessary prepwork and all the other jobs that I find boring – peeling and cutting vegetables, searching out spices, beating eggs, chopping nuts, shallow-frying things on low heat, stirring milk, whatever. After which, he (or she – I’m an equal-opportunity day-dreamer) clears the workspace, throws away the rubbish and gets everything ready for me.
Then, when all is perfectly laid out in the kitchen, I sail in and set about cooking my chosen recipe. And, naturally, when I am done, my cook does the washing up and drying and putting away of all the utensils, leaving my kitchen in perfect order for the next time…
*sighhhhh*
A sous chef is what I need, come to think of it. Someone who will never aspire to chefdom or doing anything more interesting than the prepwork and the donkey work.
*sighhhhhhhhhhhhhhhhhhhhhhhhhhhhh*
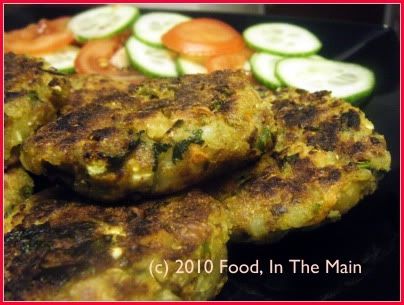
Anyway, here’s the recipe for the patties. Believe me when I say that I felt the lack of a sous chef very, very, very deeply indeed… but still, the takes-you-forever-to-cook-and-just-seconds-for-someone-to-eat patties are worth the annoying bitwork. In other words, they taste good enough to eat.
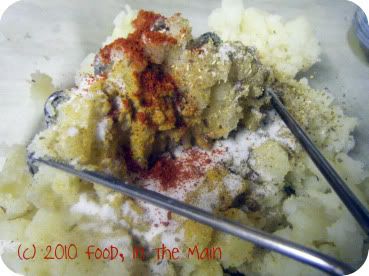
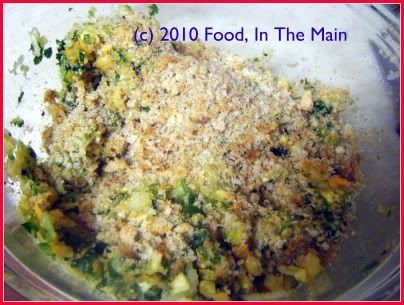
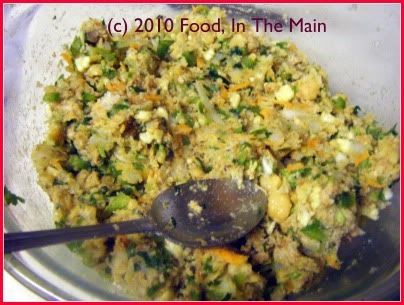
Recipe for: Vegetable chickpea patties
 Ingredients:
1/2 cup carrots, grated
1/2 cup potatoes, chopped
1/4 cup green beans, sliced into thin rounds
1/4 cup green pepper (capsicum), chopped
1/4 cup onions, chopped
2 cups cooked potatoes, mashed coarsely
1 tin (1-1/4 cups) cooked chickpeas, rinsed and drained
1 cup wholewheat breadcrumbs
1/4 cup coriander leaves, chopped
1 tsp Kitchen King masala (or garam masala)
1/4 tsp turmeric powder
1 tsp red chilli powder (or to taste)
1 tsp coriander seeds, powdered
1/2 tsp cumin seed powder
salt to taste
2 tbsp oil
Pam spray or more oil to shallow-fry
Method:
1. Place the chopped potatoes, carrots and green beans in a microwave-safe bowl and microwave covered for 5 minutes with 3-4 tbsp water, till half-cooked.
2. Add the mashed potatoes and the spices and mix well.
Ingredients:
1/2 cup carrots, grated
1/2 cup potatoes, chopped
1/4 cup green beans, sliced into thin rounds
1/4 cup green pepper (capsicum), chopped
1/4 cup onions, chopped
2 cups cooked potatoes, mashed coarsely
1 tin (1-1/4 cups) cooked chickpeas, rinsed and drained
1 cup wholewheat breadcrumbs
1/4 cup coriander leaves, chopped
1 tsp Kitchen King masala (or garam masala)
1/4 tsp turmeric powder
1 tsp red chilli powder (or to taste)
1 tsp coriander seeds, powdered
1/2 tsp cumin seed powder
salt to taste
2 tbsp oil
Pam spray or more oil to shallow-fry
Method:
1. Place the chopped potatoes, carrots and green beans in a microwave-safe bowl and microwave covered for 5 minutes with 3-4 tbsp water, till half-cooked.
2. Add the mashed potatoes and the spices and mix well.
 3. Then add the chickpeas and chopped onions.
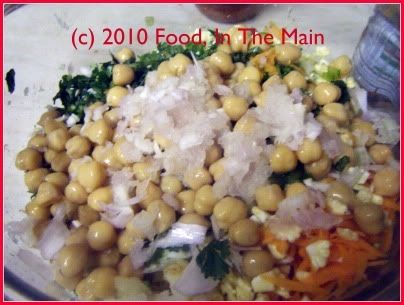 Crush the chickpeas coarsely with a masher or the back of a sturdy spoon.
4. Add the breadcrumbs and mix in.
Crush the chickpeas coarsely with a masher or the back of a sturdy spoon.
4. Add the breadcrumbs and mix in.
 5. Heat the 2 tbsp oil and pour it on the mixture. Add salt to taste along with the coriander leaves, and mix thoroughly.
 6. Now form small patties from the mixture and shallow-fry them in a non-stick pan (without crowding them) over medium-high heat.
 7. Brush the top surface of the patties with some oil (or spray some Pam) and turn the patties over carefully when golden brown on the underside.
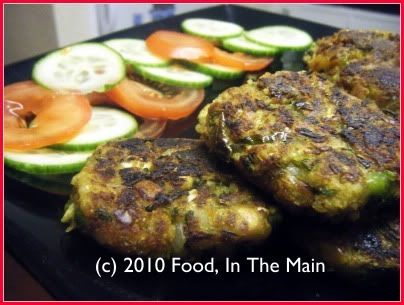
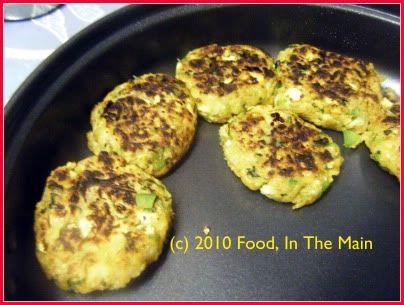 8. Serve warm with a salad for a light meal, or with ketchup for a snack.
 RECIPE: VEGETABLE CHICKPEA PATTIES
Ingredients:
1/2 cup carrots, grated
1/2 cup potatoes, chopped
1/4 cup green beans, sliced into thin rounds
1/4 cup green pepper (capsicum), chopped
1/4 cup onions, chopped
2 cups cooked potatoes, mashed coarsely
1 tin (1-1/4 cups) cooked chickpeas, rinsed and drained
1 cup wholewheat breadcrumbs
1/4 cup coriander leaves, chopped
1 tsp Kitchen King masala (or garam masala)
1/4 tsp turmeric powder
1 tsp red chilli powder (or to taste)
1 tsp coriander seeds, powdered
1/2 tsp cumin seed powder
salt to taste
2 tbsp oil
Pam spray or more oil to shallow-fry
Method:
1. Place the chopped potatoes, carrots and green beans in a microwave-safe bowl and microwave covered for 5 minutes with 3-4 tbsp water, till half-cooked.
2. Add the mashed potatoes and the spices and mix well.
3. Then add the chickpeas and chopped onions. Crush the chickpeas coarsely with a masher or the back of a sturdy spoon.
4. Add the breadcrumbs and mix in.
5. Heat the 2 tbsp oil and pour it on the mixture. Add salt to taste along with the coriander leaves, and mix thoroughly.
6. Now form small patties from the mixture and shallow-fry them in a non-stick pan (without crowding them) over medium-high heat.
7. Brush the top surface of the patties with some oil (or spray some Pam) and turn the patties over carefully when golden brown on the underside.
8. Serve warm with a salad for a light meal, or with ketchup for a snack.
RECIPE: VEGETABLE CHICKPEA PATTIES
Ingredients:
1/2 cup carrots, grated
1/2 cup potatoes, chopped
1/4 cup green beans, sliced into thin rounds
1/4 cup green pepper (capsicum), chopped
1/4 cup onions, chopped
2 cups cooked potatoes, mashed coarsely
1 tin (1-1/4 cups) cooked chickpeas, rinsed and drained
1 cup wholewheat breadcrumbs
1/4 cup coriander leaves, chopped
1 tsp Kitchen King masala (or garam masala)
1/4 tsp turmeric powder
1 tsp red chilli powder (or to taste)
1 tsp coriander seeds, powdered
1/2 tsp cumin seed powder
salt to taste
2 tbsp oil
Pam spray or more oil to shallow-fry
Method:
1. Place the chopped potatoes, carrots and green beans in a microwave-safe bowl and microwave covered for 5 minutes with 3-4 tbsp water, till half-cooked.
2. Add the mashed potatoes and the spices and mix well.
3. Then add the chickpeas and chopped onions. Crush the chickpeas coarsely with a masher or the back of a sturdy spoon.
4. Add the breadcrumbs and mix in.
5. Heat the 2 tbsp oil and pour it on the mixture. Add salt to taste along with the coriander leaves, and mix thoroughly.
6. Now form small patties from the mixture and shallow-fry them in a non-stick pan (without crowding them) over medium-high heat.
7. Brush the top surface of the patties with some oil (or spray some Pam) and turn the patties over carefully when golden brown on the underside.
8. Serve warm with a salad for a light meal, or with ketchup for a snack.
This is what I call an "all-purpose" recipe because you can use whatever vegetables you have to hand. It's especially good for using up the odds-and-ends. The only reason I use the generic term "curry" is because it's not a kootu or anything specifically South Indian, and it is not quite proper North Indian because I used "curry powder" as a flavouring.
I know - gasp! What was I thinking, using store-bought "curry powder"? Me, who used to be authentically Indian and looked down my nose (only a short distance, given that my nose is regrettably lacking in ski-slope proportions) at any recipe that involved the use of "curry powder" especially with the words "mild Madras" preceding the term. Me, who used to be mildly scornful and pitying of the uninformed Brits who relied on curry powders to make their "Indian" curries. That me, now admitting without any apparent embarrassment to having "gone over" to the British side of Indian curries? WTF?
Actually, after years and years of using readymade garam masala powder in various dishes and not thinking twice about it being a store-bought item, I finally came around to admitting that "curry powder" was pretty much the same sort of thing.
However, I do still look down my sadly length-challenged nose at people who use curry powder as the sole flavouring for their versions of curries. My superiority imaginary superiority in the matter of "authentic" recipes is maintained quite satisfactorily (from my point of view, naturally) because I used "mild Madras curry powder" mainly to provide the "authentic British" flavour to this curry. I do not, I hasten to add, use it all the time.
There, that should pretty much re-establish my credentials. And if it doesn't, here's a gentle reminder - I am now, as my husband chooses to describe, a "Brindian", not an Indian...
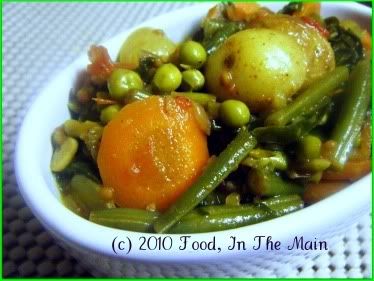
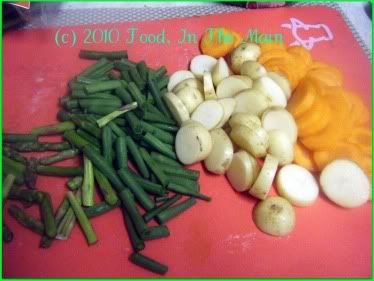
Recipe for: Basic vegetable curry
 Ingredients:
2-3 small new potatoes, sliced into 1/2-cm thick rounds
1 carrot, peeled and sliced into 1/2-cm thick rounds
1/3 cup fresh or frozen green peas
Ingredients:
2-3 small new potatoes, sliced into 1/2-cm thick rounds
1 carrot, peeled and sliced into 1/2-cm thick rounds
1/3 cup fresh or frozen green peas
 2 small onions, sliced
1/2 cup green beans, sliced 1" long
2 cups baby spinach leaves
1/2 cup roasted tomatoes OR 1 cup tomato puree + 1 tbsp concentrated tomato paste
1-2 small cloves garlic, chopped fine
1/2" piece ginger root, peeled and grated
1 tsp cumin seeds
salt to taste
2 tsp oil
1/2 tbsp mild Madras curry powder
Coriander leaves for garnish
Method:
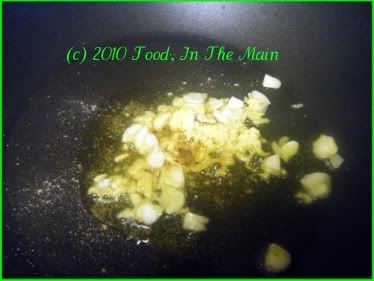
1. Heat the oil in a wide pan, add the cumin seeds and garlic, and fry on medium-low heat until the garlic softens (about 30 seconds).
2 small onions, sliced
1/2 cup green beans, sliced 1" long
2 cups baby spinach leaves
1/2 cup roasted tomatoes OR 1 cup tomato puree + 1 tbsp concentrated tomato paste
1-2 small cloves garlic, chopped fine
1/2" piece ginger root, peeled and grated
1 tsp cumin seeds
salt to taste
2 tsp oil
1/2 tbsp mild Madras curry powder
Coriander leaves for garnish
Method:
1. Heat the oil in a wide pan, add the cumin seeds and garlic, and fry on medium-low heat until the garlic softens (about 30 seconds).
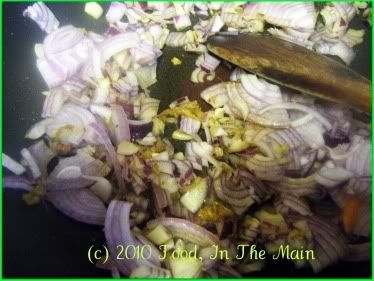
 2. Then stir in the sliced onions, grated ginger and turmeric powder and fry till the onions become limp and turn translucent.
 3. Add the sliced potatoes, carrots, green beans and green peas along with 2 cups water and the curry powder.
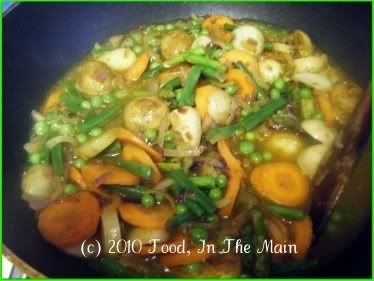 Bring it to a boil on high heat, then turn the heat down to medium and let the vegetables cook for 7-8 minutes.
4. Then add the roasted tomatoes.
Bring it to a boil on high heat, then turn the heat down to medium and let the vegetables cook for 7-8 minutes.
4. Then add the roasted tomatoes.
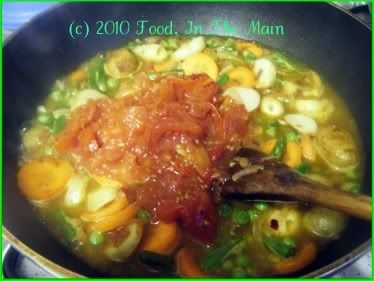 If you're using uncooked pureed tomatoes, turn the heat back up to high after adding the puree + concentrated paste, and let the liquid reduce by half.
5. Let the mixture simmer till the vegetables are fully cooked. Now add the spinach leaves.
If you're using uncooked pureed tomatoes, turn the heat back up to high after adding the puree + concentrated paste, and let the liquid reduce by half.
5. Let the mixture simmer till the vegetables are fully cooked. Now add the spinach leaves.
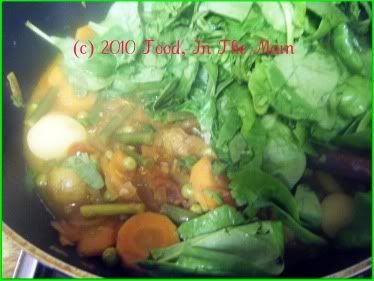 Turn the heat down to low and cover the pan for 3-4 minutes or till the spinach is wilted. Add salt to taste, stir it in well. Leave the curry on the hob for a few minutes more, if the gravy is not thick enough for you.
 Garnish with coriander leaves and serve hot with plain rice, any Indian pickle and papad.
RECIPE: VEGETABLE CURRY
Ingredients
2-3 small new potatoes, sliced into 1/2-cm thick rounds
1 carrot, peeled and sliced into 1/2-cm thick rounds
1/3 cup fresh or frozen green peas
2 small onions, sliced
1/2 cup green beans, sliced 1" long
2 cups baby spinach leaves
1/2 cup roasted tomatoes OR 1 cup tomato puree + 1 tbsp concentrated tomato paste
1 tsp cumin seeds
1-2 small cloves garlic, chopped fine
1/2" piece ginger root, peeled and grated
salt to taste
2 tsp oil
1/2 tbsp mild curry powder
Coriander leaves for garnish
Method
1. Heat the oil in a wide pan, add the cumin seeds and garlic, and fry on medium-low heat until the garlic softens (about 30 seconds).
2. Then stir in the sliced onions, grated ginger and turmeric powder and fry till the onions become limp and turn translucent.
3. Add the sliced potatoes, carrots green beans and green peas along with 2 cups water and the curry powder. Bring it to a boil on high heat, then turn the heat down to medium and let the vegetables cook for 7-8 minutes.
4. Then add the roasted tomatoes. If you're using uncooked pureed tomatoes, turn the heat back up to high after adding the puree + concentrated paste, and let the liquid reduce by half.
5. Let the mixture simmer till the vegetables are fully cooked. Now add the spinach leaves. Turn the heat down to low and cover the pan for 3-4 minutes or till the spinach is wilted. Add salt to taste, stir it in well. Leave the curry on the hob for a few minutes more, if the gravy is not thick enough for you. Garnish with coriander leaves and serve hot with plain rice, any Indian pickle and papad.
Garnish with coriander leaves and serve hot with plain rice, any Indian pickle and papad.
RECIPE: VEGETABLE CURRY
Ingredients
2-3 small new potatoes, sliced into 1/2-cm thick rounds
1 carrot, peeled and sliced into 1/2-cm thick rounds
1/3 cup fresh or frozen green peas
2 small onions, sliced
1/2 cup green beans, sliced 1" long
2 cups baby spinach leaves
1/2 cup roasted tomatoes OR 1 cup tomato puree + 1 tbsp concentrated tomato paste
1 tsp cumin seeds
1-2 small cloves garlic, chopped fine
1/2" piece ginger root, peeled and grated
salt to taste
2 tsp oil
1/2 tbsp mild curry powder
Coriander leaves for garnish
Method
1. Heat the oil in a wide pan, add the cumin seeds and garlic, and fry on medium-low heat until the garlic softens (about 30 seconds).
2. Then stir in the sliced onions, grated ginger and turmeric powder and fry till the onions become limp and turn translucent.
3. Add the sliced potatoes, carrots green beans and green peas along with 2 cups water and the curry powder. Bring it to a boil on high heat, then turn the heat down to medium and let the vegetables cook for 7-8 minutes.
4. Then add the roasted tomatoes. If you're using uncooked pureed tomatoes, turn the heat back up to high after adding the puree + concentrated paste, and let the liquid reduce by half.
5. Let the mixture simmer till the vegetables are fully cooked. Now add the spinach leaves. Turn the heat down to low and cover the pan for 3-4 minutes or till the spinach is wilted. Add salt to taste, stir it in well. Leave the curry on the hob for a few minutes more, if the gravy is not thick enough for you. Garnish with coriander leaves and serve hot with plain rice, any Indian pickle and papad.
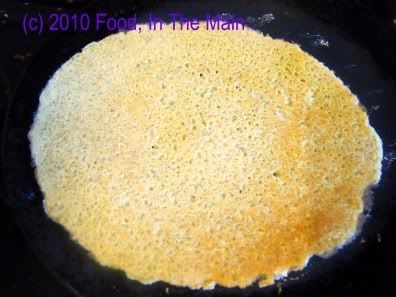
I’m probably going to hurt the sentiments of hardcore Andhra food lovers – lovers of Andhra food as well as Andhra food-lovers – when they read the next paragraph, so before I get brickbatted all over the place, I’d like to pre-qualify my statement by adding that it’s merely my insignificant opinion - not exactly likely to negatively affect the popularity of this item. Also, I would like to add that I adore Andhra food in general – the wonderful podis, the avakkai, the pappus, the gongura pickle, the generally elevated chilli-heat of most items... I could go on and on.
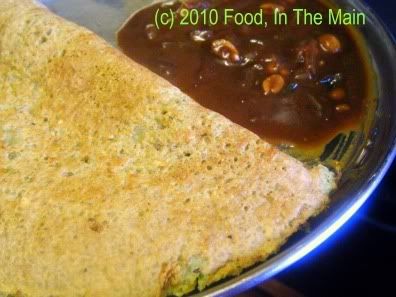
So (*deep breath*) here’s the thing... I’m not very fond of pesarattu. It’s not that I hate it or anything, but given a choice of Indian breakfast/snack food items, the pesarattu – and even more so the pesarattu-upma combination – is not what I would go for first. Or second. Possibly third, provided it comes without the upma. I don’t really care for upma – no matter which State it comes from - and it would probably be last on the list of choice.
To return to the question of the pesarattu, I think the main problem is that I consider the dosa (the regular kind - not rava, godhumai, maida or any other “instant” variation) as the queen of Indian pancakes, followed by adai in second place. Also, green gram dal has a pronounced flavour that’s not easily disguised - which, I suppose, is as much the plus point for people who like pesarattu as it is a negative for those who like it just that bit less.
Still, once in a while I don’t mind eating pesarattu. Of course, since the nearest Andhra hotel is about 5,000 miles away from where I live, I had to make the batter at home. I’ve never had pesarattu in an Andhra hotel or made by a genuine Andhra foodie, so I’m hoping that my recipe is an acceptable variation on the actual recipe. I did use green gram dal, though, so I guess I can’t have sacrificed much authenticity in my version.
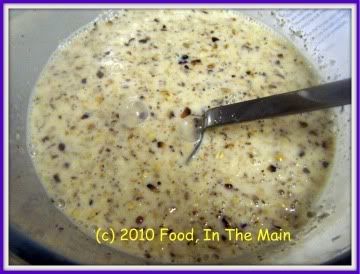
Recipe for: Pesarattu
 Ingredients:
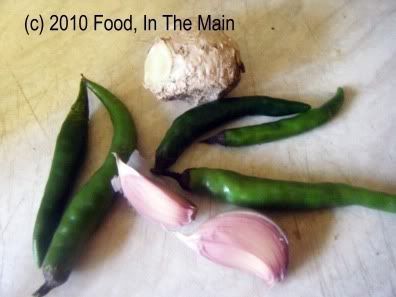
1 cup green gram dal
1/4 cup chana dal
1/2 cup uncooked rice
1-2 cloves garlic, peeled
1/2"-1" piece ginger root, peeled
2-4 green chillies (or to taste)
Salt to taste
Oil to shallow-fry
Method:
1. Soak the green gram dal, rice and chana dal in cold water for 8-10 hours or overnight.
Ingredients:
1 cup green gram dal
1/4 cup chana dal
1/2 cup uncooked rice
1-2 cloves garlic, peeled
1/2"-1" piece ginger root, peeled
2-4 green chillies (or to taste)
Salt to taste
Oil to shallow-fry
Method:
1. Soak the green gram dal, rice and chana dal in cold water for 8-10 hours or overnight.
 2. Drain the water, then add the soaked dal and rice along with the ginger, garlic and green chillies in a grinder or mixie.
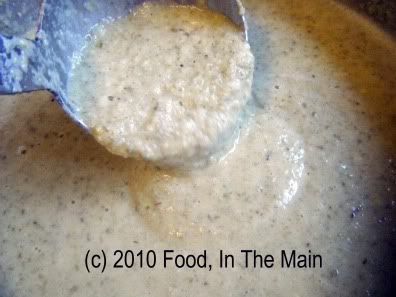
 3. Grind it all into a thickish batter that is fairly smooth. Add salt to taste and mix it in.
 4. Pour a ladleful of the batter in a heated non-stick or well oiled pancake pan, using a circular motion to spread it out evenly into a circle. Add a little oil (preferably gingelly) and turn the heat down to medium and leave it for about a minute to cook on one side.
 5. Turn the pesarattu over carefully with a spatula and add a little more oil (if you like) to help it become crisp and golden on both sides.
 6. Transfer the cooked pesarattu to a plate and use up the remaining batter in a similar manner. Leftover batter can be stored for a couple of days in the fridge, covered tightly.
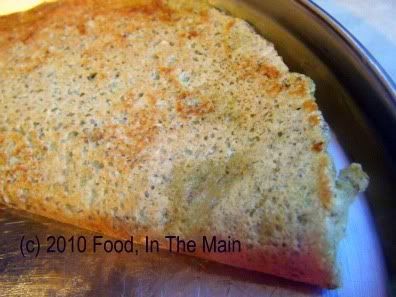 Serve hot with any chutney or podi.
RECIPE: PESARATTU (GREEN GRAM PANCAKES)
Ingredients:
1 cup whole green gram dal
1/4 cup chana dal
1/2 cup uncooked rice (pretty much any kind)
1-2 cloves garlic, peeled
1/2"-1" piece ginger root, peeled
2-4 green chillies (or to taste)
Salt to taste
Oil to shallow-fry
Method:
1. Soak the green gram dal, rice and chana dal in cold water for 8-10 hours or overnight.
2. Drain the water, then add the soaked dal and rice along with the ginger, garlic and green chillies in a grinder or mixie.
3. Grind it all into a thickish batter that is fairly smooth. Add salt to taste and mix it in.
4. Pour a ladleful of the batter in a heated non-stick or well oiled pancake pan, using a circular motion to spread it out evenly into a circle. Add a little oil (preferably gingelly) and turn the heat down to medium and leave it for about a minute to cook on one side.
5. Turn the pesarattu over carefully with a spatula and add a little more oil (if you like) to help it become crisp and golden on both sides.
6. Transfer the cooked pesarattu to a plate and use up the remaining batter in a similar manner. (Leftover batter can be stored for a couple of days in the fridge, covered tightly.) Serve the pesarattu hot with any chutney or podi.
Serve hot with any chutney or podi.
RECIPE: PESARATTU (GREEN GRAM PANCAKES)
Ingredients:
1 cup whole green gram dal
1/4 cup chana dal
1/2 cup uncooked rice (pretty much any kind)
1-2 cloves garlic, peeled
1/2"-1" piece ginger root, peeled
2-4 green chillies (or to taste)
Salt to taste
Oil to shallow-fry
Method:
1. Soak the green gram dal, rice and chana dal in cold water for 8-10 hours or overnight.
2. Drain the water, then add the soaked dal and rice along with the ginger, garlic and green chillies in a grinder or mixie.
3. Grind it all into a thickish batter that is fairly smooth. Add salt to taste and mix it in.
4. Pour a ladleful of the batter in a heated non-stick or well oiled pancake pan, using a circular motion to spread it out evenly into a circle. Add a little oil (preferably gingelly) and turn the heat down to medium and leave it for about a minute to cook on one side.
5. Turn the pesarattu over carefully with a spatula and add a little more oil (if you like) to help it become crisp and golden on both sides.
6. Transfer the cooked pesarattu to a plate and use up the remaining batter in a similar manner. (Leftover batter can be stored for a couple of days in the fridge, covered tightly.) Serve the pesarattu hot with any chutney or podi.

