skip to main |
skip to sidebar
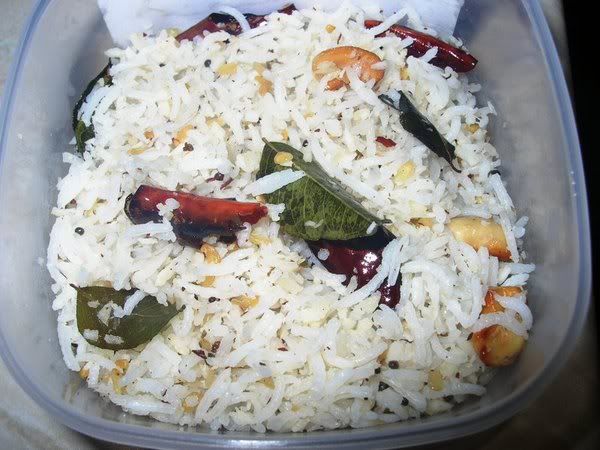
After a long time (four years, I think), I felt the urge to make coconut rice. I dont know why I dont make it more often, because I like it a lot. I guess it's to do with the unreliability of the coconuts I get around here. Goodness knows where they come from or how long ago they were harvested, but there's a 50-50 chance that a coconut bought at Tesco or Asda will be light-years from tender or, if I'm really unlucky, it will be rotting from the inside.
My mother used to tap the "eyes" of the coconut at one end to find out if they were fresh. Another thing she did was to shake them to feel how much water is inside - the more there is sloshing around, the fresher the coconut. Or so I imagined. I still dont know how exactly she determines the tenderness of the coconut, but as far as I'm concerned, I only know that a coconut is rotting when the "eyes" are actually squishy to the touch. Short of that, I havent a clue.
I've also shaken more coconuts than a Santa's helper has shaken an empty donation can (beware, Christmas is on its way...) but none of the shaking or sloshing made it any clearer to me whether the coconut was tender on the inside.
Which, I guess, is why coconut rice hasnt been on my agenda much. Non-tender coconut flesh, when grated or shredded, tastes an awful lot like wood shavings. You can chew and chew and chew until your mouth is dry, but swallowing is not an option because you just KNOW that it will all stick halfway down your gullet if you make the attempt to ingest it. Somehow the prospect of sticking a bottle brush down my throat in an effort to push stubborn lumps of food down into my stomach just doesnt hold much appeal, strange though that may sound...
Anyway, coconut rice is the simplest of recipes to make, if you have cooked rice and freshly grated or shredded coconut at had. I dont think the dry stuff would work well here and I'm not going to attempt it ever. As far as I know, coconut rice is not an everyday dish - it wasnt at home, at any rate. My mother used to make it (along with other "kalanda sadam" - meaning "mixed rice" - like lemon rice and tamarind rice) for a particular religious occasion... which, I'm embarrassed to admit, I cant actually remember. (Update will follow when the information comes in!)
Oh by the way - some people dont bother to toast the shredded coconut at all, but I fry it very lightly so that the aroma and flavour of the coconut flesh are released.
Coconut rice tastes very nice with fried papadoms (poppadums/pappadams/appalam/papadam et al) or even potato crisps.
Recipe for: Coconut rice
Ingredients:
4 cups Basmati rice cooked al dente
1/2 cup fresh shredded coconut
2 tbsp oil
2 tsp urad dal, soaked for 10 minutes in 3-4 tbsp warm water
1/4 cup cashew nuts, broken coarsely
1-1/2 tsp little brown mustard seeds
5-6 fresh curry leaves
3-4 dried red chillies (or to taste), broken in half
Salt to taste
Pinch of asafoetida
Method:
1. Heat the oil in a large wok, drop in the mustard seeds, cover and let the seeds splutter (about 30-40 seconds).
2. Drain the urad dal and add it to the oil along with the next five ingredients.
3. Fry on medium heat until the dal and the nuts are beginning to turn golden brown. Dont turn the heat too high, or the red chillies will burn before the dal and nuts are fried enough.
4. Now add the shredded coconut and stir-fry it for 30 seconds or so, no more. Do not let it brown at all.
5. Then add the rice and salt to taste and mix well. I find that this rice benefits from sitting for about an hour or so, so that the flavours mingle.
6. Re-heat in the microwave oven and serve warm, along with potato crisps or fried poppadams.
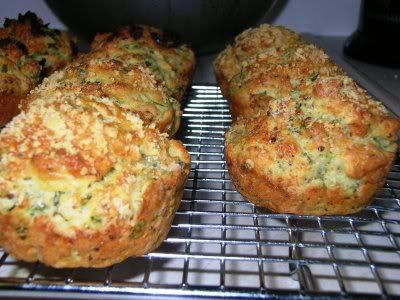
I like baking muffins - they're so quick and easy to do. Unfortunately I enjoy the baking part way better than the eating part, because of my under-developed sweet tooth. Pete likes muffins warm from the oven but once they cool down, they lie around neglected. And his kids, aged nearly 11 and nearly 13, dont like muffins at all - yeah, practically unbelievable, but true. So I dont do muffins nearly as often as I'd like to.
However, today I was in the mood. I had a basic recipe for herb and cheese muffins, so I decided to see what I could do with mostly Indian ingredients, but with a slight western touch. To that end, I picked about a cupful of coriander and fenugreek leaves. Then, because I didnt want to use cheddar cheese with those particular herbs (yep, methi leaves are classified under "herb" rather than "greens" for this recipe!) and didnt quite know what else to add, I rummaged around in my kitchen shelves to see what I could come up with.
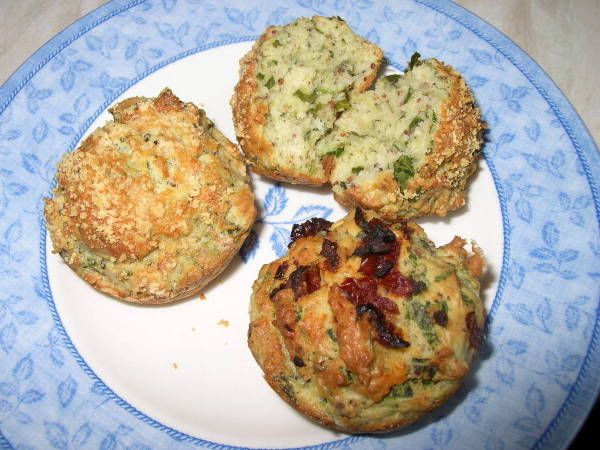
That turned out to be a jar of whole-grain mustard with black pepper and white wine, with about a heaped tbsp remaining. Wondering all the time whether it was a good idea, I emptied out the mustard and added it to the batter. And still on an experimental note, I sprinkled parmesan cheese on some of the muffins, and added drained, chopped sundried tomatoes in oil to the rest, and set them to bake, hoping for the best.

Boy oh boy, it turned out to be a tremendous success - Pete liked them (didnt bother trying them on the kids - they're SO resistant to anything different, it's amazing) although, since he was expecting sweet muffins, he was taken aback at first by the savoury flavour. But he agreed that they would be perfect with soup - or even parma ham (which combination he's welcome to try - I dont touch the stuff).
As for me, I absolutely loved the muffins! They would, as Pete said, be the perfect accompaniment to soup and salad for a light, healthy meal. If I can keep my hands off them before dinner, that is.
Next time I would probably add some chopped green chillies, because I think I would like the muffins even better with some added zing. Yummm....
Recipe for: Savoury methi-mustard muffins
Ingredients:
2 eggs
1/4 cup butter/margarine
1/3 cup chopped fresh fenugreek leaves and coriander leaves
2 cups self-rising flour
1 heaped tbsp whole-grain mustard
1/2 tsp baking soda
1/2 tsp salt
3/4 cup low-fat/whole milk (use according to preference
Optional
3-4 tbsp parmesan cheese, grated
2 tbsp sundried tomatoes in oil, drained and chopped
Method
1. Pre-heat the oven to 180C (350F). Spray/grease a 12-cup muffin pan lightly with oil
2. In a medium bowl, beat the butter/margarine and mustard till well mixed
3. Add the eggs one at a time, beating well between additions.
4. Mix in the chopped herbs
5. Add the salt, baking soda, flour and milk to the batter and fold in quickly but gently till the ingredients are just mixed. Do NOT overbeat or the muffins will turn out tough
6. Spoon the batter into 6 of the muffin cups, leaving the tops rough. Sprinkle the tops with the parmesan cheese.
7. To the remaining batter, add the chopped sundried tomatoes, mixing lightly. Spoon the batter into the remaining 6 cups.
8. Bake for 20-25 minutes, or till the muffins are golden brown and done.
9. Serve warm as they are, or with soup and salad.
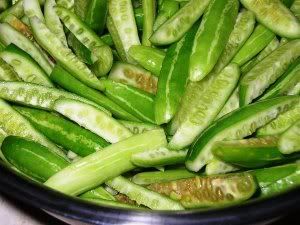
It goes by a lot of names - "kundru" in the North (or so my mother tells me), "kovakkai" in Tamil Nadu and Kerala, "dondekaya" in Telugu and "ivy gourd" in English. It probably has a few more names in a few more languages. I have heard it called "gherkin" by some people, but I'm pretty sure that's wrong. Gherkins are baby cucumbers, and I can assure you that kovakkai is NOT cucumber, baby or otherwise.
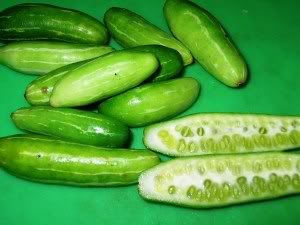
Actually, the vine on which it grows is considered a weed in some areas - which actually makes me want to see if I cant grow it here at home. After all, the main characteristic of a weed is that it can be grown easily, even by people like me who have a natural ability to kill growing plants.
Again, kovakkai is not what I would call my most favourite vegetable, but it's allright enough eaten once in a while. Since I get it fresh only very rarely, it's enough to make me eat it quite willingly. Plus it's low-calorie, rich in minerals and B complex and, best of all, its low-glycemic index makes it good for diabetics.
Mind you, kovakkai is best eaten when the vegetable is tender. That is to say, when it's cut, it should be green inside. I guess one way to tell when it's over-ripe (not nice to handle OR eat) is if it "gives" slightly when it's pressed between finger and thumb. Absolute confirmation can be had from the colour of its innards when it's cut - a vile reddish pink colour. Kovakkai are also quite difficult to cut when ripe, and the juices are sticky and horrible as well.
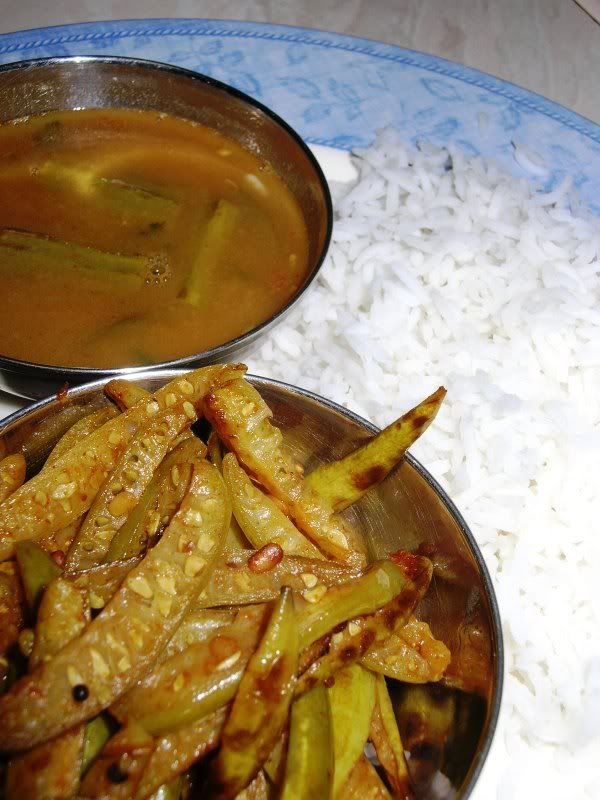
There are a few different ways of cooking this little vegetable, but I opted for the simplest one this time - stir-fried, as a side-dish to be eaten with drumstick sambar and white rice, accompanied by microwaved appalams (papads/poppadum) for a reasonably healthy, perfectly South Indian meal.
Recipe for: Kovakkai (ivy gourd) stir fry
Ingredients:
1/2 kilo kovakkai, cut into strips (trim the tips off before cutting)
2 tsp cooking oil
1 tsp red chilli powder
1/2 tsp garam masala (OR) 1 tsp rasam powder (both optional)
1 tsp urad dal
1 tsp little brown mustard seeds
Salt to taste
Method:
1. Heat the oil in a wide pan, add the mustard seeds and urad dal. Cover while the mustard seeds pop and the dal turns golden brown.
2. Add the red chilli powder and stir it around for a few seconds, then add the kovakkai.
3. Mix well, then turn the heat down to low, and cover the pan.
4. Let the kovakkai steam-cook for 15 minutes. Uncover the pan and turn up the heat. Add the salt and the rasam powder, mix well.
5. Keep an eye on the vegetable while you cook it for a few minutes on high, until little brown spots appear on the bottom layer. Serve hot with white rice and any sambar.
I love my greens - any greens, which is a quantum change from when I was younger. But I cant really tell them apart, taste-wise, unless it be the sour-sharp tangy "gongura", which is an Andhra specialty (as demonstrated deliciously by Indira in her blog). I wish I could get gongura here. The Indian grocery market in Birmingham does not run to quite such regional varieties, unfortunately.
My mother used to buy "ara keerai" and "mola keerai" from the local travelling vendor, claiming that the two were different in taste - but I could never tell them apart, either in looks or in taste. "Saag" and "palak", North Indian varieties of spinach, are interchangeable as well, to me. If I cant get these known Indian greens, I'm happy to settle for the generic "greens" available in the English supermarkets. I honestly dont find them any different when used in dals or cooked, mashed and seasoned in the Tamil way.
Today, though, there was fresh saag (or it could have been palak), courtesy of a foray to the Birmingham shops, and some of my very own home-grown fenugreek greens (yessss!), so I decided to make saag-paneer. And then while rummaging in my cupboard, I found a nearly empty pack of pink masoor dal - it came to about 1/2 cup. It didnt seem worthwhile to store such a small amount or transfer it to a tin, so I decided to use it up.
Voila! - saag paneer with masoor dal.
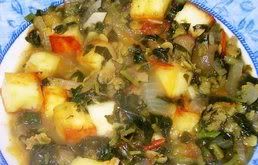
The cupful of fenugreek greens (methi) added to the saag provided the winning touch, because the final result was just mouth-wateringly tasty. I do love my methi! And the 1/2 cup of masoor dal, cooked, was just enough to hold together the rest of the ingredients, making it unnecessary to add any cornflour or rice-flour as a thickener. And boy was it tasty! Masoor is one of my favourite dals because it cooks so quickly. I've always though it a bit of a shame, though, that the pretty salmon pink colour disappears when the dal is cooked - it turns yellowish instead.
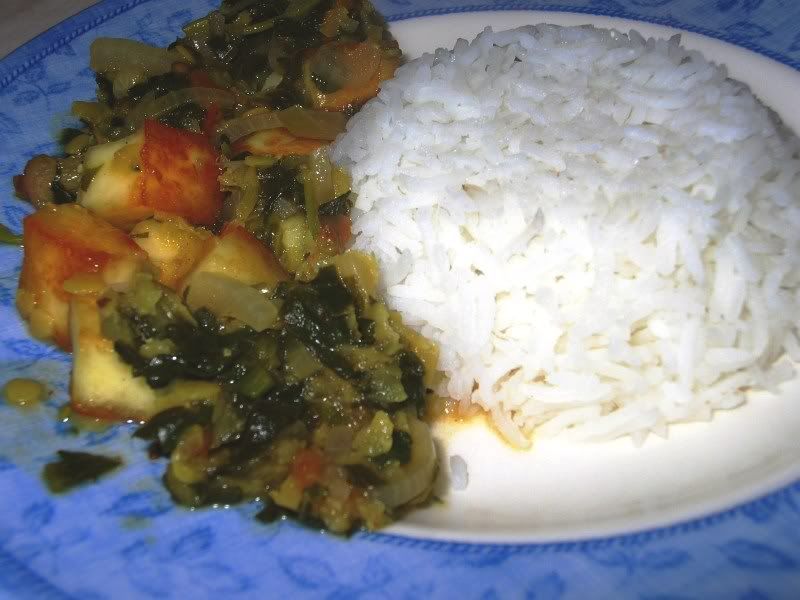
Oh, and the best part of this dal - the only fat content is from the paneer. If you use low-fat paneer, so much the better!
Recipe for: Saag-paneer with masoor dal
Ingredients:
1 bunch fresh spinach leaves, cut into strips
1 cup fresh methi (fenugreek) leaves, chopped
1 large onion, sliced thin
2 large ripe tomatoes, chopped
200 gm paneer, cubed and lightly stir-fried in a tsp of oil
3 green chillies, chopped fine (optional)
1/2 tsp red chilli powder (optional)
1/2 tsp garam masala or chana masala
2 large cloves garlic, chopped
3/4 cup pink masoor dal
1/2 tsp turmeric powder (optional)
Low-fat cooking oil spray
For tempering:
1 tsp oil or ghee
1/2 tsp garam masala
1 heaped tsp cumin seeds
2 dried red chillies, broken in half (optional)
Method:
1. Wash the masoor dal and cook it in about 1-1/2 cups water mixed with the turmeric powder, till it's done but not mushy. (Remove any froth with a spoon). Drain the water and reserve (about a cupful).
2. In a wide pan, heat the tsp of oil and add the garlic and chopped green chillies (if using). Stir-fry for 30 seconds, then add the sliced onions. Squirt the onions with a couple of sprays of cooking oil. Fry till the onions start turning brown.
3. Add the chopped tomatoes and cook for 2-3 minutes, then add the chopped greens. Sprinkle 3-4 tbsp of the reserved dal-water over the greens. Cover the pan and cook for 5-6 minutes on medium-low, until the greens are wilted and cooked.
4. Now add the red chilly powder (if using), the cooked masoor dal and the rest of the dal-water and mix well. Add salt to taste.
5. Add the lightly fried, cubed paneer and simmer the dal for 4-5 minutes.
Seasoning:
Heat a tsp of oil/ghee in a small pan, add the dry red chillies (if using) and the cumin seeds. When the seeds change colour and give off a nice aroma (a few seconds), add 1/2 tsp of garam masala and take the pan off the fire. Pour this seasoning over the surface of the dal and serve hot with plain steamed rice and microwaved papad.

