skip to main |
skip to sidebar
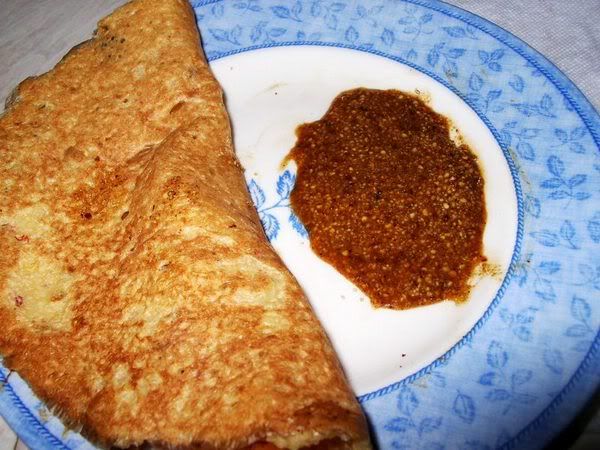
Onion bhajis - onion pakoda to you and me - is probably the UK's most favourite starter before any British-Indian meal, as much as chicken tikka masala is its most favourite "Indian" dish. Serve this up to any normal British person who likes Indian food, and you will be instantly elevated to the status of "fantastic cook". I say this as a person who has earned the title from her friends and from her husband's friends and really anybody who's had onion bhajis at my place :)
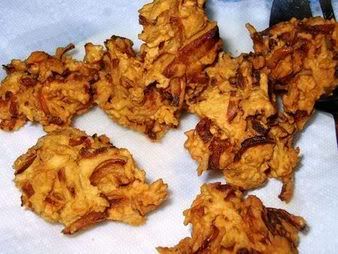
After eating the much-touted bhaji from an "Indian" takeaway restaurant here for the first time, it wasnt exactly rocket science to figure out what went in it - basically gram flour, some crushed coriander seeds, some chilli powder and salt added to sliced onions and deep-fried. Served with the ubiquitous "mint raita dipping sauce" - which was a spoonful of ready-made mint sauce mixed with a cupful of yogurt. That was it. And honestly speaking, that IS it even when I make bhajis at home. Nothing more, nothing less. Make no mistake, though... the things are tasty and extremely more-ish!
When I duplicated the recipe at home for Pete's friends one evening, though, I was completely taken aback by how much they raved about it. I tried telling them that it wasnt difficult to make, far from it... but they just wouldnt have it. Faced with so much insistent praise, I decided to accept the inevitable and gracefully let myself be crowned the Queen of Bhajis. Okay, so it's a dubious title, but mine own!
Just dont forget to address me as Your Royal Bhajiness.
Recipe for: Onion bhaji - UK-style
Ingredients:
3-4 medium sized onions, sliced thinly
About 1-1/2 cups gram flour/chickpea flour
1 tsp red chilli powder (more or less acc to taste)
1 htsp crushed or powdered coriander seeds
Salt to taste
3/4 cup water, more or less, as required
Oil to deep fry
Method:
1. Put the sliced onions in a big bowl and add the chilli powder, coriander powder and salt. Mix with a big flat spoon till evenly distributed.
2. Add the chickpea flour a little at a time, stirring again to coat the onions.
3. Now sprinkle water all over this, adding just enough to make the flour moist and stick to the onions - and it WILL be sticky.
4. Heat the oil - it's ready when a bit of bread sizzles immediately. Drop in the bhajis by the table spoon or by hand in bite-sized lumps. Fry on medium-high until golden brown and crisp on the outside. The inside should be soft but not raw.
5. Serve hot with instant mint raita as a dip. These are also nice with tomato ketchup or other condiments.
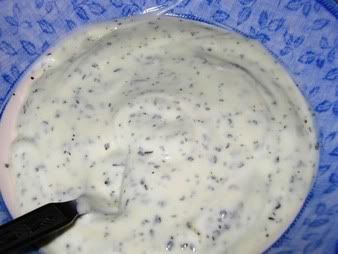
Recipe for instant mint raita:
1 tsp ready-prepared mint sauce or mint jelly
1 cup yogurt, beaten lightly
1/4 tsp salt
Mix the ingredients well and serve with the bhajis.
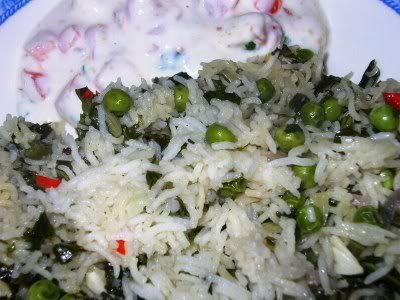
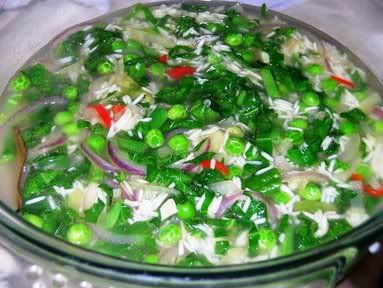
Funnily enough, there isnt much I can say about this recipe (do I hear a collective sigh of relief?) :) It's simple, filling, aromatic, low-fat and has plenty of vegetables - not much else to ask of a dinner dish, is there? This pulao is one step down from a khichdi, the missing ingredient being tuvar dal. I didnt add it because I wasnt sure if the tuvar dal would cook completely in the microwave.
I'm a bit wary of cooking dals in the microwave because the one time I tried it with tuvar dal, it made an unholy mess when it bubbled over in the oven - and it STILL was only half-cooked. While lots of things are nice al dente instead of mushy, tuvar dal is not on that list.
We had this nearly-khichdi vegetable pulao with a simple tomato raita, but it would be just as nice with coconut chutney or some spicy pickle alongside.
Recipe for: Microwave vegetable pulao
Ingredients:
1 cup basmati rice, soaked in warm water for 30 minutes
2 cups mixed chopped vegetables (any combination of green beans, carrots, spinach, cauliflower, peas, etc)
1 onion, sliced thin
1 bay leaf
1 medium-hot red chilli, sliced into very thin rings
3-4 green chillies, slit (optional or adjust to taste)
1/2 tsp garam masala
1 tsp cumin seeds
1 tsp slivered garlic (2-3 pods)
1 tsp ginger root, grated
2 tsp oil
Salt to taste
1 tbsp coriander leaves, to garnish
Handful of roasted/fried cashewnuts, for garnish (optional)
Method:
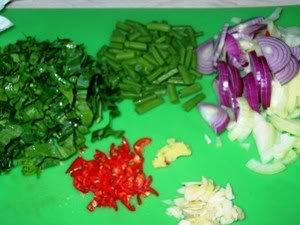
1. Heat the 2 tsp oil in a pan and add the bay leaf, garlic, grated ginger, slit chillies, sliced red chilli and cumin seeds. Fry for 30 seconds or so, stirring continuously.
2. Add the garam masala and onions and stir-fry till they start turning soft, then add the vegetables and stir again.
3. Drain the rice and add that to the pan as well and fry for 2-3 minutes.
4. Add 2-1/4 cups water and salt to taste. Pour it all into a microwaveable bowl and cook it for 15 minutes or so on high without a cover. (Start with 10 minutes and see if the vegetables and rice are cooked - the cooking time depends on the wattage of the oven.)
5. Cover the bowl and let the pulao rest for 5 minutes. Just before serving, fluff the rice up gently with a fork and sprinkle the chopped coriander over. Also top with the fried cashewnuts, if using.
Serve hot with chilled tomato-yogurt raita.
Quick tomato raita:
1 ripe tomato, chopped fine
1 cup cold yogurt (Greek-style, for preference)
1/4 tsp salt
pinch of garam masala (or molagapodi if you have it)
Mix together and serve as an accompaniment for the pulao.
I know, it's a clunky title. But I couldnt come up with a better description in English for pulikachal, which would translate from the Tamil literally into "tamarind (puli) boil-up (kachal)" - descriptive enough but not particularly useful informative.

I dont make pulikachal very often because there's always the impression at the back of my mind that it takes too long to make, and now that I'm working full-time, there doesnt seem to be enough free time to do all the things I want, let alone spend lots of time on just cooking. But the impression is not quite right, because once the masala has been made for it, pulikachal kind of cooks itself. It doesnt need looking after every single minute.
The best pulikachal I've ever had was when I was an apprentice sub-editor at the Indian Express, my very first job. My boss (and mentor) there was a wonderful old gentleman called C P Seshadri, fondly and universally known as "Master". He was a very knowledgeable person, a living bit of history - a contemporary of Mahatma Gandhi, Pandit Nehru and all the other stalwarts of the Indian freedom movement... and what is more, he was personally acquainted with them.
Anyhow, long story short, Master was very affectionate and kindly, more grandfatherly to me than my own grandpa! When he discovered that I didnt bother to bring lunch from home but sometimes ate junk food at the little stalls outside the office gates, he insisted on me sharing the hot lunch that was delivered to him from his home, waving aside my embarrassed protestations. (But the food... oh the food! - embarrassment quickly took a back seat!)
His wife (Mrs Master to me) was a very dignified, stern looking lady - but in reality very kind. Not to mention, a SUPERB cook. Everything she made was wonderful, but her tamarind rice was out-of-this-world good. Iyengars are traditionally considered to make the best pulikachal and I have to say that Mrs Master was living proof of that. I wish I'd been interested enough in cooking then to ask her for the recipe.
That said, though, I've evolved a pretty good recipe for pulikachal, based - but of course - on my mother's. My version has coconut in it (and yes, I do realise that for someone who doesnt like coconut in a lot of things, I seem to be using the stuff rather a lot!).
Anyway, while trawling through the Net a couple of years back, I came across a comment in some food-chat board that said the writer added toasted grated coconut to the masala for pulikachal. After a lot of thought - and a great deal of hesitation - I decided to follow that tip. And what a surprise to find that the coconut adds texture but doesnt register on the palate... and you cant smell it either. JUST the ticket.
No more babbling for now - here's my recipe!
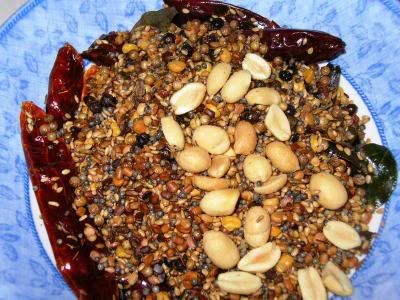
Recipe for: Pulikachal (spicy sauce/chutney for making tamarind rice)
Ingredients:
1 tbsp tamarind paste (Tamicon) dissolved in 6 cups warm water
or
1 lemon-sized ball of tamarind, soaked and pulped to make 6 cups of tamarind water
For the masala:
1 tsp oil
2 tbsp coriander seeds
1/2 tbsp chana dal
1/2 tbsp mustard seeds
1/2 tbsp cumin seeds
1 tbsp sesame seeds
1 tbsp urad dal
1 tbsp black peppercorns
1 tbsp peanuts
1/2 tsp fenugreek seeds
8 dried red chillies
10-15 curry leaves
1/4 packed cup grated coconut
For the tempering:
3 tsp oil
2 tsp mustard seeds
2 dried red chillies, broken in half
1 tsp urad dal
2 tsp chana dal
4 tsp roasted peanuts
2 tsp sesame seeds
5-6 curry leaves
Method:
1. Roast all the masala ingredients (except the coconut) in one tsp of oil till the seeds pop and the dals become a lovely golden brown. Set aside to cool.
2. Roast the grated coconut separately, turning it over frequently, till it turns golden brown. Let it cool as well.
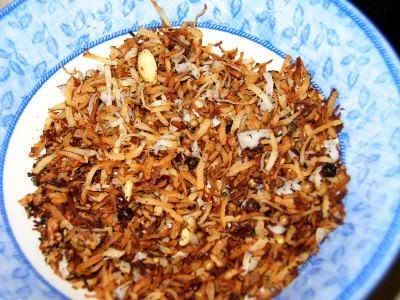
3. In a coffee grinder or spice grinder, grind the roasted masala ingredients and the coconut to as smooth a paste as possible. This might be easier done a little at a time, because the resulting paste is very thick. Dissolve the paste in a cupful of water and set aside.
4. In a wide but deep vessel, heat 3 tsp oil. Add a pinch of asafoetida (optional), then all the tempering ingredients and cover till the seeds finish popping.
5. Pour in the 6 cups of tamarind water and stir. Let the water come to a rolling boil, then stir in the ground masala paste, mixing till well incorporated.
6. Leave the heat on high and cook the mixture till it reduces to a third and starts thickening. Add salt to taste now. (The reduction could easily take 20 minutes or more, depending on the depth and width of the pan. Basically, the deeper the pan, the longer the time).
7. When the pulikachal is thick (the consistency of honey, more or less), turn the heat off. It will become thicker still as it cools.
Pulikachal can be used to make tamarind rice - about a tbsp mixed with a cupful of cooked rice, but you can add more or less depending on taste. This recipe makes quite spicy pulikachal.
Say pumpkin, and immediately the garish orange one comes to mind - the one that's hollowed out to make Jack o' Lanterns for Halloween. I guess it's eaten a lot in the US during Thanksgiving - made into pies and cookies and cakes and casseroles and goodness knows what else. But orange pumpkins arent my favourite - the white ones are. That is, translucent white on the inside, and green on the outside.
White pumpkin seems to be a vegetable eaten mostly by Tamilians... it's one of my favourites when made into kootu (using ground coconut to flavour the gravy and bring the cooked vegetable "together") following my mother's recipe.
I'm not sure if it's particularly popular elsewhere (except when making aviyal, I suppose) in India, because the last time I visited my mother when she was living in Hyderabad, we didnt find white pumpkin in the vegetable shops for love or money. And the one time that I spotted a pumpkin, the shopkeeper refused to sell us a portion of it - it was all or nothing. Since a whole pumpkin is a waste of a purchase for just two people - even for two people who love it! - we had to leave with nothing.
But a reasonable substitute for white pumpkins - which I have never seen in the UK - is the chayote squash... or Bangalore kathirikkai, as I knew it in Madras. It's a slightly strange looking vegetable, puckered up on one side, but it tastes great when made into kootu.

Chayote squash, or Bangalore kathirikkai
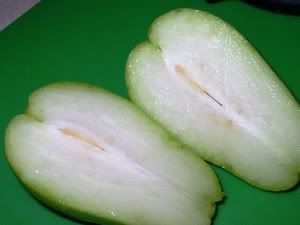
What it looks like cut lengthwise
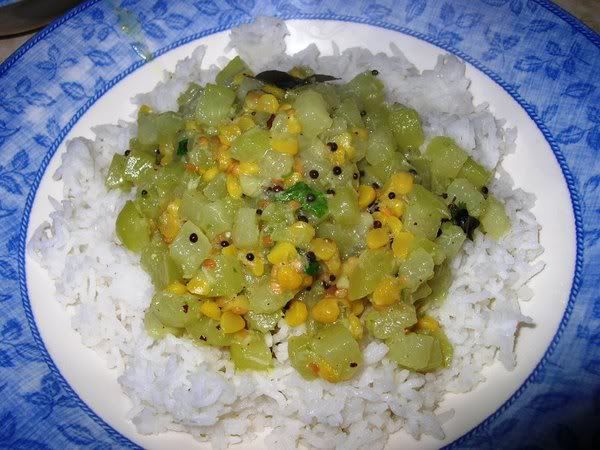
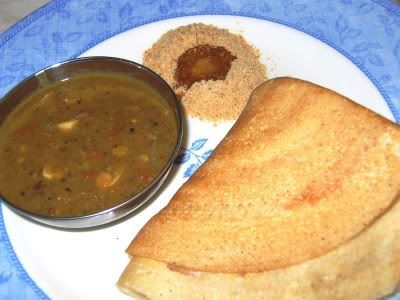
It's nice as a side dish with vatha kuzhambu/sambar and rice, fantastic as an accompaniment for rotis and pretty darn good over plain rice as a main meal. That's what I had yesterday for my dinner - chayote squash kootu with rice and microwaved appalams. Homey, filling and healthy!
Recipe for: Chayote squash (Bangalore kathirikkai) kootu
Ingredients:
2 cups chayote squash, chopped evenly into small cubes
1/4 cup gram dal (chana dal/kadalai paruppu)
Two pinches of turmeric powder
Water
For the coconut paste:
2 tbsp fresh grated coconut
4-5 green chillies (or to taste)
1/2 tsp cumin seeds
2 tsp rice flour
For the tempering/tadka:
1 tsp mustard seeds
1 tsp urad dal
1 tsp cumin seeds
a few curry leaves
pinch of asafoetida
2 tsp oil
1 tbsp chopped coriander leaves for garnish (optional)
Method:
1. Put the chopped squash and the chana dal in a saucepan and pour in just enough water to cover the vegetables fully.
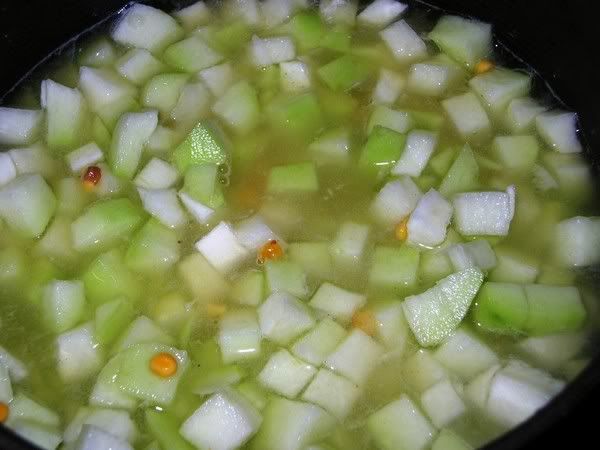
2. Add the turmeric and stir, then cover the pan and bring the water to a boil. Turn down the heat to a slow simmer till the chana dal is cooked but still retains its shape, about 15-20 minutes. (Test by squashing a kernel of dal between your fingers - if it mashes easily, it's done.) Keep an eye on the water level so that it doesnt fall below the level of the vegetable. The squash should be cooked by then as well.
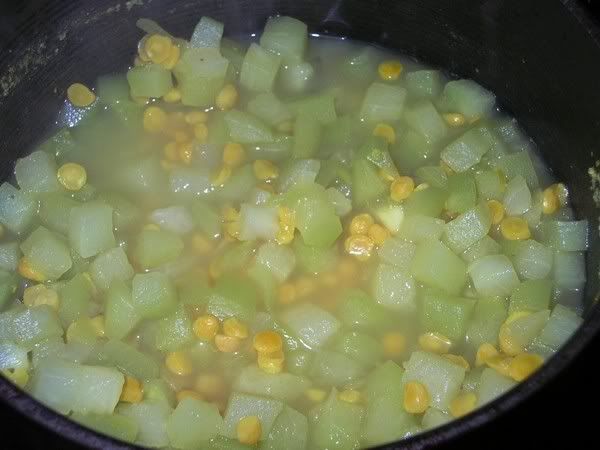
3. Meanwhile, grind the coconut paste ingredients into a smooth paste using some warm water (about 3-4 tbsp).
4. Add the paste to the cooked vegetable along with salt to taste, and mix well. Let the kootu simmer for 3-4 minutes.
5. In a small pan with a lid, heat 2 tsp oil and add the tempering ingredients, then close the pan. Wait till the mustard seeds have popped and the cumin seeds and urad dal have changed colour, then pour directly onto the kootu. Mix well and take the kootu off the heat.
6. Garnish with chopped coriander leaves and serve with rice or chapatis/rotis.
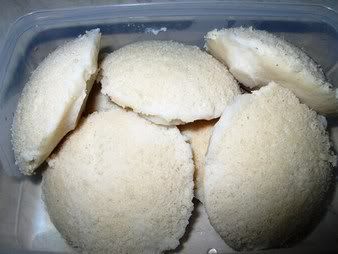
I was planning to make this post about coconut-coriander chutney as an accompaniment for idli - and then decided to post a quick recipe for idli batter as well, encouraged by a specific request for it. (Hey, it's nice to be asked - it's usually me that does the asking of my ever-patient mom!)
Making idli batter is a simple affair nowadays, because I know where to get the ground rice (or idli rava) for it. The traditional way is to make it by soaking a certain kind of rice (puzhungal arisi) in water, but I dont have a proper wet grinder that would make it easy to grind the rice. I use my trusty Sumeet mixie instead, and idli rava is a lot kinder to its motor! (I live in perpetual dread of my mixie breaking down - that would be a catastrophe beyond description!)
Anyway - my recipe for idli batter is 4 cups of idli rava or ground rice (I use the Natco brand)to one cup of de-husked urad dal. (If you use the dal with husk, you get idlis with black spotty bits. Not very nice to look at but just as edible as white idlis. Ask me. I speak from experience.)
I've also tried using basmati rice in place of the puzhungal arisi, but although it works for making dosas, idlis turn out sticky and too doughy for my liking. I dont think using rice flour for the batter would be successful either - the result would be the same as with basmati rice. Ground rice or idli rava is best, as it is somewhat coarser in texture and gives idlis their slightly grainy look.
When a South Indian thinks idlis, it's always accompanied by sambar, molagapodi and coconut chutney. These three are a must. Tomato chutney and onion chutney are optional but welcome extras and, outside of a hotel, a total indulgence if made at home at the same time as the other accompaniments!
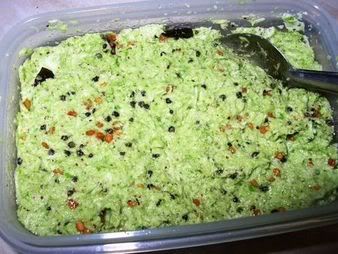
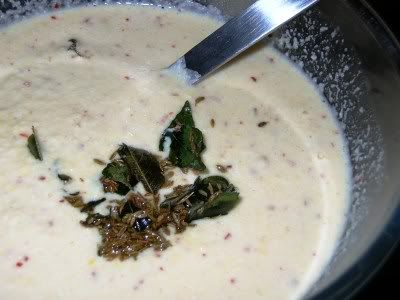
Since I bought a coconut yesterday, I had to use up about half a cup of frozen grated coconut that I was storing. That, along with the remnants of a bunch of coriander, made for a pretty, green chutney that was just right with my idlis. I "seasoned" the chutney with fried mustard seeds, urad dal and curry leaves, so that makes it South Indian style. If I'd added ginger root to the coconut while grinding, and lemon juice after (instead of the seasoning), it would have been a North Indian style chutney. Small and subtle changes in preparation, but BIG change in taste. Hurray for variations!
Recipes for: Coconut-coriander chutney and idli
Ingredients:
1/2 cup fresh grated coconut
4-5 green chillies (or to taste)
2 tbsp fresh coriander leaves, coarsely chopped
Salt to taste
For seasoning:
2 tsp oil
1 tsp urad dal
1 tsp mustard seeds
4-5 curry leaves, torn in half
pinch of asafoetida
Method:
1. Grind the coconut, green chillies, coriander leaves and salt in a spice or coffee grinder to as smooth a paste as possible.
2. Turn the blended coconut into a bowl.
3. Heat the oil in a small pan with a lid. When the oil is hot, put in the mustard seeds, urad dal, curry leaves and asafoetida. Stir and cover.
4. Once the mustard seeds have popped and the urad dal is a reddish gold in colour, pour it on top of the chutney at once. Mix well and serve with hot idlis or dosas.
Idli:
Ingredients:
4 cups idli rava
1 cup urad dal (de-husked)
Salt to taste
Water as required
Method:
1. Grind the urad dal to a smooth paste, using as little water as possible (use cold water). The urad dal should make a thick batter that drips very slowly off a ladle.
2. Make a fairly thick batter of the idli rava and two cups of water. This can be less thick than the urad dal batter, but should not be runny.
3. Mix the two batters together thoroughly in a big bowl, adding salt to taste. The bowl should be only half full, or maximum 2/3 full, to allow for the batter to ferment and rise.
4. Cover and let rise in a warm place for about 8 hours or overnight. If you live in a cold place, this might take as long as 18 hours. I usually heat my oven to 100C first. Then I turn it off, leaving the light on for warmth, and place the bowl of batter in the oven, leaving it to rise.
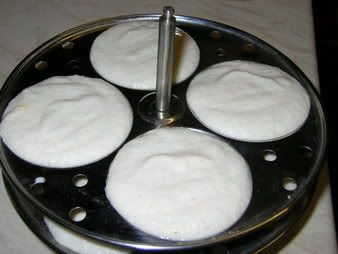
5. Once the batter is risen, stir it well. If you have an idli stand or mould, grease the cups and pour a ladleful of batter into them. If you dont have a mold, use a flat shallow vessel with a rim and pour the batter into it (the batter should be about 3/4" high in the vessel).
6. Steam it for 12-15 minutes (if using a pressure cooker, DONT use the weight). Let cool for about 5 minutes, then unmold carefully, using a thin-edged spoon to remove the idlis. Serve hot.
Here's my first (deliberate) post on typically Indian kitchen utensils, as started by Indira (of Mahanandi fame). I call it deliberate because I did a post a while back, on the ribbon pakoda "press" - an unofficial entry for the "Indian Kitchen" series!
Anyway, this post is about a utensil I'm pretty sure every single South Indian kitchen would have - the idli mould. Grease the depressions in the idli thattu (plate), pour in the idli batter, stack up the plates on the "stem",

and steam the whole thing for 12-15 minutes in a pressure cooker (not using the weight, of course) - and taDAH! steaming hot idlis ready for your morning pleasure.
I remember my mother's idli mould (probably my grandmother's, actually) - the depressions had hundreds of tiny holes. If the idli plates were not washed thoroughly, the holes would retain some of the cooked idli batter. We were living in Dar-es-salaam, Tanzania, and I would have been maybe 6 or 7 years old.
Our maid then wasnt the most meticulous when it came to washing up, so there was always some dried cooked idli plugging the teensy holes in the idli plates. It used to be my particular pleasure to poke the dry bits out of the tiny holes with a pin. I used to get terribly disappointed if I knew that my mother was doing the washing-up... because I knew there wouldnt be a single hole to unplug, as it were! :)
Arent they CUTE? :)
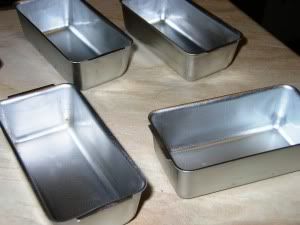
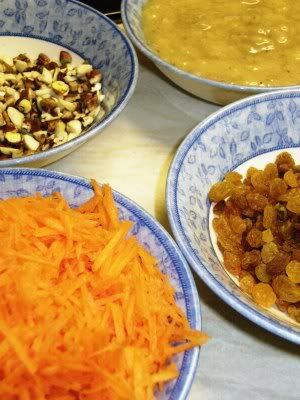
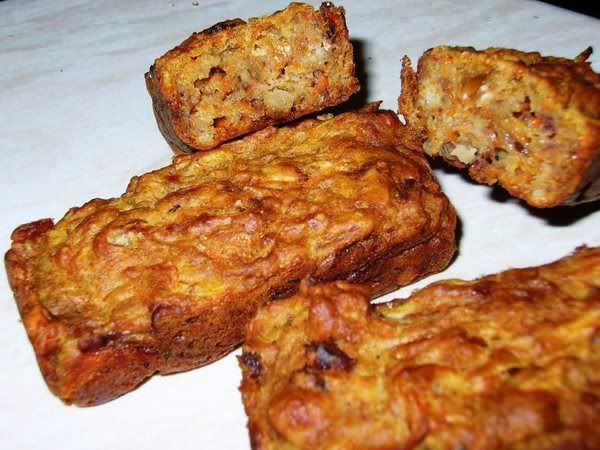
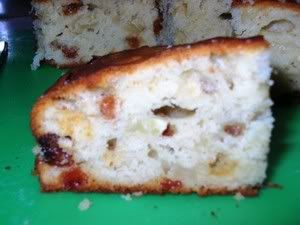
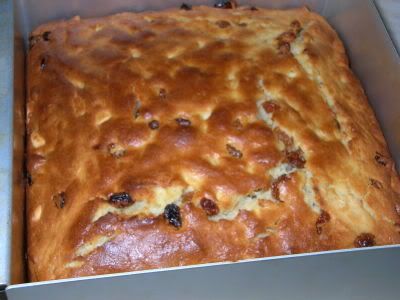
With such adorable mini-loaf pans, is it any surprise that I wanted to make banana bread very very extremely much? They were a gift from my brother-in-law's girlfriend and I fell in love with the little things right away. There was also a recipe for bana-carrot cake from Cooking Light that I badly wanted to try. What else could I do but bring the two together and make banana-carrot mini loaves. Or rather, 6 mini loaves and one square cake that I cut into bars. Voila! - banana-carrot cake bars!
I will confess right away, I didn't expect this cake to turn out so heavy... but considering it uses no eggs and only 1/2 cup oil for the batter, I guess I should not have been quite so surprised. However, I was more than pleased with the flavour, and I loved the texture, dense and chewy, made even more so by the chopped nuts I used. The loaves were more like flapjacks, really. Yum-MEE! We just couldnt stop eating them, believe me.
I guess this would have been a really low-calorie recipe but for the nuts... but I wouldnt have left them out for the world. Sorry, Cooking Light magazine!
Recipe for: Banana-carrot cake bars (adapted from Cooking Light magazine)
Ingredients:
Three large bananas, mashed smooth
2 generous cups grated carrot
2-1/4 cups flour (I used 1 cup white, 1-1/4 cup wholewheat)
1/2 cup oil
up to 1 cup brown sugar (I used 1/2 cup Splenda and 1/4 cup brown sugar)
1/2 tsp crushed/powdered cardamom seeds
1 tbsp baking soda
1/2 cup mixed chopped nuts (I used pecans, pistachios and almonds)
1/2 cup golden sultanas
1/4 tsp salt
Method:
1. Preheat the oven to 180C (350F), and grease an 8" square cake pan (or about a dozen mini pans, if you have them).
2. Sift the flour, salt and baking soda in a large bowl.
2. Add the rest of the ingredients to the flour and cut in lightly, the mix until the batter is moistened. Add a few tbsp milk if the batter is very thick.
3. Pour the batter in the greased pan and bake for 45-50 minutes or until the cake tests done.
4. Cool in the pan for 10 minutes, then turn the cake out onto a wire rack. Cut into bars when cool. Store in an airtight tin.
 I guess there are as many recipes for molagapodi as there are people who make it... and I'm happy to try out all of them (the recipes, obviously!).
For a change, I have no objection (hallelujah!?) to coconut as one of the ingredients of molagapodi - in fact, my mother has a recipe for thengai (coconut) molagapodi that's particularly yummy. Probably handed down by my paternal grandmother, who was apparently a wonderful cook. It's just a pity that I have hardly any memories of her, much less her cooking.
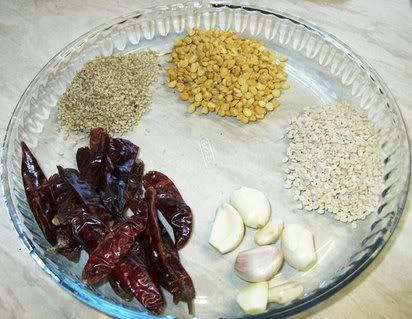
Anyhoo, I like using lots of sesame seeds in my recipe, and sometimes - like this time - I throw in a dozen pods of garlic while roasting the dals. I like the garlic flavour to be right there at the forefront, fighting with the sesame seeds, but if you want a shyer, less obvious garlicky taste, use fewer pods.
Gingelly oil is favourite to mix with this molagapodi, but I'm sure ghee would work as well.
Recipe for: Garlic-sesame molagapodi for dosa/idli
Ingredients:
1 cup urad dal
1 cup gram dal (bengal gram/kadalai paruppu)
10 dry red chillies (or to taste)
2 tbsp sesame seeds
10 garlic pods, peeled and sliced
1/4 tsp asafoetida (optional)
5-6 curry leaves (optional)
Salt to taste
Method:
1. Dry-roast the urad dal and gram dal in a pan over medium heat until they turn golden. Set aside to cool.
2. In the same pan, roast the sesame seeds next, till they give out a nice smell. They will pop if the heat is too high, so keep it on medium-low. Set aside to cool.
3. Finally, heat a 1/2 tsp of oil in the pan and fry the sliced garlic pods, the curry leaves and the red chillies till the chillies begin to turn a darker colour and then turn off the heat.
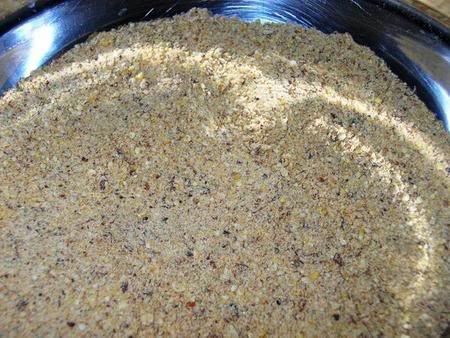
4. Once all the ingredients get to room temperature, grind them to a powder that is the texture of sand, add salt to taste and mix well.
5. To serve as an accompaniment for idlis or dosas, put a tsp or so of the molagapodi on a plate and mix with a tsp or two of gingelly oil or melted ghee, as per taste.
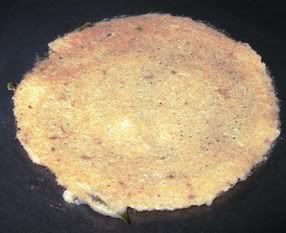
Adai is the heavier protein-rich cousin of the more common dosa. I dont think adai is anywhere near as well known as dosa is in North India, because it's so much more common in the south. Keralites eat it with aviyal, a coconut-and-vegetable medley cooked with buttermilk or sour curds - an acquired taste which I confess I havent mastered yet, whether it's the making or the eating. My mother makes aviyal with a tamarind base, which I prefer - but that's not what this post is about!
To get back to adai - it's basically made with by grinding together a combination of rice and different dals - thuvar, channa & urad - and I'm sure the proportions of the dals and rice vary from household to household. The good thing is that the batter doesnt need to ferment before it can be used - although, again, some people prefer to let it ferment for a few hours before making the adai. Some people add grated or chopped coconut to the batter (my opinion on that, as always, is "Bleaaurrrgh"), and others vary it by adding chopped onions.
I remember my grandma making adai on a cast-iron flat pan - she would make the very first dosa or adai a baby-sized one, to check whether the heat was right to cook the batter and to make sure it didnt stick to the pan. That first baby one used to be my particular delight. When she made the bigger ones, she would poke four or five little holes in the batter after spreading a ladleful in the pan, into which she would pour a little oil or ghee. This was to make it cook quicker and more evenly and of course to make it crisp. I dont need to do that since my trusty non-stick tava works just fine without any extra oil added.
In my family, adai was traditionally simply served with softened pieces of jaggery. I didnt use to like that much then, but I quite like it now.
Recipe for: Thaval adai
Ingredients:
2 cups rice
3/4 cup chana dal
3/4 cup thuvar dal
1/2 cup urad dal
10 dried red chillies (fewer if you like it less hot)
Salt to taste
For the tempering:
1 tbsp cumin seeds
10 curry leaves
1/2 tbsp black peppercorns, crushed (optional - I didnt use it)
1/4 tsp asafoetida powder
1 tbsp ghee or oil
Method:
1. Soak the rice and dhals together for 8 hours or overnight.
2. Grind them with the red chillies and salt, using water as required to make a coarse thick batter.
3. Heat the ghee or oil in a small pan and fry the cumin seeds, peppercorns and curry leaves, adding the asafoetida after 30 seconds.
4. Pour into the batter and mix well.
5. To make the adai, pour a ladleful of the batter onto a heated non-stick tava or flat pan.
6. Spread it out into a circle using the back of the ladle, using a concentric motion. It can be as thick or thin as you like, but thicker adais take longer to cook.

7. You can pour a half tsp of oil around the edge of the adai while it is cooking, but this is not required if you're using a non-stick pan.
8. Cook till the adai is golden on one side, then flip it over and cook till that side acquires golden spots as well.
9. Serve hot with softened lumps of jaggery (traditional) or with coconut chutney and thick yogurt or curds. If you like, you can even have it with idly podi, like I did.
I was planning to make kara kuzhambu (a spicy-hot gravy for rice) but ended up with kara sambar using cooked thuvar dal. I must have cooked the thuvar dal with the intention of making something using it, forgot about it and decided to make kara kuzhambu instead. Then when the kuzhambu was almost ready, I (re)discovered the cooked thuvar dal. Since I didnt want to freeze it to use another day, I decided to dump it in the kara kuzhambu - and thus kara sambar came about. It made for great sambar with a somewhat different taste than when I make sambar the regular way.
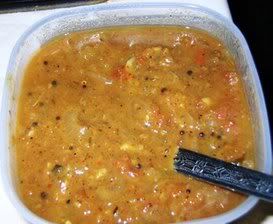
I had the kara sambar with dosa and molagapodi made Indira's way, and enjoyed every last bit of it! I will probably end up making this kara sambar more often... out of choice, not by accident.
Recipe for: Kara sambar
Ingredients:
For the sambar:
1 cup cooked and mashed tuvar dal
1 cup shallots, chopped into thirds (If you dont have shallots, onions are ok to use)
1/2 cup garlic, chopped into chunks
2 cups tomatoes, chopped fine
1 tsp tamarind paste, dissolved in 4 cups water
1 tsp red chilli powder
1/2 tsp turmeric powder
1 tsp mustard seeds
1/4 tst each of urad dal, fenugreek seeds and cumin seeds
3-4 tbsp oil
1 tbsp fresh chopped coriander leaves for garnishing
4-5 curry leaves (optional)
Salt to taste
For the dry masala powder:
1 tbsp coriander seeds
1 tsp black peppercorns
1 tsp cumin seeds
1 tsp channa dal
1 tsp urad dal
5-6 dry red chillies
1/2 tsp fenugreek seeds
Dry-roast these without oil and grind to a fine powder. Reserve.
Method:
1. Heat the oil in a pan and add the mustard, cumin, urad dal and fenugreek seeds and the curry leaves, if using.
2. Cover the pan and let the seeds pop (about 30 seconds).
3. Add the chopped shallots and garlic and fry for a few minutes till they turn soft.
4. Then put in the chopped tomatoes and cook till the tomatoes are soft and mushy.
5. Mix in the chilli powder and turmeric, then add the tamarind water and stir.
6. Bring the mixture to a boil and let it bubble briskly for about 7 minutes, then add the dry masala powder and mix.
7. Let this simmer for five minutes before stirring in the cooked thuvar dal and salt to taste.
8. Boil for 3-4 minutes, turn off the heat. The mixture should be quite thick, but still pourable. If not, thicken it with a little cornflour and boil for another minute or so. Garnish with coriander leaves.
9. Serve over rice or as an accompaniment with dosa or idli.
I used to think that poli was a South Indian recipe, until I found out that Maharashtrians make it for Makar Sankranti (harvest festival) - which necessitated a change in my world view somewhat, because people from the four Southern Indian States consider Maharashtra and Mumbai-ites to be North Indians... whereas people from the North India consider Maharashtrians to be more South Indian than north.
It doesnt help that Marathi as a language and its script are so much closer to Hindi and its script and not in the least like Tamil, Malayalam, Kannada or Telugu. All very confusing.
But to get back to the delights of poli... I might have mentioned this before, but I like coconut in very, very few sweet dishes. Poli isnt one of them dishes. So when I came across a recipe for poli that seemed different from the norm because of the stuffing ingredients - it contained sesame seeds but very little gram/chickpea flour and not any chana dal at all (cooked chana dal stuffing is what I've had thus far) - I was pleased. I love the taste of sesame in savoury and sweet dishes, so that was another plus.
I have to say that the poli made this way didnt stay soft for long. The traditional ones I've had, with mashed cooked gram dal & jaggery filling, are meltingly soft and delicious, especially with a dollop of ghee on top. The sesame-seed poli I made were delicious too, but - have I said this before? - not soft. Still, that didnt stop me scarfing them down, so I guess it's worth putting up the recipe.
If anybody wants to know how to make them soft... they'll have to look elsewhere for the answer. And if anybody does find the answer, would they be kind enough to pass on the info to me too, pleeeeeeeeeeeeease?
Recipe for: Sesame seed and jaggery poli (slightly adapted from Cuisine Cuisine)
Ingredients:
For the stuffing:
1 cup jaggery, powdered
1 htbsp gram/chickpea flour
1 tsp cooking oil
1 tbsp poppy seeds
2 tbsp white sesame seeds
1/4 tsp cardamom seeds, powdered
For the poli:
2 cups plain flour
1 cup wholewheat flour
1 tbsp warmed oil
1/4 tsp salt
Warm water as required for making the dough
Plain flour for dusting
Ghee for shallow-frying
Method:
1. Make a soft but not sticky dough with the poli ingredients. Let it rest covered for about 30 minutes.
2. Heat 1 tsp oil in a little pan and roast the gram flour, stirring constantly, until the raw smell is gone (about a minute). Be careful not to burn the flour. Set aside to cool.
3. Roast the poppy seeds and sesame seeds on dry heat over medium flame till they start to turn golden. Grind these in a spice of coffee mill, together with the cardamom powder, into a fine powder. Mix with the roasted gram flour and reserve.
4. Put the powdered jaggery in a bowl, sprinkle a tsp of water, and melt in the microwave for a 45 seconds. Take it out and give it a stir. If it needs to melt a bit more - ie, if there are any dry bits - put it back in the microwave for 20 seconds. Dont overcook it by microwaving it for too long.
5. Quickly mix the sesame-poppy seed powder with the jaggery, making sure it's thoroughly mixed. Set aside to cool.
To make the poli:
6. Knead the dough well, then make small balls (slightly smaller than a golf ball).
7. Roll out two balls into palm-sized circles.

8. Sprinkle some of the filling all over one dough circle (break up any lumps with your fingers), then cover it with the other circle.
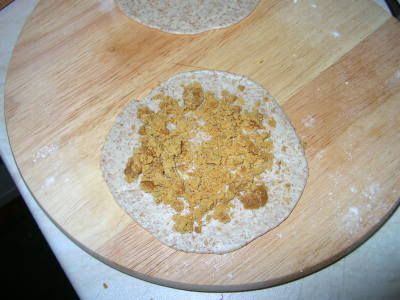
9. Dust the top with flour and gently roll out the dough circle into a slightly larger circle, so that the filling is sandwiched.
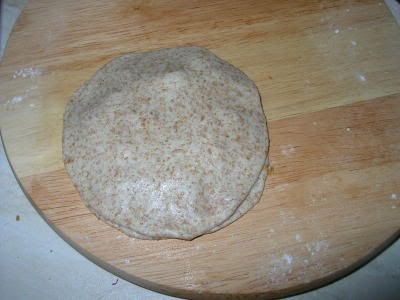
10. Then roll it out some more into a thin round.
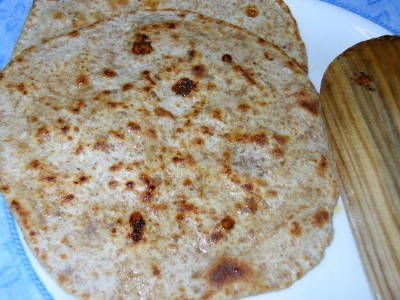
11. Heat a tava or frying pan (keep it on medium heat) and transfer the poli to it. Cook for a few seconds on one side, turn it over and smear that side with ghee. Flip it over once again and smear the other side with ghee as well. Shallow fry until the poli begins to get golden brown spots on both sides. Serve warm.
Note: The jaggery will melt in the heat and might ooze out - in that case keep an eye on it so that it doesnt burn. A little extra direct heat gives a caramelly flavour that is very nice, but burnt jaggery is quite awful to smell and taste.
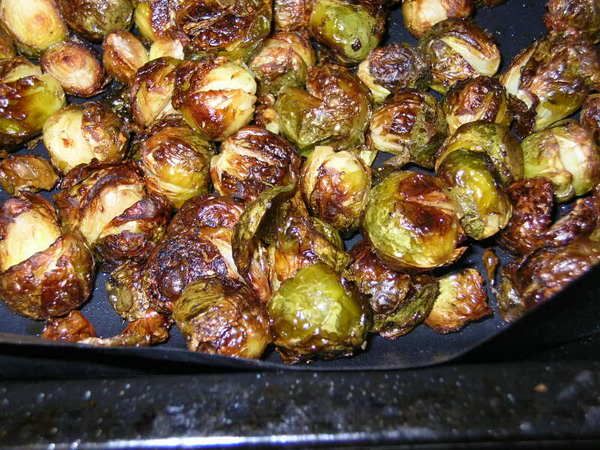
Okay, they're not everybody's favourite vegetable... in fact, Pete has the same reaction to them that I have to aubergines (it goes something like "bleaurrrgh") but I've always liked these miniature cabbagey balls. I used to make sambar with them in India, and I've had 'em boiled here, sprinkled with salt and pepper and tossed in a little butter. Nice, for sprouts fans.
But then I came across a recipe for oven-roasted sprouts in one of my favourite blogs Words to Eat By and decided to give that a go.
Of course, I couldnt just leave it at adding just salt and pepper - I like more zing. So I made up a spicy mix of olive oil, salt, pepper, some red chilli powder and coriander seed powder and a little mustard and whisked it all together. Tossed my halved sprouts in the mix and set it in the oven at 180C for about 30 minutes.
Well, it should have been 30 minutes, but as often happens, I got caught up in something else and nearly burnt the layers off my sprouts. Luckily they were only slightly burnt and I liked the extra outer crispiness anyway. The insides were soft - a lovely contrast. I dont really know how soft the inner portion of the sprouts should be when they are perfectly done - perhaps they shouldnt be as soft as mine got. I'll keep a closer eye on my sprouts next time. Excuse me while I go and pig out on my spicy roasted brussels sprouts... it's dinner time!
Recipe for: Oven-roasted brussels sprouts
Ingredients:
1/2 kg brussels sprouts, trimmed and cut in half if too large
4 tbsp olive oil
Salt to taste
1/2 tsp red chilli powder
1/2 tsp coriander powder
1/2 tsp fresh ground black peppercorns
1/2 tsp mustard seeds, finely powdered
Method:
1. Preheat the oven to 180C (350F).
2. Whisk the oil and the various powders until well amalgamated.
3. Toss the sprouts in the seasoned oil.
4. Place on greaseproof paper on a shallow baking tray, in a single layer.
5. Roast the brussels sprouts for 30 minutes or so, or till the outer layer is brown and crisp.
6. Serve hot. Yum!
A simple cake, very easy to make, with a delicate flavour, reasonably low-fat (I dont know how to calculate nutrition values, though) because I used Splenda instead of sugar and very low-fat Greek yogurt - what more is there to say? Oh yeah, that it's rather nice with a cup of coffee, as testified by Pete.
Recipe for: Yogurt cake with almonds and sultanas
Ingredients:
2 cups flour
2 eggs
1 cup low-fat yogurt
1 cup white sugar (I used Splenda)
1/2 cup vegetable oil
1 tbsp baking powder
1 tsp vanilla extract (or paste, for an even more authentic flavour)
1/4 cup almonds, chopped and lightly toasted
1/4 cup golden sultanas
1 tsp rum extract (or essence)
Method:
1. Pre-heat the oven to 180C (350 F). Line the bottom of a round or square 9" cake pan with silicone paper, and grease the sides.
2. In a big bowl, combine the yogurt, eggs, Splenda/sugar and flour.
3. Add the rest of the ingredients and fold lightly till it's all well-mixed.
4. Pour into the prepared tin and bake for 45 minutes or so, or till a cake tester inserted in the centre comes out clean.
5. Cool in the tin for 10 minutes, then turn out on to a wire rack and let cool completely before cutting.
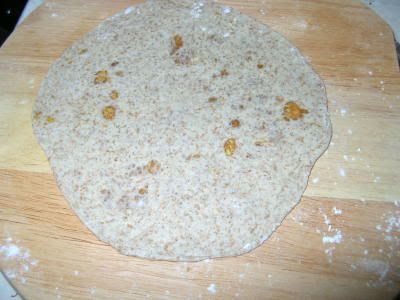
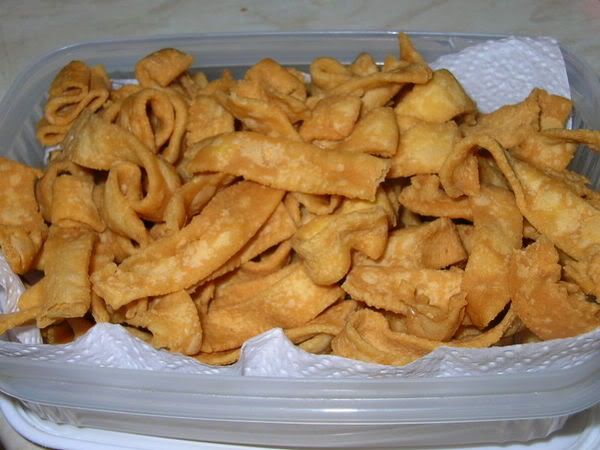
I guess nada pakoda is one of those things that can only be made by using a traditional "press" that's ubiquitous in any South Indian household. If there's another way of doing it, I'm not aware of it. I suppose it might be possible to roll the dough out and cut into thin strips, but I dont think it would be worth the trouble.
However, with the use of a press, it's really easy and the end result extremely more-ish. Addictively more-ish, actually. The nada-maker is atriumph of simplicity. It's basically two cylinders with handles at the top, one cylinder hollow and the other slightly smaller (and not hollow) to fit inside the hollow one - as seen in the photos below. There are usually 3 or four plates with holes or slits of varying sizes (to make different kinds of savouries), which go inside the hollow cylinder - not all at the same time, though!
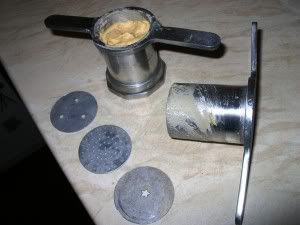

The dough is put inside the hollow cylinder with the appropriate plate inserted at the bottom, and the sealed cylinder is placed on top. Then using both sets of handles, the top cylinder is pushed into the bottom one, which forces the dough out in the desired shape - flat and ribbon-like, long and round like spaghetti, thin vermicelli-like, etc. The ribbon pakoda plate is the one on the far right.
What I made was the basic version but to vary the taste, a tbsp of garlic or onion paste can be added to the dough
Recipe for: Nada (ribbon) pakoda
Ingredients:
2 cups rice flour
1 cup gram/chickpea flour
1 tsp red chilli powder
pinch of asafoetida
1 tbsp butter
1 generous tbsp white sesame seeds
OR
1 tbsp cumin powder
Salt to taste
Water as required to make dough
Oil for deep frying
Method:
1. Make a fairly stiff dough with all the ingredients - not TOO stiff, or it will be very difficult to press it through the mould, and not too "loose" or the dough will absorb too much oil and fall apart in the oil itself.
2. Heat the oil in a wok. If a piece of bread rises instantly to the top when dropped in, the oil is at the right temperature.
3. Break off a piece of the dough, roll it gently in your hand so that it fits into the hollow cylinder. (Leave a 1/2 cm gap at the top so that the dough doesnt come out messily at the top while being pressed.)
4. Use the press directly over the hot oil and squeeze out the dough in a circular motion. You can make 2-3 little portions or one big one which can be broken up later.
5. Fry the pakoda on medium heat till golden brown on both sides. Drain and place on absorbent kitchen paper. Store in an airtight tin when cool.
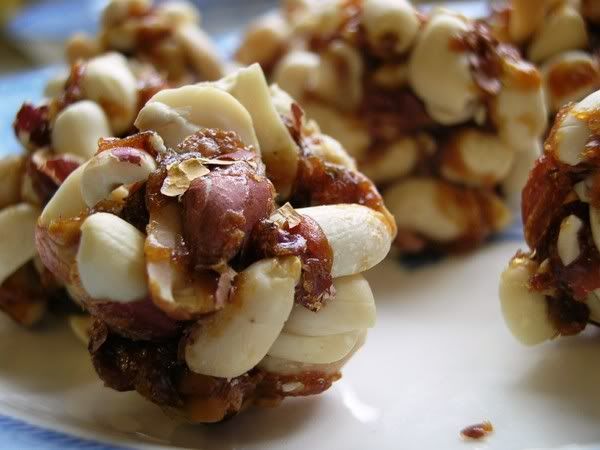
I've never liked the ready-made kadalai urundai available in India... the home-made ones are so much nicer, especially the ones made by my mother. The ready-made ones were rock-hard - so hard that when you bit into them, you had to double-check to make sure it wasnt your teeth that had splintered. I had the private conviction that they were held together with superglue.
Making kadalai urundai at home - especially in a microwave - should be the simplest of procedures... and in theory, it is. I mean, all it requires is two ingredients - jaggery (raw unrefined sugar) and de-husked peanuts... three, at the most, if you include a dash of powdered cardamom. It's even easier if you can get pre-roasted unsalted peanuts. My mother makes them perfectly in the microwave but could I follow suit? Could I hell.
The first trial batch turned out okay - just about. The second batch was a flop because the jaggeried (new word here, folks) peanuts refused to stick together to form balls. I guess that was because the jaggery didnt melt evenly in the microwave.
I'm not sure, but I think the quality of the jaggery matters a lot here. I had a little bit of dark brown jaggery and a packet light jaggery, ready-powdered. The two unfortunately didnt mix well. The dark brown jaggery melted really quickly while the powdered stuff had only just started to. Any longer in the microwave and the dark brown jaggery would have burned.
Anyway... here's the basic recipe that I got from my mother. Good luck trying it (if anybody does try it) because the results will probably vary based on the quality of the jaggery and the wattage of the microwave oven.
TIP: Add a tsp or two of water to the jaggery before microwaving it.
Recipe for: Kadalai urundai (peanut balls)
Ingredients:
1 cup de-husked, unsalted peanuts (ready-roasted, if possible)
3-4 tbsp jaggery, smashed into small pieces
1/4 tsp powdered cardamom seeds - optional
Method:
1. Roast the peanuts (if unroasted) in the microwave for 2-3 minutes (depending on the wattage). Let the peanuts cool and check that they're crisp. If not, roast them for another minute. Check again for crispness.
2. Melt the jaggery in a shallow dish - this should take a minute or two. Again, this depends on the oven's wattage and the quality of the jaggery, so start with one minute's worth.
3. Drop a bit of the jaggery in water - if it forms a ball, it's ready.
4. Very quickly mix the peanuts and the powdered cardamom with the melted jaggery (it cools incredibly fast) and form little balls while still warm.
5. Store in an airtight box.
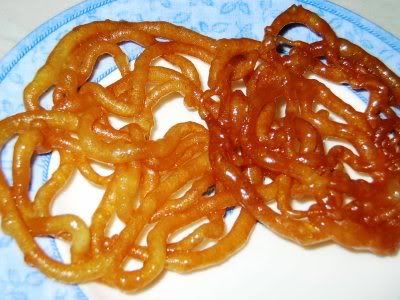
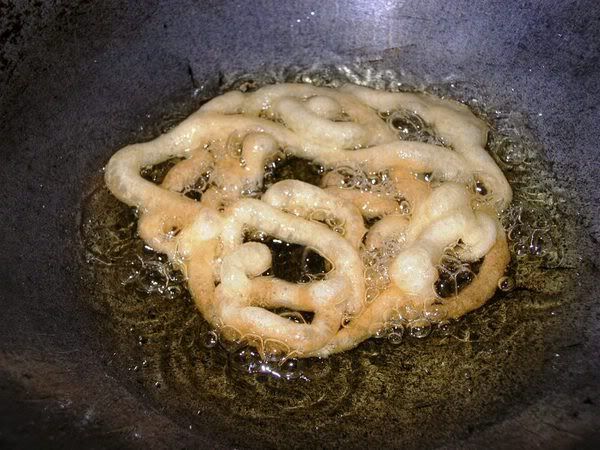
There's a traditional way of making jilebi that I just didnt bother with for two reasons: 1. I didnt have enough time. 2. I wasn't sure I could get the batter to ferment (kinda cold here now, plus see Reason 1 again).
So I followed a recipe (adapted only very slightly) from Bilbo of Smorgasboard for instant jilebis. I have to say it worked out rather well... Pete loved it (he even said it was as good as those from my favourite sweetshop in Birmingham - which, although not true, was very nice to hear!) and as for Rebecca, his daughter, she couldnt get enough of them.
Cant blame them, I love jilebis as well. They're one of the few Indian sweets that I can go on eating indefinitely... perhaps it's because they're not just tooth-achingly sweet but have a sour tang to them that comes from fermenting the batter.
Jilebis are lovely to eat crisp and hot, of course, but I especially love them the next day - I store them in the refrigerator - by which time they've lost most, but not all, of their crispness and gained a softness (and a sticky sugar glaze) that is just irresistible combined with the tangy/sweet taste. (I'm drooling here.)
Strangely enough, I dont like jangri, IMO jilebi's less attractive cousin, which starts out dripping with syrup and with a soft texture. (If anybody's thinking "jeez, what a fuss-budget she is" by now, I will gracefully admit to being one... sometimes.)
Anyway... back to my Diwali jilebis. Turned out I didnt have a proper jilebi press (press, mold, whatever), and my icing accessories had unaccountably gone AWOL. So I made do with a conical disposable plastic icing bag with the tip cut off, and poured the batter into it. Not the best idea, really - it kind of worked, but a good portion of the batter was wasted as it squirted out of the top and oozed down my hand and down the bag. It also meant that my jilebis turned out a bit wonky in shape. Then again, I'm not a professional halwai (sweet-maker) so they would have been shapeless no matter what I used.
I would suggest using one of the medium-size icing/piping nozzle to make jilebis... havent tried it that way, so I cant be more accurate. Odd, now that I think of it, but I havent actually seen jilebis being made so I dunno how the professionals do it!
Recipe for: Instant jilebi
Ingredients:
For the jilebi
--------------
1 cup plain flour
1 tsp chickpea/gram flour
1/2 tsp active dry yeast
1 cup water (a few tbsp more or less as required)
2 tablespoons fresh lemon juice
Oil for deep frying
For the sugar syrup
-------------------
2 cups sugar
2 cups water
1 tbsp rosewater
OR
1/2 tsp powdered cardamom seeds
Method:
1. Combine the flours and yeast in a bowl, add enough water to make a fairly thick but pourable batter. Let this sit for 10 minutes, then stir in the lemon juice.
2. To make the sugar syrup, combine the water and sugar in a pan, stirring over medium heat until the sugar dissolves completely.
3. Let the mixture boil briskly for 10-15 minutes and then turn off the heat.
4. Heat the oil in a wok. Fit a medium nozzle (not sure of size, but it shouldnt be one with a big opening, because the batter expands in the oil) onto an icing bag and pour the batter into it.
5. Squeeze the batter directly into the hot oil, looping the stream to make pretzel-shapes. Fry the jilebis one or two at a time (depending on the size of your wok) until a golden brown on both sides.
6. Drain and drop directly into the sugar syrup, soaking the jilebis for about 30 seconds each side.
7. Remove with a slotted spoon and place on a plate. Serve hot, cold or at room temperature.