skip to main |
skip to sidebar
While vegetarian food is not hard to find in most pubs, hotels etc, the choice is woefully limited – usually pasta of some kind, vegetarian chili, bean burger, sometimes a vegetable curry or Mediterranean-veg lasagna chock full of gross aubergines/eggplant and zucchini (because, you know, they’re Mediterranean vegetables and apparently no other veggies are known to ever be used in Mediterranean cuisine). Some places offer two vegetarian options, if you’re lucky. But usually it’s just one of the above, and vegetarians have to like it or lump it.
I should be glad that there’s at least SOMETHING non-meaty and non-fishy to eat in Western restaurants, and I suppose I am... but I still can’t help wishing that their chefs would show just a little imagination for vegetarians. Which is why I like a little pub in Wem (Pete’s hometown), called the Old Post Office (Pete’s home-away-from), which is owned and run by Pete’s business partner Guy, and a couple of his friends. The pub is called the Old Post Office because before it was converted to a pub, it used to be the old post office premises before they moved lock stock and barrel to the new post office premises – well, why did you think the pub’s name is what it is?
Anyway, I like the pub for all sorts of reasons – one, the younger crowd (the noisy, binge drinking, annoying kind) stay away because it doesn’t offer them much in the way of a “hep” ambience. Two, the pub plays good music on an excellent sound system (which Pete set up). Three, the décor is homely (I especially love the squashy-soft sofas from whose hug it’s difficult to get out) but with an exotic touch in the way of beautiful sculptures and paintings and wall-hangings which Guy brought back from his trips to Africa. The effect is casual and comfortable.
And now for the fourth and most important reason - the food. The pub offers a carvery every Sunday, with at least two different choices of meat, which Pete loves. The Sunday carvery has had very good reviews in the local newspapers, because the servings and accompaniments are generous – and all freshly cooked that day, nothing from frozen. I would be happy to eat just the accompaniments that are available – roast potatoes, boiled potatoes, cabbage, peas, cauliflower or broccoli cheese, roast parsnips, carrots, leeks, stuffing balls, Yorkshire puddings - a veritable feast!
But I get a special entree just for me as the only vegetarian who goes there for Sunday lunch. The two lady chefs make it a point to try out a new recipe for me, even though – or perhaps especially because – vegetarian food is not their comfort zone. It’s not even as if I’m a guinea pig… apparently they try out their new recipes during the week on the regulars (the pub makes it a point to provide sandwiches and other finger food on the house, in the evening), asking them for feedback. And then, on a Sunday, the recipe makes its formal debut – just for me (or any other vegetarian, assuming any comes along. It hasn’t happened yet, they say.)
Since I know that there won’t be any aubergine in anything (the staff all know of my loathing for this gross slimy-when-cooked vegetable), I’m always delighted to try whatever they've made – and so far, every single thing has been a hit. It's really nice of them to take the trouble to make anything, just for one person, especially when they've got their hands full catering for all the regular guests.
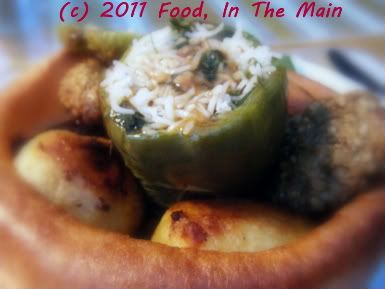
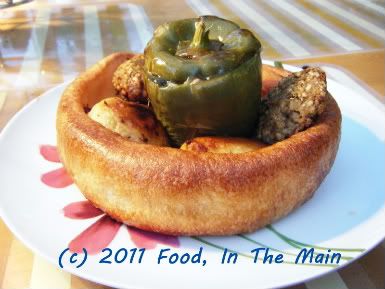
One time it was peppers stuffed with a really nice rice mixture, and since I had peppers at home last Sunday (when Pete and Bex were having a Sunday lunch at home), I decided to make my own main course and share the accompaniments (called “trimmings”) with my husband and stepdaughter for our family meal. Pete served everything in a giant Yorkshire pudding - yummy!
Recipe for: Stuffed green peppers with nutty rice
Ingredients:
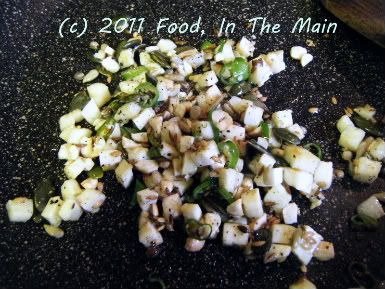
2 green peppers (capsicum/bell pepper)
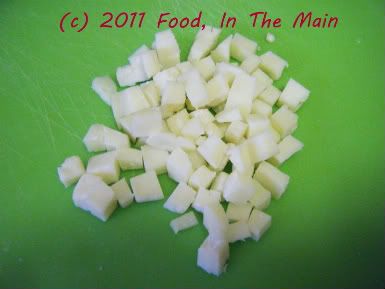
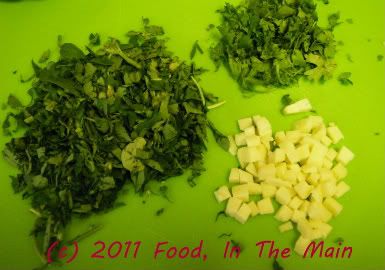
1/4 cup paneer, diced into 1/2 cm cubes
1 cup cooked basmati rice
1 green chilli, sliced into thin rings
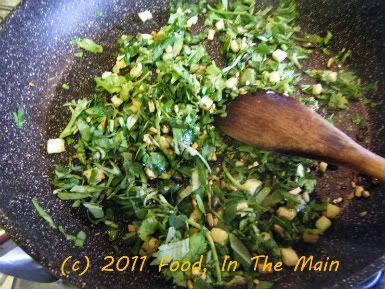
4 tbsp shredded methi leaves (optional)
1/2 cup shredded coriander leaves
1/2 tsp cumin powder
2 tbsp mixed nuts (peanuts, cashewnuts, pecans), chopped
2 tsp raisins or sultanas
1/2 tsp freshly ground black pepper
1/4 tsp garam masala
2 tsp oil
Salt to taste
Method:
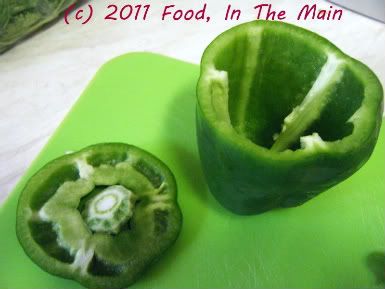
1. Slice off the tops of the peppers and carefully remove the seeds and pith. Make sure the peppers can remain upright; even up the bottoms if required so that they sit flat. Reserve the tops, don't throw them away.
2. Heat the oil in a pan and add the chillies, paneer and chopped nuts. Stir fry till the nuts and the paneer are pale golden brown.
3. Add the coriander and methi leaves and fry till they wilt.
4. Add the sultanas/raisins.
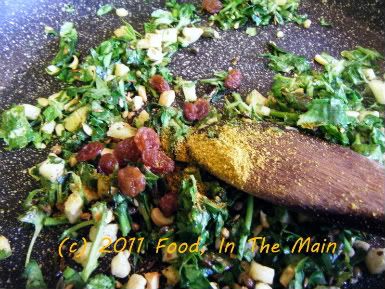
5. Now mix in the rice, garam masala, black pepper powder and salt to taste. Heat this stuffing thoroughly, then turn the heat off and let it cool.
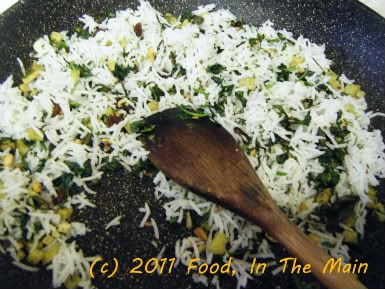
6. Spoon the filling into the prepared peppers, pressing down with the back of the spoon to get as much of the stuffing in as possible,
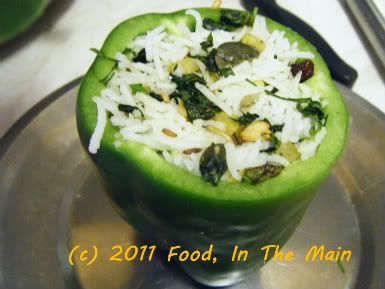
then put the tops of the peppers back on.
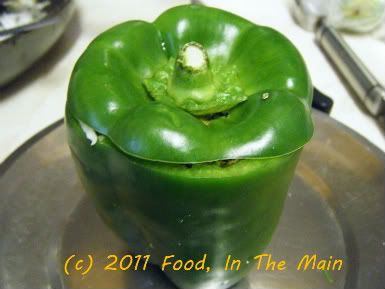
7. Place the stuffed peppers on a baking tray and spray them with Pam on the outside, or brush them with a little oil. Bake in the oven at 200C for 15 minutes or so, or till the peppers are a soft and wrinkled. Don't overcook them.
8. Serve the peppers hot as a main course with a selection of vegetables, and vegetarian gravy.

RECIPE: STUFFED GREEN PEPPERS WITH NUTTY RICE
Ingredients:
2 green peppers (capsicum/bell pepper)
1/4 cup paneer, diced into 1/2 cm cubes
1 cup cooked basmati rice
1 green chilli, sliced into thin rings
4 tbsp shredded methi leaves (optional)
1/2 cup shredded coriander leaves
1/2 tsp cumin powder
2 tbsp mixed nuts (peanuts, cashewnuts, pecans), chopped
2 tsp raisins or sultanas
1/2 tsp freshly ground black pepper
1/4 tsp garam masala
2 tsp oil
Salt to taste
Method:
1. Slice off the tops of the peppers and carefully remove the seeds and pith. Make sure the peppers can remain upright; even up the bottoms if required so that they sit flat. Reserve the tops, don't throw them away.
2. Heat the oil in a pan and add the chillies, paneer and chopped nuts. Stir fry till the nuts and the paneer are pale golden brown.
3. Add the coriander and methi leaves and fry till they wilt.
4. Add the sultanas/raisins.
5. Now mix in the rice, garam masala, black pepper powder and salt to taste. Heat this stuffing thoroughly, then turn the heat off and let it cool.
6. Spoon the filling into the prepared peppers, pressing down with the back of the spoon to get as much of the stuffing in as possible, then put the tops of the peppers back on.
7. Place the stuffed peppers on a baking tray and spray them with Pam on the outside, or brush them with a little oil. Bake in the oven at 200C for 15 minutes or so, or till the peppers are a soft and wrinkled. Don't overcook them.
8. Serve the peppers hot as a main course with a selection of vegetables, and vegetarian gravy.
There is a slight – very slight – downside to growing your own herbs… the fact that there is so MUCH of them to use up during the growing season. The fact that most herbs are seasonal and die down during the winter is another pinprick to my gardening soul – if only because of the guilt of not using them as much as possible. You know, the sort of guilt generated by an inner voice that goes “You complained about not having your own herbs, now you have them you’re not using them, you’re letting them go waste, use 'em up, use 'em up, use 'em upppp!”).
Much as I love my fresh herbs, coriander is the one that I use the most and can’t grow enough of, especially as it is not the “cut and come again” kind of herb. I do grow maybe a couple of batches of coriander in the summer, but it’s usually quicker and more convenient to just buy a bunch from the supermarket.
Other herbs which I use reasonably frequently are basil, chives and mint. I have three kinds of mint and like I’ve said before, this year they’re growing wild. If they were not container-grown, they would probably have taken over the entire backyard – possibly like triffids, only fresh smelling (and also not poisonously carnivorous, unlike triffids).
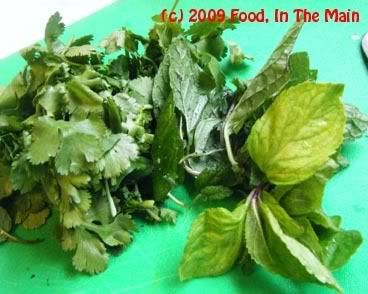
Anyway, I’ve been using up more mint this summer than I ever have before, in an effort to quieten my brain’s guilty yammering and make use of at least some of the bounty – mint chutney, minty rice in several forms, salads, and so on. I made this rice a short while back, using up the last of my own fresh coriander, and some of my golden variegated mint. I didn’t make a paste of the herbs this time, just sliced them into as thin ribbons as possible and used them like that – I suppose it made a difference in that the taste was not so in-your-face-herby as when the mint is ground up. .
PS. I’m not so bothered about my mint plants now, as they have started flowering and there are bees, wasps and assorted other insects gorging themselves on the flowers. (Also, the hovering insects make it a bit dicey for me to pick the mint – I’m not brave or stoic about being stung!)
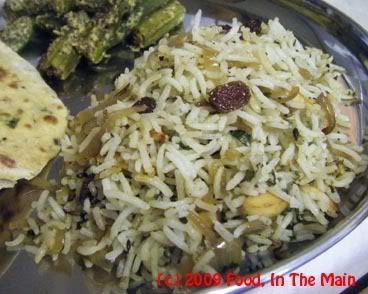
Recipe for: Herby onion rice with almonds
Ingredients:
1 cup basmati rice, soaked for 20 minutes and cooked al dente and cooled2 medium onions + 4 shallots (optional)1/2 cup coriander leaves1/2 cup mint leaves1 tbsp ginger, grated1 tsp cumin seeds2 tbsp skinned slivered almonds 1 tsp coriander powder2 tbsp sultanas
1 tsp oil1 tsp gheeSalt to tasteMethod:
1. Slice and onions and shallots thinly. 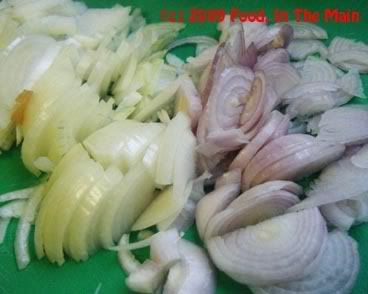
2. In a wide pan, heat 1 tsp oil and add the coriander powder and grated ginger. Fry for 30 seconds or till the ginger goes a darker shade of brown. 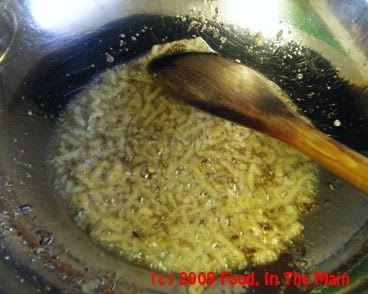
3. Add the sliced onions + shallots and cook them slowly on a medium-low flame with 2 tbsp water,
 till softened and lightly caramelised (about 8 minutes).
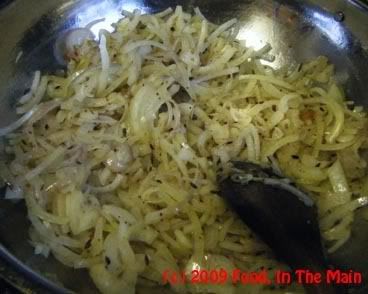
4. Add the chopped herbs along with salt to taste and stir-fry till they wilt. 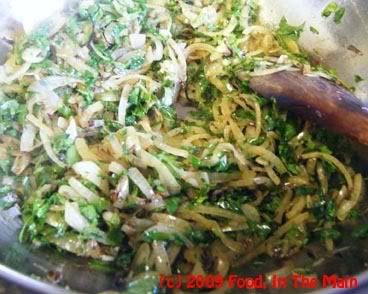
5. Add the cooked rice and gently fold in with a large spatula, taking care not to break or mush up the grains. 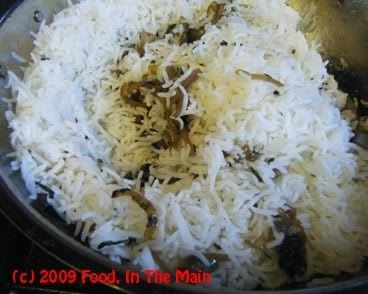
6. In a separate, small pan, heat the tsp of ghee till melted, then add the sultanas and stir till they swell up and go golden brown. Remove from the ghee, squeezing them gently with a spoon against the side of the pan to let the excess ghee drip away. Reserve. 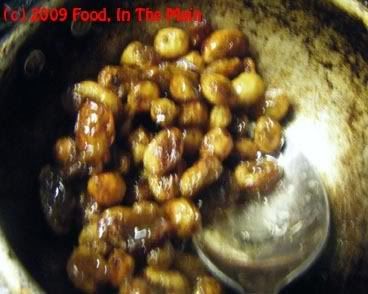
7. To the ghee remaining in the pan, add the cumin seeds and the slivered almonds,
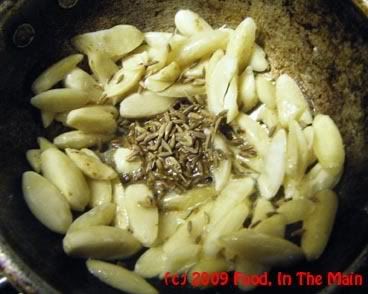
stirring with a spoon till the almonds take on a pale gold colour and the cumin seeds are aromatic. 
7. Add the almonds and sultanas to the rice and mix in. 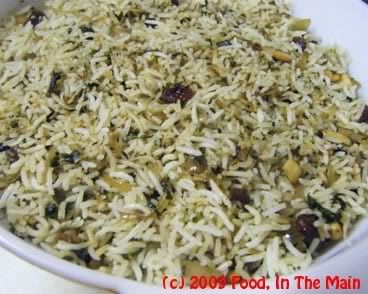 8. Serve hot with a spicy curry.
Until recently, blood oranges were in the realm of “What the heck are they?”, as far as I was concerned. The name didn’t appeal terribly, either. Blood orange? What, a meat-lover’s fruit now? Did it taste like blood (ugh, gruesome thought)?
Then I googled around and learnt that blood oranges were so named because their interior is anything from a deep orangey-red to crimson in colour - totally unlike your regular orange which is just, well, orange. Some of the sources mentioned that blood oranges tasted better and had a sweeter fragrance than regular oranges.
Ok, so blood oranges were fancy citrus fruit grown in the US, in Spain and in Italy. And, they were pretty exotic because of being rare and difficult to get elsewhere, especially without great expense - which basically meant that unless I actually traveled to that part of Italy or Spain or the US, I was not very likely get an opportunity to strike up an acquaintance with any blood oranges.
That seemed pretty much that, so I set aside any such hope and refrained from printing off all the wonderful blood orange recipes so efficiently searched and presented by Google.
And then, in my local Sainsbury, I came across a pack of blood oranges. Four of them, nestling in a thermocol holder under a hard plastic cover.
The price was as exotic as the fruit, but I reverently put the pack in my trolley. After all, they were cheaper than the cost of traveling to Spain or Italy or the USA (but gosh, not by much!).
Then it was homeward bound in a lather of excitement, me barely able to wait to get inside the front door so that I could open up the pack and get face-to-face with my first ever blood oranges. Pete was left to carry the bags into the house and put everything away (a task I hate only next to vacuuming. Shopping is fun, but putting everything away is the polar opposite. Anybody agree?). Pete might have grumbled, but I have no recollection. I happen to subscribe to the school of thought which believes that foodies and food-blog writers should be left to gloat and fuss over their latest purchase or exotica without having to be bothered with the minutiae of home life. (Especially housework.)
Anyway, the thing about describing something is that words can only do so much to tell the reader what it actually tastes or feels or smells like. Photographs can show what it looks like, but the smell/taste/feel sensations remain woefully unconveyed (I hope that is a valid word.)
That’s why my first deep sniff of my first blood orange was such a heady affair – it was orangey, of course, but there was something more to it... it was more fruity and somehow almost perfumey. I was in for a bit of disappointment when I cut it open, though - I was expecting a deep ruby red, or at least a flame orange, all through, but only part of it was red... towards the centre it was like a regular orange. And the taste... it was glorious! A burst of sweet with the slightest hint of tart, it was so good that I was half tempted to eat them all, never mind making anything with them.
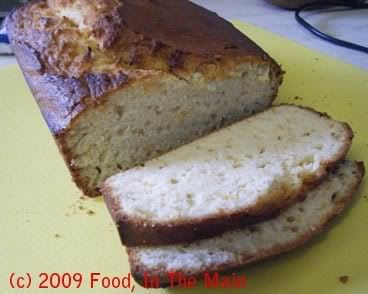
But I desisted because I had to make the most of these hard-to-get fruit. After scouting for recipes, I settled on a buttermilk blood-orange cake. I love orange-flavoured cakes, as I've probably mentioned before, and this one was absoutely glorious. It may have been the blood oranges, it may have been my imagination, but the loaf-cake was probably the most addictively orangily good one I've ever made. I took two slices of it every day to work for a week, and it stayed beautifully moist for 3 whole days. It didnt exactly crumble to bits thereafter, though... it just was a bit drier than fresh - but the flavour and taste were just as lovely. This loaf-cake is a sure-fire repeat recipe.
Recipe for: Buttermilk blood-orange cake
Ingredients:
1-1/2 cups buttermilk
2 cups self-raising flour
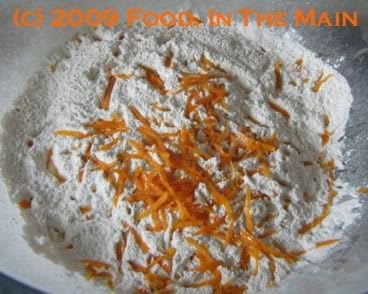
1/2 tsp baking powder Zest of one medium orange
1/2 cup fresh blood-orange juice (no problem with having pulp in it)
1/2 cup oil
1 medium egg
1-1/4 cups sugar
2 tsp vanilla extract
Method:
1. Mix together the self-raising flour, sugar, baking powder and grated orange zest.
2. Put the oil and orange juice in a large bowl along with the vanilla extract.
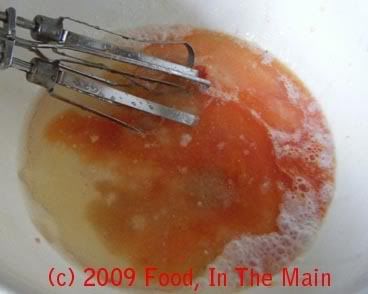
3. Whisk in the egg until well incorporated and the mixture is lightly frothy.

4. Then stir in the buttermilk. Now add the flour to the wet mixture.
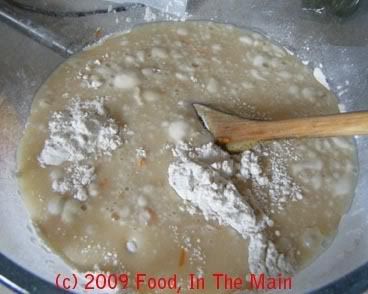
5. Stir till the batter is smooth. Don't over beat.
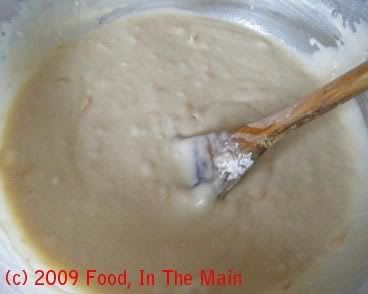
6. Pour the batter into a 2-pound loaf pan sprayed with Pam.
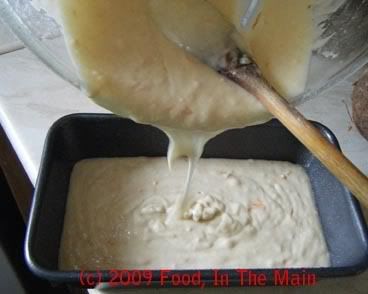
7. Bake in a 180C oven for 40 minutes or till the cake tests done. Since ovens vary in performance, start checking the cake at 30 minutes and test every 5 minutes to see if it's done.
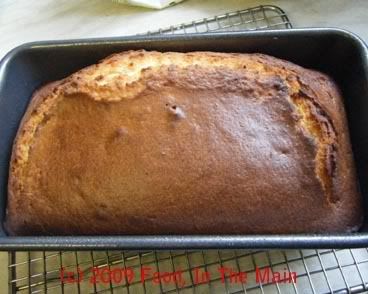
8. Leave in the pan for 10 minutes, then turn out on to a wire rack to cool completely.
The basic recipe for this really yummy kuchen (German for cake) was from Nic at Bakingsheet - the only added extra from me were the golden sultanas, which I think are nice in nearly anything.
I wanted to make something different for Pete's birthday - not the usual chocolate cake, so this seemed to fit the bill just nicely.
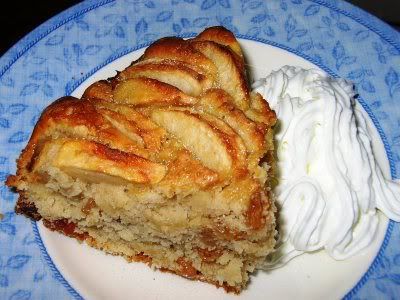
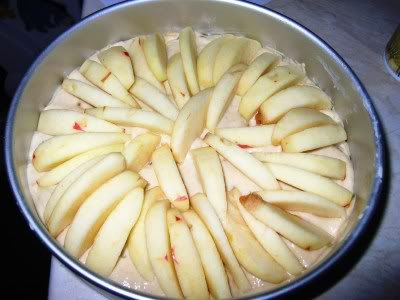
I cant praise this kuchen enough (and Pete loved it too) - the batter rises up beautifully around the apples and then pulls back as the cake cools, giving a very nice effect to the top of the cake. Anybody with better apple-arranging skills will probably end up with an even more picturesque cake, but even my haphazardly placed apples looked very nice.
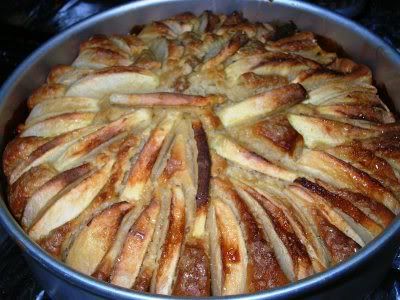
This kuchen is absolutely delicious served warm with thick cream or icecream. And the aroma and flavour of the vanilla coming through is to die for. Some people find vanilla bland, but I just love it - its flavour is so gentle and elegant. In fact, I also sprinkled vanilla sugar over each serving, which turned out to be an excellent idea.
I used three Pink Lady apples - peeled, cored and sliced - for my kuchen. Or rather, I used two and a bit, and ate the remaining because there really was no space left on top. With hindsight, two apples will do nicely.
Recipe for: Apple kuchen with golden sultanas
Ingredients:
Two Pink Lady apples, peeled, cored and sliced into 1/2 cm thick wedges
1/3 cup butter, softened
1/2 cup brown sugar
1/4 cup white sugar
1 large egg
2 tsp vanilla extract
1-1/2 cups plain flour
2 tsp baking powder
1/4 tsp salt
1/2 tsp nutmeg
3/4 tsp cinnamon
1/2 cup milk
1/2 cup golden sultanas
1 tbsp sugar for topping (I used demerara)
Vanilla sugar for dusting (optional)
Method:
1. Preheat the oven to 180C (350F). Grease a round 8" cake pan (I used one with a loose base).
2. In a medium bowl, whisk together the flour, salt, baking powder, nutmeg and cinnamon.
3. In a large bowl, beat the butter and sugar until soft and fluffy.
4. Beat in the egg and vanilla extract.
5. Add the flour mix and milk in 4 alternating additions, starting and ending with the flour.
6. Fold in the sultanas and spread the batter in the prepared cake pan.
7. Arrange the apple slices on the top and sprinkle with the demerara sugar.
8. Bake for 45 minutes or so, or until a tester inserted in the centre comes out clean.
9. Serve warm, dusted with vanilla sugar and accompanied by thick cream or icecream.
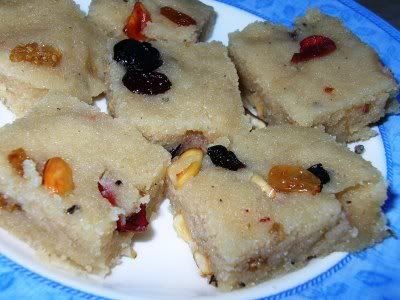
I was inspired to make suji halwa when I saw Atabela's recipe for it. It seemed like such a good idea and a nice change from the usual suji halwa. A small bag of unsweetened dried berries was begging to be used, so the decision was made.
I also added some traditional sultanas and cashewnuts to the halwa, although I guess most nuts (maybe not peanuts, though) would taste just as good. Oh, and the only calories in it come from the ghee, because I used Splenda instead of sugar. There's just no way to compromise on the ghee, unfortunately, because of the flavour and aroma it imparts.
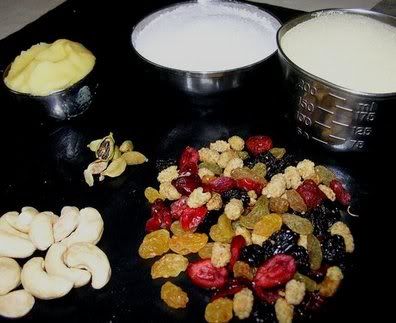
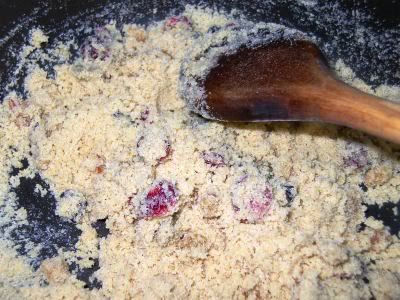
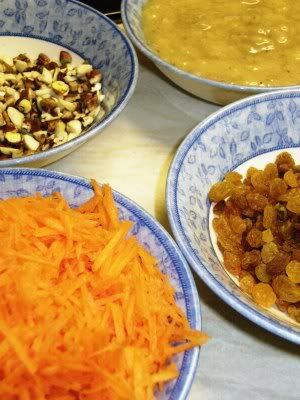
Clockwise from bottom right: Mixed dried berries (cranberries, strawberries, sour cherries and sultanas), cashewnuts, cardamom, ghee, Splenda and suji.
Suji halwa is a quick, fuss-free sweet to make - it's also homey and sort of soothing. Or maybe that's because I associate it with memories of home.
This halwa is nicest eaten hot (the microwave comes in handy here, if you're not eating it fresh). I didnt make mine the usual formless mass of halwa - I spread it on a lightly greased plate straight from the cooking pan, and cut it into squares. The berries looked like little jewels studding the little squares of halwa. They looked pretty and were the perfect size to satisfy my undemanding sweet tooth, one square at a time. And did I say they looked pretty?
Recipe for: Suji halwa with dried berries
Ingredients:
1 cup suji
3/4 cup sugar or Splenda
1/4 cup ghee
3/4 tsp cardamom powder
1/3 cup mixed dried berries and sultanas
2 cups water
Method:
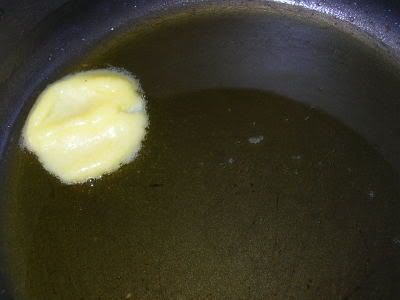
1. Heat 1 tsp of the ghee in a small pan and fry the berries and nuts until the nuts turn golden. Remove from the hot pan (to stop them browning further) and reserve.
2. Melt the remaining ghee in a wide pan.
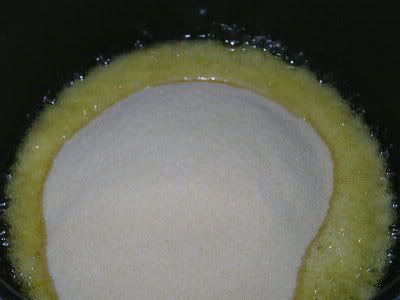
3. Add the suji to the ghee and roast it on medium-high heat, stirring frequently, until the suji starts to turn a darker colour (about 10 minutes) and gives off a nice roasting aroma.
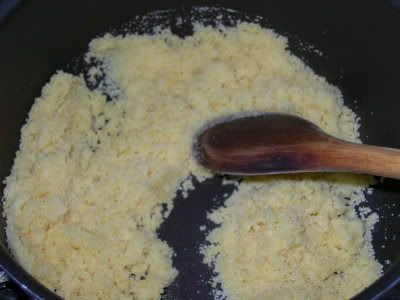
4. The suji is done when it becomes wet-looking and the ghee begins to separate from the mixture.
5. Now is the time to add the berries and nuts, and the sugar. Stir it all into the roasted suji mix.
6. Add the cardamom powder and two cups water to the pan and stir well and frequently, making sure there are no lumps.
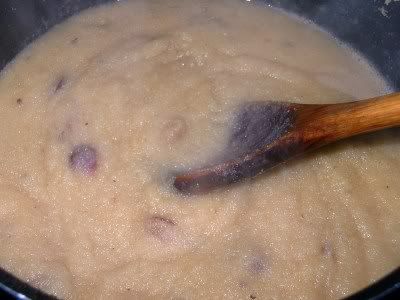
7. Keep stirring until the suji absorbs the water and the mixture pulls away from the sides of the pan. At this point, stirring will be difficult as the halwa will have become a soft mass. Turn off the heat. The halwa can be served rightaway in cups.
8. If you want to make serving pieces like I did, spread the hot halwa on a lightly greased flat plate, patting it down quickly and carefully with a wetted palm. Cut into pieces when it has cooled a little.
The halwa stays good for 2 days, and can be re-heated in the microwave prior to serving.
Arent they CUTE? :)

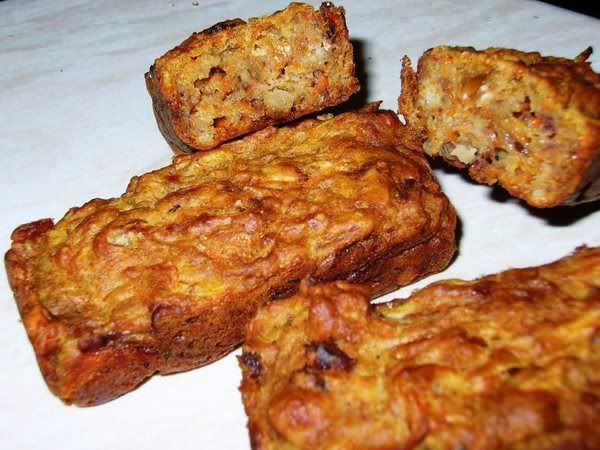
With such adorable mini-loaf pans, is it any surprise that I wanted to make banana bread very very extremely much? They were a gift from my brother-in-law's girlfriend and I fell in love with the little things right away. There was also a recipe for bana-carrot cake from Cooking Light that I badly wanted to try. What else could I do but bring the two together and make banana-carrot mini loaves. Or rather, 6 mini loaves and one square cake that I cut into bars. Voila! - banana-carrot cake bars!
I will confess right away, I didn't expect this cake to turn out so heavy... but considering it uses no eggs and only 1/2 cup oil for the batter, I guess I should not have been quite so surprised. However, I was more than pleased with the flavour, and I loved the texture, dense and chewy, made even more so by the chopped nuts I used. The loaves were more like flapjacks, really. Yum-MEE! We just couldnt stop eating them, believe me.
I guess this would have been a really low-calorie recipe but for the nuts... but I wouldnt have left them out for the world. Sorry, Cooking Light magazine!
Recipe for: Banana-carrot cake bars (adapted from Cooking Light magazine)
Ingredients:
Three large bananas, mashed smooth
2 generous cups grated carrot
2-1/4 cups flour (I used 1 cup white, 1-1/4 cup wholewheat)
1/2 cup oil
up to 1 cup brown sugar (I used 1/2 cup Splenda and 1/4 cup brown sugar)
1/2 tsp crushed/powdered cardamom seeds
1 tbsp baking soda
1/2 cup mixed chopped nuts (I used pecans, pistachios and almonds)
1/2 cup golden sultanas
1/4 tsp salt
Method:
1. Preheat the oven to 180C (350F), and grease an 8" square cake pan (or about a dozen mini pans, if you have them).
2. Sift the flour, salt and baking soda in a large bowl.
2. Add the rest of the ingredients to the flour and cut in lightly, the mix until the batter is moistened. Add a few tbsp milk if the batter is very thick.
3. Pour the batter in the greased pan and bake for 45-50 minutes or until the cake tests done.
4. Cool in the pan for 10 minutes, then turn the cake out onto a wire rack. Cut into bars when cool. Store in an airtight tin.
Another orange cake recipe, because I've got so many at home. Oranges, I mean. I think there must be at least a dozen-plus oranges left even after I ate two, and Rebecca a few more (good thing she was here yesterday)... that's what comes of taking up the "Buy one dozen, get the next dozen free" offer at the supermarket. Pete doesnt stop to think if we can use whatever's going cheap - he's just so entranced by the bargain that he just grabs them (which is why I prefer to do the shopping!). Then they sit around at home, quietly going rotten while I frantically try to use them up somehow, ANYhow.
Which brings me to the cake. It's a much more moist affair than the orange-chocolate marble cake, with lots of golden sultanas and nuts. The best thing about it is that there's no complicated beating and adding and care involved in making the batter. Just assemble the ingredients and mix 'em up. My kind of cake!

I usually dont chop up the sultanas for any cake, but this time I did - sat in front of the TV watching sitcoms while I snipped the sultanas up with my spare embroidery scissors (my kitchen scissors unaccountably having disappeared). I also used three kinds of nuts in the cake - brazils, pecans and macadamias.The traditional way is to use vanilla extract as flavouring, but I decided to substitute that with about a teaspoon of powdered cardamom seeds.
The cake smelt gorgeous - there's nothing as wonderful as the sweet aroma of cardamom - and the cardamom brought to mind (and tongue) the memory of the rava kesari that I love... very nice indeed!The icing with fresh orange juice (what else!) and grated orange peel just topped the cake off nicely, adding the extra sweetness that Pete requires.
Recipe for: Nut-and-sultana orange cake flavoured with cardamom

Ingredients:
2-1/2 cups all-purpose or cake flour
2 tsp baking powder
1/4 tsp baking soda
1/2 tsp salt
1-1/2 cups sugar (I used 1 cup light sugar, 1/2 cup Splenda granular
1 tbsp orange zest
1 cup golden sultanas, snipped to pieces (can be left whole too
1/2 cup mixed nuts (I used pecan, macadamia and brazil), chopped
1-1/2 cups buttermilk
2/3 cup margarine or butter
3 eggs
1/2 tsp cardamom seeds, powdered fine
OR
2 tsp vanilla extract
For the icing
1/3 cup margarine or butter, softened but not melted
2-3 cups icing sugar
1 tbsp orange zest
Fresh orange juice (about 1/2 a medium orange squeezed, more if required
Method
1. Sift the flour with the baking powder, soda and salt in a big mixing bowl
2. Add the rest of the ingredients to the flour, making sure that the batter is well mixed
3. Put the batter in a greased 9" cake tin (round or square) lined with silicone paper. Bake in a moderate oven (180 degrees C or 350 Fahrenheit) for 45-50 minutes, or till done. Poke a cake tester in the middle to see if it's done.
4. Let the cake sit for 5 minutes in the tin, then unmould and cool completely on a wire rack.
Icing: Put the icing ingredients in a bowl and mix well, adding as much orange juice as required to make the icing spreadable. Ice the top and sides of the cake.

