Cant believe how quickly 2007 has gone by - do the days, weeks and months fly by faster and faster the older you get? If so, the years are going to disappear in the blink of an eye... and I for one dont wish to rush through the rest of my life. Not, of course, that there's any choice about how time goes by. I mean, otherwise we'd all be choosing to s-t-r-e-t-c-h the good times out, wouldnt we? Times flies when we're having fun, they say. In that case, all I can say is - I must have had a DOOZY of a time in 2007, because I still remember the first post of this year and I didnt even have to think about it. And now I'm on the last post. Flipping amazing.
Anyway, here's a retrospective of my food blog in the year 2007 - perhaps it's a bit too late for Nupur's "Best moments of 2007" round-up... but I'm doing it anyway, and I'll send her the link anyway, and hope for the best. My favouritest five posts this year have been:
1. My first post of 2007 - Ricotta Rasmalai. I love this recipe for turning out so delicious and so untraditionally traditional.
2. Vegetarian shepherds pie - Because this recipe sacrifices nothing - in taste or farmyard animals - while still being very British.
3. Kiwi Gee's carrot halwa For two reasons - one, this was my 250th post and two, the halwa was GORGEOUS!
4. Fat free microwave potato crisps - Again for two reasons - one, I really, really enjoyed writing the post, it was so effortlessly nonsensical. And two, the crisps were superb!
5. Devil's food cake - Because the cake was soooooo good for the tiny amount of effort required in making it. And because it turned out the same way every time I made it (as long as I didnt arbitrarily change the ingredient amounts).
And that's it.
Goodbye, Year 2007! It's been fun! Happy new year 2008 to all, and may everything good come your way!
Monday, December 31, 2007
Wednesday, December 26, 2007
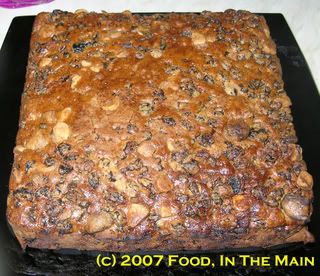
Cider apple Christmas cake
This recipe I got from The Guardian online. The Guardian writer called it "Srumpy Christmas cake" but I cant really call mine that, and I'll tell you why. When I saw what was required - i.e, cider, I gleefully added that to my grocery list when I went shopping. I was pretty sure that the smallest amount of cider I could buy was a four-pack, and so it turned out. I figured that Pete would happily drink the remaining 3 cans.
I got back home triumphantly with my four-pack of cider cans, and brandished them at a surprised Pete (he usually buys the alcohol for the house), telling him that I was reserving one of the cans but he could make free use of the other three. He looked at the cans, then at the recipe, then looked at me with a "I dont know how to tell you this, but..." expression on his face.
I asked him what was wrong.
He increased the intensity of the "I dont know how to tell you this, but..." expression and shook his head slightly. Well, what WAS wrong?
It turned out that I'd bought the wrong kind of cider. The gassy carbonated type that wasnt really what the recipe asked for.
"But it said cider," I wailed.
He pointed out that yes, it did say Scrumpy Jack, but if I'd taken two seconds to read more than just the one word, I would have seen that it did not say natural cider.
Bah.
Here's a resolution for New Year - I'm not going to venture into the alcohol aisles of supermarkets unaccompanied.
In the meantime though, it looked like I had four extra cans of cider for Pete and none for my cake. I was about to set out again for the supermarket when Pete said that I could pour the cider into a vessel and leave it overnight for it to de-carbonate (if there isnt such a word, there is now). That way I could probably use it as per the recipe.
Well, since I wasnt really keen on going back out into the dark and cold evening, I decided to do as he said. After all, he's our resident expert on all things alcohol.
And it worked. The next morning the cider was as still as anybody could wish for (although I have to say that the kitchen smelled somewhat... odd). But that was just the cider deflating, I guess.
The cake turned out very moist and considering the amount of fruit that went into it, quite light in texture. I guess the grated apples helped to keep it moist. I personally would have added half a cup or thereabouts of chopped nuts to the batter, but that's because I like the sweetness of most things to be tempered by something not sweet. (Which is why chocolate with whole hazelnuts is my most favourite.) I decorated the top of the cake with my favourite baking nuts - pecans.

I didnt spike the cake with rum or brandy in the run-up to Christmas, but I did keep it tightly wrapped (one layer of clingwrap and one of foil) until called for. That was about a month or so that the cake spent in its "mummified" state. It tasted pretty good, according to me, and spectacular according to Pete. But then he loves fruitcake.
Recipe for: Cider apple Christmas cake

Ingredients:
600g raisins
375g dried figs or prunes, chopped
350g glace cherries
2 small dessert apples (120g) peeled, cored and grated
700ml scrumpy (or other cider)
4 level tsp mixed spice
200g unsalted butter, softened
175g dark soft brown sugar
3 large eggs
150g ground almonds
275g plain flour
2 level tsp baking powder
Method:
1. A day before baking the cake, preheat the oven to 180C (160C fan-assisted)/350F.
2. Put the fruit, scrumpy and spice in a casserole, cover with foil and bake for an hour and a half. Remove the foil for the last 15 minutes.

3. Cover, and leave on a worktop overnight. You should be left with plump fruit and little juice.

4. Next day, double or triple line a 20-25cm square deep cake tin with baking parchment.
5. Beat the butter and sugar, beat in the eggs, then fold in the fruit and nuts.
6. Sift the flour and baking powder, and beat through.
7. Spoon into the tin (decorate the top with nuts if you like).

Cover with foil and bake at 160C (150C fan-assisted)/325F for 40 minutes, then remove the foil and bake for 40 minutes more until a skewer comes out clean.

8. Cool completely before cutting. The cake can be stored tightly wrapped for upto 2 months, probably longer.
I got back home triumphantly with my four-pack of cider cans, and brandished them at a surprised Pete (he usually buys the alcohol for the house), telling him that I was reserving one of the cans but he could make free use of the other three. He looked at the cans, then at the recipe, then looked at me with a "I dont know how to tell you this, but..." expression on his face.
I asked him what was wrong.
He increased the intensity of the "I dont know how to tell you this, but..." expression and shook his head slightly. Well, what WAS wrong?
It turned out that I'd bought the wrong kind of cider. The gassy carbonated type that wasnt really what the recipe asked for.
"But it said cider," I wailed.
He pointed out that yes, it did say Scrumpy Jack, but if I'd taken two seconds to read more than just the one word, I would have seen that it did not say natural cider.
Bah.
Here's a resolution for New Year - I'm not going to venture into the alcohol aisles of supermarkets unaccompanied.
In the meantime though, it looked like I had four extra cans of cider for Pete and none for my cake. I was about to set out again for the supermarket when Pete said that I could pour the cider into a vessel and leave it overnight for it to de-carbonate (if there isnt such a word, there is now). That way I could probably use it as per the recipe.
Well, since I wasnt really keen on going back out into the dark and cold evening, I decided to do as he said. After all, he's our resident expert on all things alcohol.
And it worked. The next morning the cider was as still as anybody could wish for (although I have to say that the kitchen smelled somewhat... odd). But that was just the cider deflating, I guess.
The cake turned out very moist and considering the amount of fruit that went into it, quite light in texture. I guess the grated apples helped to keep it moist. I personally would have added half a cup or thereabouts of chopped nuts to the batter, but that's because I like the sweetness of most things to be tempered by something not sweet. (Which is why chocolate with whole hazelnuts is my most favourite.) I decorated the top of the cake with my favourite baking nuts - pecans.

I didnt spike the cake with rum or brandy in the run-up to Christmas, but I did keep it tightly wrapped (one layer of clingwrap and one of foil) until called for. That was about a month or so that the cake spent in its "mummified" state. It tasted pretty good, according to me, and spectacular according to Pete. But then he loves fruitcake.
Recipe for: Cider apple Christmas cake

Ingredients:
600g raisins
375g dried figs or prunes, chopped
350g glace cherries
2 small dessert apples (120g) peeled, cored and grated
700ml scrumpy (or other cider)
4 level tsp mixed spice
200g unsalted butter, softened
175g dark soft brown sugar
3 large eggs
150g ground almonds
275g plain flour
2 level tsp baking powder
Method:
1. A day before baking the cake, preheat the oven to 180C (160C fan-assisted)/350F.
2. Put the fruit, scrumpy and spice in a casserole, cover with foil and bake for an hour and a half. Remove the foil for the last 15 minutes.

3. Cover, and leave on a worktop overnight. You should be left with plump fruit and little juice.

4. Next day, double or triple line a 20-25cm square deep cake tin with baking parchment.
5. Beat the butter and sugar, beat in the eggs, then fold in the fruit and nuts.
6. Sift the flour and baking powder, and beat through.
7. Spoon into the tin (decorate the top with nuts if you like).

Cover with foil and bake at 160C (150C fan-assisted)/325F for 40 minutes, then remove the foil and bake for 40 minutes more until a skewer comes out clean.

8. Cool completely before cutting. The cake can be stored tightly wrapped for upto 2 months, probably longer.
Sunday, December 23, 2007
Tomato-vegetable rice
There are days when trying to get some inspiration can be as elusive and exasperating an exercise as trying to grab a handful of water. The harder you try to grab it, the less there is in hand. Since my previous post, I seem to have developed the written equivalent of speechlessness. A blank page reflects a blank mind... or is it the other way around? Whatever, I decided that I would write at least one paragraph before posting a recipe (and yes, there are recipes waiting to see the light of publication, as it were) - and never mind if it has nothing to do with food or food writing.
So that was the paragraph.
And here's the recipe.
Recipe for: Tomato-vegetable rice

Ingredients:
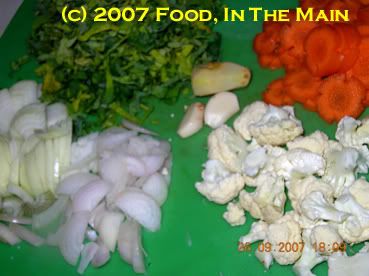
2 cups vegetables of choice, chopped (I used cauliflower, spinach and carrots)
1 large onion + 5 shallots, sliced thin (or use two onions)
1 tsp ginger-garlic paste
3 tomatoes + 1 tomato, chopped
½ cup frozen peas
1 cup loosely packed fresh coriander leaves
4-5 green chillies, slit (or as per taste)
1-1/4 cups uncooked basmati rice, soaked for 20 minutes
1 tsp coriander powder
½ tsp cumin powder
2 tsp oil
Salt to taste
A few fresh curry leaves
Water as required
Method:
1. Grind 3 tomatoes and the coriander leaves to a smooth paste. Reserve.

2. Heat the oil in a wide pan and add the green chillies, coriander and cumin powder and curry leaves. Fry for 30 seconds or so on high heat.

3. Add the sliced onions and stir, frying till the onions begin to turn translucent and pale brown.

Then add the remaining chopped tomato and let it cook till it starts to mush down.

4. Add the remaining vegetables and mix well, letting them cook on medium heat for about 4 minutes, until the spinach wilts.

5. Then add the rice (after draining all the water) to the pan

and stir on high heat till it is well mixed in.

6. Add the frozen peas now and stir them in.

7. Now measure out the ground tomato-coriander paste in a cup and pour it in. Add as much water as required to make a total of 2-1/4 cups liquid. Add salt to taste and stir it all in.

8. Let the water-tomato paste mixture come to a bubbling boil, then turn down the heat, smoothen the top and cover tightly with a lid.

9. After 20 minutes, turn off the heat. Let the pan stay covered for another 10 minutes. Then uncover, gently stir the rice mixture, and serve hot with poppadoms and raita.
So that was the paragraph.
And here's the recipe.
Recipe for: Tomato-vegetable rice

Ingredients:

2 cups vegetables of choice, chopped (I used cauliflower, spinach and carrots)
1 large onion + 5 shallots, sliced thin (or use two onions)
1 tsp ginger-garlic paste
3 tomatoes + 1 tomato, chopped
½ cup frozen peas
1 cup loosely packed fresh coriander leaves
4-5 green chillies, slit (or as per taste)
1-1/4 cups uncooked basmati rice, soaked for 20 minutes
1 tsp coriander powder
½ tsp cumin powder
2 tsp oil
Salt to taste
A few fresh curry leaves
Water as required
Method:
1. Grind 3 tomatoes and the coriander leaves to a smooth paste. Reserve.

2. Heat the oil in a wide pan and add the green chillies, coriander and cumin powder and curry leaves. Fry for 30 seconds or so on high heat.

3. Add the sliced onions and stir, frying till the onions begin to turn translucent and pale brown.

Then add the remaining chopped tomato and let it cook till it starts to mush down.

4. Add the remaining vegetables and mix well, letting them cook on medium heat for about 4 minutes, until the spinach wilts.

5. Then add the rice (after draining all the water) to the pan

and stir on high heat till it is well mixed in.

6. Add the frozen peas now and stir them in.

7. Now measure out the ground tomato-coriander paste in a cup and pour it in. Add as much water as required to make a total of 2-1/4 cups liquid. Add salt to taste and stir it all in.

8. Let the water-tomato paste mixture come to a bubbling boil, then turn down the heat, smoothen the top and cover tightly with a lid.

9. After 20 minutes, turn off the heat. Let the pan stay covered for another 10 minutes. Then uncover, gently stir the rice mixture, and serve hot with poppadoms and raita.
Labels:
carrot,
cauliflower,
mixed vegetables,
one-pot dish,
onions,
rice,
spinach,
tomato
Wednesday, December 12, 2007
Aloo (potato) kofta
I usually like it when my sister-in-law invites herself over for a "lovely Indian" (that describes my cooking AND me, by the way - so there!), because it obliges me to try out recipes that I've been hoarding to make "one of these days". She's vegetarian - she doesnt even eat eggs - despite being English and has been since she was 8 years old or thereabouts, to the mystification of her family. Anyway, she loves Indian food and I in turn try to introduce her to a wide variety of dishes when she visits us. Well, not all at the same time, of course.
This time I decided to try aloo koftas. After researching a wide variety of kofta recipes on the Net, I settled for the Vegetarian Society's recipe which was really simple. I wasnt sure how to get the potato balls to hold together and yet stay soft, but the recipe's tip of rolling the koftas in plain flour (I seasoned the flour) and deep frying them was just BRILLIANT! The koftas held together beautifully but didnt get hard.
One thing I'm really grateful for is that I didnt add the koftas to the gravy till just before serving. As it is, when I reheated the koftas along with the gravy, in the microwave, the damn things simply sucked up the gravy like a vacuum cleaner, making the whole dish rather thicker than I'd really wanted... I suppose I should have anticipated that, but I didnt.
Anyway, like I said, if I'd put the koftas in the gravy right after frying them, all I would have had to show for my efforts would have been potato mush in gravy. Tasty, perhaps, but mush nevertheless. Brr. Am I GLAD to have avoided that disaster!
Recipe for: Aloo (potato) kofta
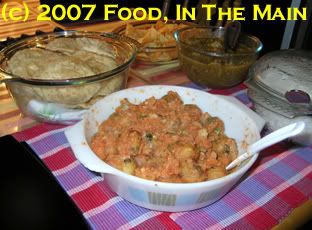
Ingredients:
4-5 large potatoes
1 cup peas
3 spring onions, finely chopped
3-4 green chillies (or to taste), finely chopped
2-3 tbsp finely chopped fresh coriander
1 tsp ground cumin seeds
1 tsp coriander powder
Salt to taste
Gram flour as required (or use plain flour), seasoned lightly with ground black pepper to taste
Oil for deep-frying
For the sauce:
2 tbsp oil
1 large onion ground to a paste with 1 tomato
1 medium onion chopped
2 cloves garlic, finely chopped
Juice from 2 tbsp grated ginger
1/2 tsp turmeric powder
2 tsp coriander powder
1 tsp red chilli powder
4 large tomatoes, skinned and chopped
1-1/2 cups water
Coriander leaves for garnish
Method
1. Pressure cook the potatoes, peel and mash.
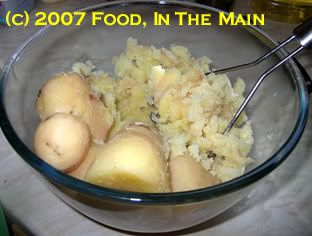
2. Cook the peas in the microwave, and add them to the mashed potato, breaking them down slightly.
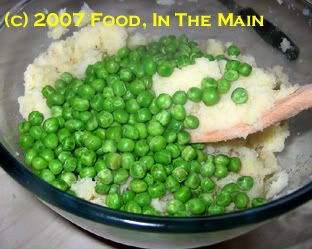
3. Add the spring onions, chilli, coriander, spices and salt.
4. Mix well and form into small balls (size of a large marbble). Roll each one in the seasoned flour, knocking off any excess.
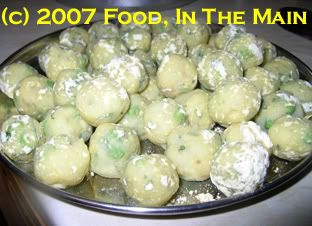
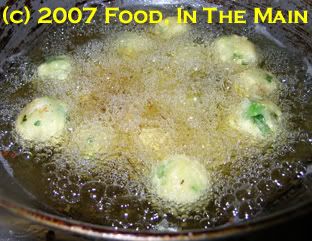
5. Heat the oil in a kadai or deep pan. Fry the potato balls in batches till golden. Dont overcrowd them.
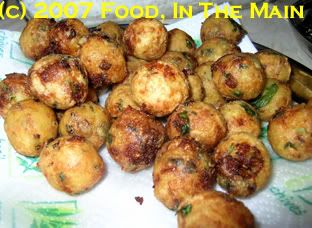
6. Drain the koftas on kitchen paper until required.
7. To make the sauce, heat 2 tbsp oil and fry the chopped onion till it goes soft.
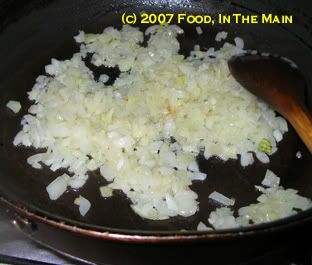
Then add the ground onion and fry on medium high until the oil starts to leave the sides.
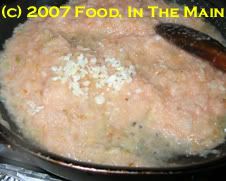
8. Add the garlic, ginger juice and spices and cook for 2 minutes.
9. Stir in the chopped tomatoes.
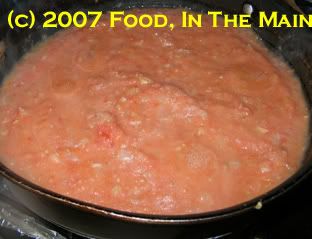
Fry on medium high again, until the tomatoes have broken and the sauce has thickened.
10. Just before serving, put the koftas in a serving dish and pour the hot sauce over.
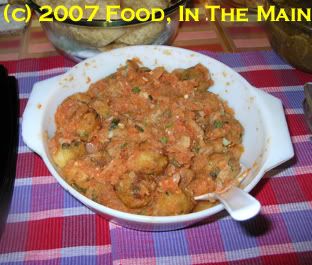
Serve immediately with cumin rice or parathas.
This time I decided to try aloo koftas. After researching a wide variety of kofta recipes on the Net, I settled for the Vegetarian Society's recipe which was really simple. I wasnt sure how to get the potato balls to hold together and yet stay soft, but the recipe's tip of rolling the koftas in plain flour (I seasoned the flour) and deep frying them was just BRILLIANT! The koftas held together beautifully but didnt get hard.
One thing I'm really grateful for is that I didnt add the koftas to the gravy till just before serving. As it is, when I reheated the koftas along with the gravy, in the microwave, the damn things simply sucked up the gravy like a vacuum cleaner, making the whole dish rather thicker than I'd really wanted... I suppose I should have anticipated that, but I didnt.
Anyway, like I said, if I'd put the koftas in the gravy right after frying them, all I would have had to show for my efforts would have been potato mush in gravy. Tasty, perhaps, but mush nevertheless. Brr. Am I GLAD to have avoided that disaster!
Recipe for: Aloo (potato) kofta

Ingredients:
4-5 large potatoes
1 cup peas
3 spring onions, finely chopped
3-4 green chillies (or to taste), finely chopped
2-3 tbsp finely chopped fresh coriander
1 tsp ground cumin seeds
1 tsp coriander powder
Salt to taste
Gram flour as required (or use plain flour), seasoned lightly with ground black pepper to taste
Oil for deep-frying
For the sauce:
2 tbsp oil
1 large onion ground to a paste with 1 tomato
1 medium onion chopped
2 cloves garlic, finely chopped
Juice from 2 tbsp grated ginger
1/2 tsp turmeric powder
2 tsp coriander powder
1 tsp red chilli powder
4 large tomatoes, skinned and chopped
1-1/2 cups water
Coriander leaves for garnish
Method
1. Pressure cook the potatoes, peel and mash.

2. Cook the peas in the microwave, and add them to the mashed potato, breaking them down slightly.

3. Add the spring onions, chilli, coriander, spices and salt.
4. Mix well and form into small balls (size of a large marbble). Roll each one in the seasoned flour, knocking off any excess.

5. Heat the oil in a kadai or deep pan. Fry the potato balls in batches till golden. Dont overcrowd them.

6. Drain the koftas on kitchen paper until required.

7. To make the sauce, heat 2 tbsp oil and fry the chopped onion till it goes soft.

Then add the ground onion and fry on medium high until the oil starts to leave the sides.

8. Add the garlic, ginger juice and spices and cook for 2 minutes.
9. Stir in the chopped tomatoes.

Fry on medium high again, until the tomatoes have broken and the sauce has thickened.
10. Just before serving, put the koftas in a serving dish and pour the hot sauce over.

Serve immediately with cumin rice or parathas.
Wednesday, December 05, 2007
Devil's food cake
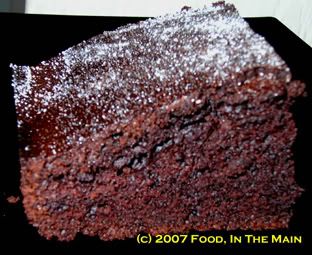
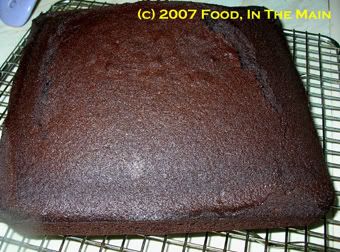
I have to say right at the start that I'm MOST excited about this cake. It's a simple chocolate cake, but the texture and crumb were SO perfect that I'm going to use only this recipe for any future chocolate cakes. It would be absolutely stunning with chocolate or vanilla frosting, as a layered cake.
The recipe came from a yahoo food group into my inbox. The original recipe, according to the sender's note, is from the Myrecipes.com website. I shall have to look it up to see if there are more recipes like this one.
I have to admit that I thought it wouldnt turn out well, because the batter was so runny. I did have to bake it for much longer than the 25 minutes specified in the recipe - I think it was closer to 45 minutes, but I cant be absolutely certain. It definitely wasnt just 25 minutes though.
I could have frosted the cake, but I felt too lazy to do so. Besides, the recipe said to merely sift some powdered sugar over it. No powdered sugar here, so I sprinkled vanilla sugar on it (after first brushing the top of the cake with maple syrup to make the sugar stick!). The cake was gorgeous - beautifully chocolatey with a deeper note from the instant coffee... it really would be perfect for making a layered chocolate cake with frosting. Next time!
Recipe for: Devil's food cake
Ingredients:
Cooking spray
5 tbsp butter/margarine
1/2 cup cocoa
1 cup packed dark brown sugar (I used light brown)
2 large eggs
1/2 tsp baking soda
1-1/2 tsp vanilla extract
1/4 tsp salt
1 cup all-purpose flour
1/2 cup hot water
2 tsp instant coffee granules
2 tbsp maple syrup
3-4 tbsp vanilla sugar
Method:
1. Preheat oven to 350° (180°C). Coat a 6-inch square pan with cooking spray.
2. Place butter/margarine in a large microwave-safe bowl. Cover and microwave for 30 seconds or until butter melts.
3. Add cocoa, stirring well with a whisk.
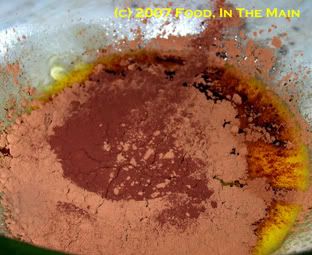
Add brown sugar, stirring well until mixture pulls away from sides of bowl.
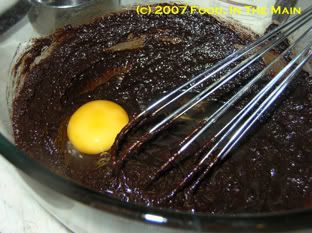
4. Add eggs, 1 at a time, stirring with a whisk until smooth.
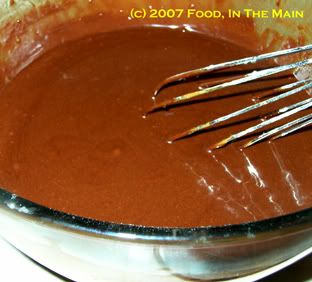
5. Stir in baking soda, vanilla, and salt.
6. Gradually add flour, stirring just until blended (do not overstir).
7. Combine hot water and espresso. Add to flour mixture, stirring just until blended.
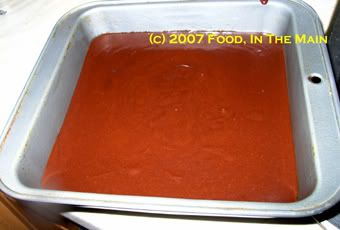
8. Pour batter into prepared pan.
Bake at 350° till done (a toothpick or cake tester inserted in the centre should come out clean). Cool 10 minutes on a wire rack.
9. Brush the top of the cake with the maple syrup and sprinkle with vanilla sugar. Cut into squares; serve warm or at room temperature.
The recipe came from a yahoo food group into my inbox. The original recipe, according to the sender's note, is from the Myrecipes.com website. I shall have to look it up to see if there are more recipes like this one.
I have to admit that I thought it wouldnt turn out well, because the batter was so runny. I did have to bake it for much longer than the 25 minutes specified in the recipe - I think it was closer to 45 minutes, but I cant be absolutely certain. It definitely wasnt just 25 minutes though.
I could have frosted the cake, but I felt too lazy to do so. Besides, the recipe said to merely sift some powdered sugar over it. No powdered sugar here, so I sprinkled vanilla sugar on it (after first brushing the top of the cake with maple syrup to make the sugar stick!). The cake was gorgeous - beautifully chocolatey with a deeper note from the instant coffee... it really would be perfect for making a layered chocolate cake with frosting. Next time!
Recipe for: Devil's food cake

Ingredients:
Cooking spray
5 tbsp butter/margarine
1/2 cup cocoa
1 cup packed dark brown sugar (I used light brown)
2 large eggs
1/2 tsp baking soda
1-1/2 tsp vanilla extract
1/4 tsp salt
1 cup all-purpose flour
1/2 cup hot water
2 tsp instant coffee granules
2 tbsp maple syrup
3-4 tbsp vanilla sugar
Method:
1. Preheat oven to 350° (180°C). Coat a 6-inch square pan with cooking spray.
2. Place butter/margarine in a large microwave-safe bowl. Cover and microwave for 30 seconds or until butter melts.
3. Add cocoa, stirring well with a whisk.

Add brown sugar, stirring well until mixture pulls away from sides of bowl.
4. Add eggs, 1 at a time, stirring with a whisk until smooth.

5. Stir in baking soda, vanilla, and salt.
6. Gradually add flour, stirring just until blended (do not overstir).
7. Combine hot water and espresso. Add to flour mixture, stirring just until blended.

8. Pour batter into prepared pan.

Bake at 350° till done (a toothpick or cake tester inserted in the centre should come out clean). Cool 10 minutes on a wire rack.

9. Brush the top of the cake with the maple syrup and sprinkle with vanilla sugar. Cut into squares; serve warm or at room temperature.
Labels:
chocolate,
chocolate cake,
devils food cake,
sponge,
sponge cake
Tuesday, December 04, 2007
JFI: Tur Dal - Tur dal mor kuzhambu
Since one of my favourite bloggers, Linda of "Out of the Garden", extended the last submission date for JFI: Toor dal to December 7, I thought I would take the opportunity to submit one more recipe for the round-up. I feel quite pleased with myself - it isnt often I get (ok, or give myself) the chance to make more than one recipe for a food event.
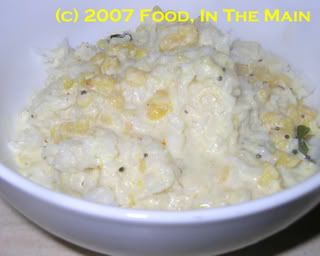
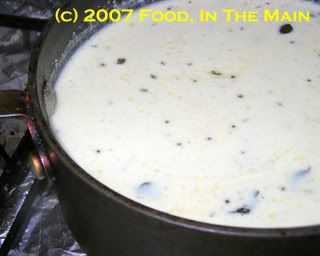
Anyway, I had a cup of tur dal which I'd cooked, left in the pressure cooker and forgotten about for an entire night and day. I'd decided to make mor kuzhambu (a buttermilk-based "gravy" for plain rice) when I (re)discovered the tur dal lurking in the pressure cooker. So to circumvent the process of putting the tur dal in a container in the fridge and using it another day, I just whisked the tur dal into the buttermilk mixture. I liked the fact that the tur dal did a good job of preventing the buttermilk from splitting when heated - I didnt push my luck by bringing it to a boil, but I certainly managed to heat it more thoroughly than if it had been just plain buttermilk without the dal.
And yes, it tasted fine.
Recipe for: Tur dal mor kuzhambu
Ingredients:
1 cup cooked tur dal, mashed (I left a spoonful unmashed for texture)
4 cups thick buttermilk + 1/2 cup water
4 tbsp grated coconut
4-5 fresh green chillies (or to taste)
1/2 tsp cumin seeds
small marble sized piece of tamarind or 1/2 tsp tamarind paste
Salt to taste
1 tsp mustard seeds
1 tsp oil
Good pinch of asafoetida powder
a few fresh curry leaves (optional)
Method:
1. Grind the coconut, green chillies, cumin seeds and tamarind to a smooth paste using hot water as required.
2. Whisk the cooked tur dal into the buttermilk + water till well mixed.
3. Then whisk in the ground coconut mixture along with salt to taste.
4. Heat the oil in a saucepan, add the mustard seeds, curry leaves and asafoetida powder. Cover and let the mustard seeds pop.
5. Pour in the buttermilk kozhambu mix into the pan carefully, stirring all the while.
6. Heat it through without letting it come to a boil.
Serve hot with plain white rice and any vegetable curry.
Anyway, I had a cup of tur dal which I'd cooked, left in the pressure cooker and forgotten about for an entire night and day. I'd decided to make mor kuzhambu (a buttermilk-based "gravy" for plain rice) when I (re)discovered the tur dal lurking in the pressure cooker. So to circumvent the process of putting the tur dal in a container in the fridge and using it another day, I just whisked the tur dal into the buttermilk mixture. I liked the fact that the tur dal did a good job of preventing the buttermilk from splitting when heated - I didnt push my luck by bringing it to a boil, but I certainly managed to heat it more thoroughly than if it had been just plain buttermilk without the dal.
And yes, it tasted fine.
Recipe for: Tur dal mor kuzhambu

Ingredients:
1 cup cooked tur dal, mashed (I left a spoonful unmashed for texture)
4 cups thick buttermilk + 1/2 cup water
4 tbsp grated coconut
4-5 fresh green chillies (or to taste)
1/2 tsp cumin seeds
small marble sized piece of tamarind or 1/2 tsp tamarind paste
Salt to taste
1 tsp mustard seeds
1 tsp oil
Good pinch of asafoetida powder
a few fresh curry leaves (optional)
Method:
1. Grind the coconut, green chillies, cumin seeds and tamarind to a smooth paste using hot water as required.
2. Whisk the cooked tur dal into the buttermilk + water till well mixed.
3. Then whisk in the ground coconut mixture along with salt to taste.
4. Heat the oil in a saucepan, add the mustard seeds, curry leaves and asafoetida powder. Cover and let the mustard seeds pop.
5. Pour in the buttermilk kozhambu mix into the pan carefully, stirring all the while.
6. Heat it through without letting it come to a boil.

Serve hot with plain white rice and any vegetable curry.
Labels:
buttermilk,
mor kuzhambu,
thuvaram paruppu,
toor dal,
tur dal
Monday, December 03, 2007
Eggless fruit cake
After a long time I felt like baking something, and since Pete likes fruit cakes a lot, I decided I would try a new recipe - an eggless one because my mother was coming here (just for a day en route to Chennai). As with any cake recipe I try for the first time, no matter how simple it looks, I was a bit apprehensive about how the cake would turn out, given that it didnt involve eggs. (I've had a few disasters with eggless cakes, as regular readers might know!)
Luckily, fruitcakes are fairly forgiving in the sense that they dont have to be light and airy - a little denseness can be overlooked. But only a little. If a fruitcake feels heavy like a brick and looks like and overdone brick, my suggestion would be not to eat it, but to use it in some kind of construction - perhaps as part of the foundations if you're building a house. Or you could treat it as "dwarf bread", that wonderful baked item that makes its appearance in Terry Pratchett's books - dwarf bread is edible - just - and can be used as emergency rations as it lasts forever... but it is also hard enough to be used as a deadly weapon. Some fruitcakes I've eaten over the years could well have evolved from the Discworld's original dwarf bread!
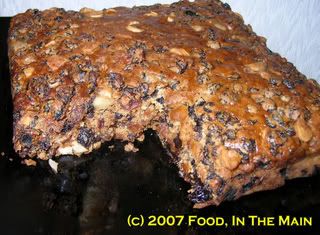
However, to get back to my cake, this was a keeper of a recipe! The cake was moist and nicely chewy, with a little crunch from the addition of roughly chopped brazil nuts (because my pecans had gone rancid, unfortunately. I hate when that happens.) It was lovely, and the texture and flavour has only become better in the three days since I baked it. Plus, as an added bonus, it's easy to make.
I'll have to admit one thing, though... the cake isnt photogenic, especially when cut into chunks. It's so VERY knobbly and bulging in all directions with fruit and nuts that I just couldnt take a pretty picture of it. I tried and tried but finally had to settle for the piece as it was - bulge, bumps, warts and all. Either that or not post a photo at all, which is unthinkable except in the direst of situations (viz, if there isnt a photo at ALL! *gasp*).
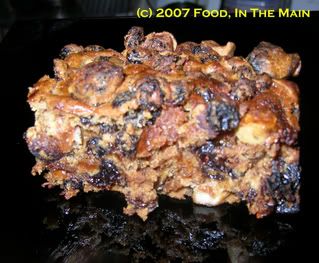
So please, dear readers, dont judge a cake by its outer appearance. Dont bring it out for guests, if you're the kind who only showcases the prettiest and bestest of your attempts in company. But DO try a piece of the cake with a cup of coffee at home, share it with your uncritical loved ones, shove it at family and friends... but do, do, DO try it! It's a pretty gorgeous cake!
The original recipe was apparently taken from a vegetarian cookbook and it says that to make this cake completely vegan, you can substitute the butter with vegan margarine.
Recipe for: Eggless fruit cake
Ingredients:
1-1/2 cups plain flour
1/4 tsp salt
1/4 tsp ground cinnamon
1/4 tsp ground nutmeg
3/4 tsp mixed spice
2/3 cup margarine
3/4 cup soft brown sugar
3 cups dried fruit (I used sultanas and currants)
1/4 cup chopped brazil nuts
1 cup + 2 tbsp water
1 tsp bicarbonate of soda
Method:
1. Grease a 7" square or round tin and line with greaseproof paper to come an inch above sides of the tin. Spray lightly with Pam.
2. Sift together flour, salt, cinnamon, nutmeg and mixed spice.
3. Rub in margarine, then mix in brown sugar.
4. Stir the fruit and nuts into the mixture.
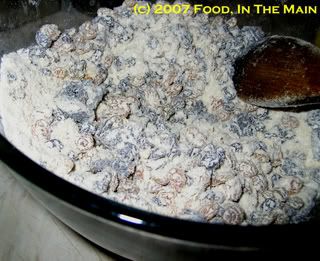
5. Make a hollow in the centre of the mixture, pour in the water, and stir in lightly.
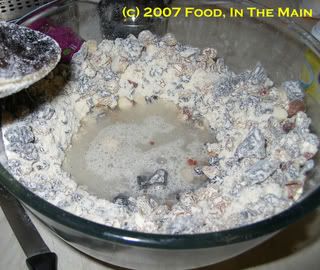
6. Warm 2 tbsp water slightly and pour over the bicarbonate of soda, then stir it thoroughly into the mixture (but dont beat).
7. Turn mixture into prepared tin.
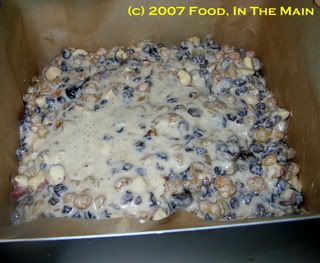
8. Bake cake at 180°C for an hour or till it is cooked.
Leave in the tin for 10-15 minutes, then turn out onto a cooling rack. Cut into pieces when cool.
Luckily, fruitcakes are fairly forgiving in the sense that they dont have to be light and airy - a little denseness can be overlooked. But only a little. If a fruitcake feels heavy like a brick and looks like and overdone brick, my suggestion would be not to eat it, but to use it in some kind of construction - perhaps as part of the foundations if you're building a house. Or you could treat it as "dwarf bread", that wonderful baked item that makes its appearance in Terry Pratchett's books - dwarf bread is edible - just - and can be used as emergency rations as it lasts forever... but it is also hard enough to be used as a deadly weapon. Some fruitcakes I've eaten over the years could well have evolved from the Discworld's original dwarf bread!
However, to get back to my cake, this was a keeper of a recipe! The cake was moist and nicely chewy, with a little crunch from the addition of roughly chopped brazil nuts (because my pecans had gone rancid, unfortunately. I hate when that happens.) It was lovely, and the texture and flavour has only become better in the three days since I baked it. Plus, as an added bonus, it's easy to make.
I'll have to admit one thing, though... the cake isnt photogenic, especially when cut into chunks. It's so VERY knobbly and bulging in all directions with fruit and nuts that I just couldnt take a pretty picture of it. I tried and tried but finally had to settle for the piece as it was - bulge, bumps, warts and all. Either that or not post a photo at all, which is unthinkable except in the direst of situations (viz, if there isnt a photo at ALL! *gasp*).

So please, dear readers, dont judge a cake by its outer appearance. Dont bring it out for guests, if you're the kind who only showcases the prettiest and bestest of your attempts in company. But DO try a piece of the cake with a cup of coffee at home, share it with your uncritical loved ones, shove it at family and friends... but do, do, DO try it! It's a pretty gorgeous cake!
The original recipe was apparently taken from a vegetarian cookbook and it says that to make this cake completely vegan, you can substitute the butter with vegan margarine.
Recipe for: Eggless fruit cake

Ingredients:
1-1/2 cups plain flour
1/4 tsp salt
1/4 tsp ground cinnamon
1/4 tsp ground nutmeg
3/4 tsp mixed spice
2/3 cup margarine
3/4 cup soft brown sugar
3 cups dried fruit (I used sultanas and currants)
1/4 cup chopped brazil nuts
1 cup + 2 tbsp water
1 tsp bicarbonate of soda
Method:
1. Grease a 7" square or round tin and line with greaseproof paper to come an inch above sides of the tin. Spray lightly with Pam.
2. Sift together flour, salt, cinnamon, nutmeg and mixed spice.
3. Rub in margarine, then mix in brown sugar.
4. Stir the fruit and nuts into the mixture.

5. Make a hollow in the centre of the mixture, pour in the water, and stir in lightly.

6. Warm 2 tbsp water slightly and pour over the bicarbonate of soda, then stir it thoroughly into the mixture (but dont beat).
7. Turn mixture into prepared tin.

8. Bake cake at 180°C for an hour or till it is cooked.

Leave in the tin for 10-15 minutes, then turn out onto a cooling rack. Cut into pieces when cool.
Labels:
brazil nuts,
currants,
dry fruits,
eggless,
fruit cake,
nuts,
raisins,
sultanas
Tuesday, November 27, 2007
Amiri Khaman
I'll never make an author, and there's a good reason why. I'm lazy. The more I think about how much there is to do, the less I feel like doing it. I'm ok if I just start writing without any plan in mind - that way I can write a lot... but give me a something specific to write about, and inevitably I end up only thinking about writing it. With that attitude, once I actually finish writing, I dont bother to look at it again. The very thought of having to revise or rewrite is anathema, and has always been that way. (A little revision and rewriting back in school might have paid better dividends... but hey, laziness rules!) Hats off to novelists who revise their manuscripts and rewrite and then perhaps rewrite some more...
So basically that's what happens as far as the food events are concerned... I think "Oh yes, i can make something for that event" - and then I go ahead and think some more, flip through my recipes to see what would be suitable, then decide on a recipe, then think some more about actually making the recipe... and the next thing you know, the time for submission is over, and another event is past.
I've had all November to take part in Suganya's "Vegan Month" event. Plenty of time to think about what to make. I saw myself making at least half a dozen vegan items, but in the event, all I've been able to manage is one recipe, and that very nearly at the last minute. BUT... considering my success rate in events past, I think I'm ahead of the game at this point!
Amiri Khaman is a recipe that appeared in my inbox from Tarla Dalal's website. It seemed different (ish), something I'D never tried before, so I went ahead and made the recipe. Its name is a bit of a puzzle because there's nothing particularly "amiri" (rich?) about it. It's just a fairly easy snack to make and quite nice to eat especially when it's hot. But I suppose that's as good a recommendation for a recipe as any!

This is my very-nearly-last-minute, nearly-missed-it entry for Suganya's Vegan Month. I've pretty much followed Tarla Dalal's recipe except that I used fresh Thai red chillies instead of green. And because I didnt have any fresh lemons or limes (or even lime juice from a lemon-shaped knobbly yellow squeezy plastic bottle), I used sumac in its place. It worked quite well because sumac is a bit sour-tasting - but I would recommend fresh lemon juice as laid out in the original recipe. There's nothing like fresh lemon or lime juice for that juicy sharp sourness.
Recipe for: Amiri Khaman

1 cup split yellow gram (yellow moong dal)
6 fresh green or red chillies (or to taste)
1" piece ginger
1 tsp soda-bi-carb
1/2 tsp turmeric powder
1 tsp caster sugar
Juice of 1 large lemon (or enough sumac to taste)
2 tsp mustard seeds
3-4 cloves garlic, finely chopped
1/4 tsp asafoetida (hing)
2 tbsp oil
salt to taste
For the garnish
2 tbsp chopped coriander
1 cup sev (thin deep-fried gramflour noodles, as required)
Method
1. Soak the dal for at least 6 hours.
2. Leave 4 tablespoons of the dal aside and grind the rest with the chillies and ginger.
3. Add the whole (unground) dal and mix.
4. Add the soda bi-carb, turmeric powder and salt and keep the mixture aside for at least 4 hours.
5. Steam the mixture in a pressure cooker for 12 minutes or till done. I used idli plates, but you can also spread the mixture to 1/2" thickness on a flat greased plate and steam it.

Ready for steaming

Just out of the steamer.

6. Cool and crumble.
7. Add the sugar, sumac/lemon juice and a little salt, and mix well.

8. Heat the oil in vessel and add the mustard seeds. When they crackle, add the chopped garlic and asafoetida and fry again for a few seconds.
9. Pour this mixture on top of the crumbled dhoklas, add the chopped coriander and mix to distribute evenly.


10. Serve garnished with the sev. If you have mint chutney or tamarind chutney, so much the better.
So basically that's what happens as far as the food events are concerned... I think "Oh yes, i can make something for that event" - and then I go ahead and think some more, flip through my recipes to see what would be suitable, then decide on a recipe, then think some more about actually making the recipe... and the next thing you know, the time for submission is over, and another event is past.
I've had all November to take part in Suganya's "Vegan Month" event. Plenty of time to think about what to make. I saw myself making at least half a dozen vegan items, but in the event, all I've been able to manage is one recipe, and that very nearly at the last minute. BUT... considering my success rate in events past, I think I'm ahead of the game at this point!
Amiri Khaman is a recipe that appeared in my inbox from Tarla Dalal's website. It seemed different (ish), something I'D never tried before, so I went ahead and made the recipe. Its name is a bit of a puzzle because there's nothing particularly "amiri" (rich?) about it. It's just a fairly easy snack to make and quite nice to eat especially when it's hot. But I suppose that's as good a recommendation for a recipe as any!

This is my very-nearly-last-minute, nearly-missed-it entry for Suganya's Vegan Month. I've pretty much followed Tarla Dalal's recipe except that I used fresh Thai red chillies instead of green. And because I didnt have any fresh lemons or limes (or even lime juice from a lemon-shaped knobbly yellow squeezy plastic bottle), I used sumac in its place. It worked quite well because sumac is a bit sour-tasting - but I would recommend fresh lemon juice as laid out in the original recipe. There's nothing like fresh lemon or lime juice for that juicy sharp sourness.
Recipe for: Amiri Khaman

1 cup split yellow gram (yellow moong dal)
6 fresh green or red chillies (or to taste)
1" piece ginger
1 tsp soda-bi-carb
1/2 tsp turmeric powder
1 tsp caster sugar
Juice of 1 large lemon (or enough sumac to taste)
2 tsp mustard seeds
3-4 cloves garlic, finely chopped
1/4 tsp asafoetida (hing)
2 tbsp oil
salt to taste
For the garnish
2 tbsp chopped coriander
1 cup sev (thin deep-fried gramflour noodles, as required)
Method
1. Soak the dal for at least 6 hours.
2. Leave 4 tablespoons of the dal aside and grind the rest with the chillies and ginger.
3. Add the whole (unground) dal and mix.
4. Add the soda bi-carb, turmeric powder and salt and keep the mixture aside for at least 4 hours.
5. Steam the mixture in a pressure cooker for 12 minutes or till done. I used idli plates, but you can also spread the mixture to 1/2" thickness on a flat greased plate and steam it.

Ready for steaming

Just out of the steamer.

6. Cool and crumble.
7. Add the sugar, sumac/lemon juice and a little salt, and mix well.

8. Heat the oil in vessel and add the mustard seeds. When they crackle, add the chopped garlic and asafoetida and fry again for a few seconds.
9. Pour this mixture on top of the crumbled dhoklas, add the chopped coriander and mix to distribute evenly.


10. Serve garnished with the sev. If you have mint chutney or tamarind chutney, so much the better.
Subscribe to:
Comments (Atom)

