skip to main |
skip to sidebar
Fresh sweetcorn – yum.
Chillies – yum.
Rice – yum.
Put ‘em all together – yum yum yum.
That’s the sort of maths I find easy, and that’s why I made this recipe from the eCurry website. I love the website, I love the recipes and the food, and I love the photos of the food. I can’t think of a single thing I don’t like there.
I've no idea what hatch chiles are, so I had to substitute jalapenos instead, but I think that was the only change I made from the original.
I made the chilli-flavoured oil from scratch, following her recipe exactly. (If you want to do it that way too, click the link to her recipe – there’s no point me repeating it here as I didn’t change a thing.) So while the home-made chilli-flavoured oil was nice, I do think that store-bought chilli oil would save on time and trouble (and some coughing and evil chilli fumes in the house as well).
Certainly if I wanted to make this rice again on a whim, I wouldn’t be able to if I had to start the chilli oil 24 hours ahead. Whims don’t really make for forward planning, and my life is very whimsical.
At this point I have to hope that the word whimsical means what I want it to mean – which is that my life runs on whims – and not whatever definition you get for “whimsical” in the dictionary… unless that definition includes “full of whims”.
Now, if I have ruined the word “whim” for you as much as I have for myself by making it seem suddenly weird, you are ready for the recipe.
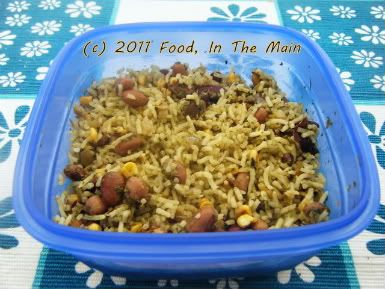
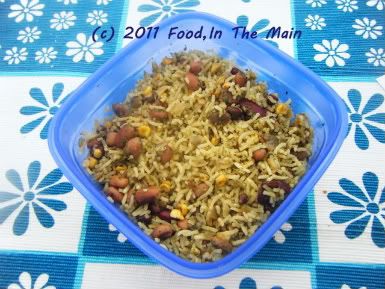
Recipe for: Roasted jalapeno sweetcorn rice
Ingredients:
6 jalapenos
1 whole ear fresh corn
6 cloves garlic
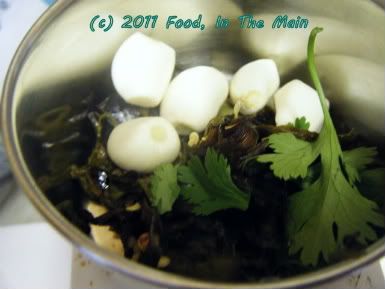
a big handful of fresh coriander leaves
1 tsp cumin seeds + 1/2 tsp cumin seeds
2-3 cups cooked basmati rice
2 tbsp oil + 1 tbsp oil
1 medium onion, diced
Chilli-flavoured oil
fresh lime
salt
1 can mixed pulses/beans (about a cup), rinsed under cold water and drained
Method:
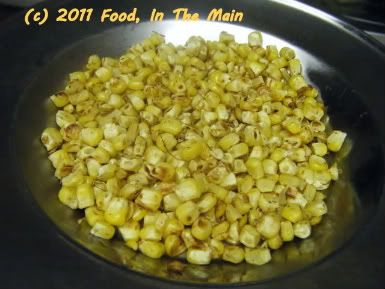
1. Slice the kernels from the corn with a sharp knife and separate the kernels if necessary.
2. Lightly toast them on a dry skillet till the water evaporates and they acquire light brown spots.
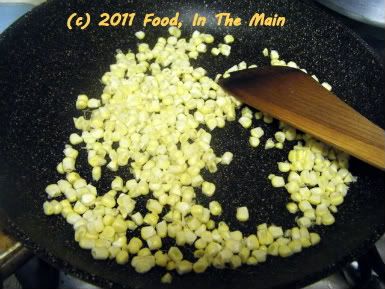
Reserve.
3. Roast the jalapenos on an open flame till the skin is blistered all over.
4. Place the jalapenos in a ziploc bag and close tightly. Allow peppers to steam for 10-15 min. When cooled, the skin will peel off easily from the flesh.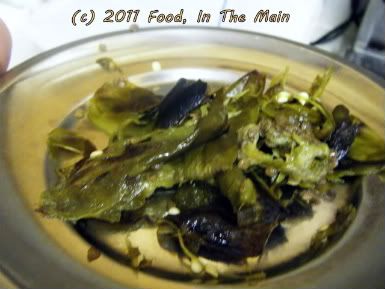
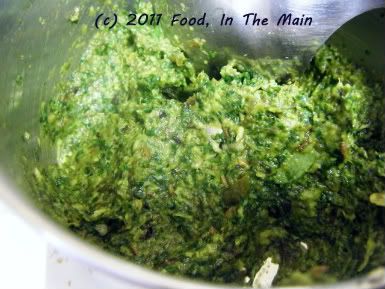
5. Puree roasted peppers, peeled and chopped garlic, 1 teaspoon cumin seeds, fresh coriander and 1 tsp oil till smooth.
Set aside.
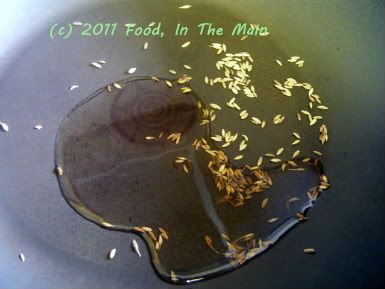
6. Heat a thick bottomed pan. Add the 1/2 tsp of cumin seeds and lightly roast them till they are a shade darker and fragrant.
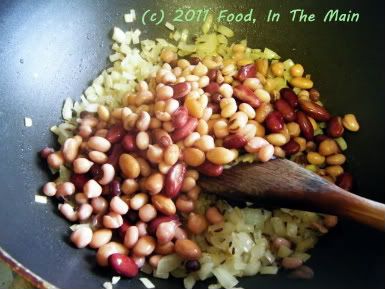
7. Add 2 tbsp oil and add the onions. Fry the onions at medium heat till they are tender, and starting to brown at the edges.
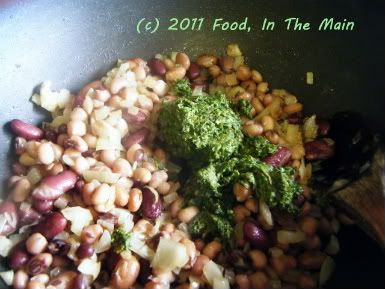
8. Now add the beans and cook them all together with the onion for 5 minutes or so.
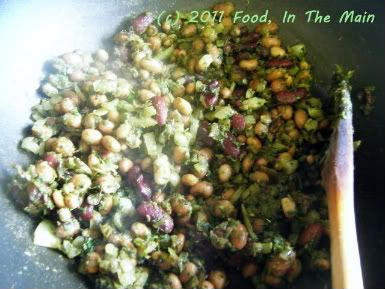
9. Next, add the roasted pepper puree to the pan.
Add salt to taste and cook at high heat for 5-6 minutes till the oil starts to separate and the puree thickens.
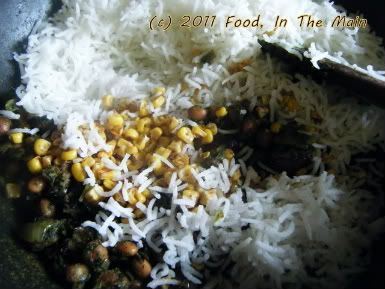
10. Add the corn and the rice and stir them together for a couple of minutes till the green sauce is well combined with the rice.
11. Cook for about 3 more minutes, tossing frequently but carefully so as not to break the rice.
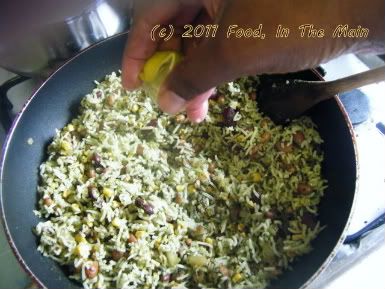
12. Drizzle the chili oil over the rice and stir.
13. Serve hot with lime wedges on the side so that people can squeeze over the juice to taste.
RECIPE: ROASTED JALAPENO SWEETCORN RICE
Ingredients:
6 jalapenos
1 whole ear fresh corn
6 cloves garlic
a big handful of fresh coriander leaves
1 tsp cumin seeds + 1/2 tsp cumin seeds
2-3 cups cooked basmati rice
2 tbsp oil + 1 tbsp oil
1 medium onion, diced
Chilli-flavoured oil
fresh lime
salt
1 can mixed pulses/beans (about a cup), rinsed under cold water and drained
Method:
1. Slice the kernels from the corn with a sharp knife and separate the kernels if necessary. 2. Lightly toast them on a dry skillet till the water evaporates and they acquire light brown spots. Reserve.
3. Roast the jalapenos on an open flame till the skin is blistered all over.
4. Place the jalapenos in a ziploc bag and close tightly. Allow peppers to steam for 10-15 min. When cooled, the skin will peel off easily from the flesh.
5. Puree roasted peppers, peeled and chopped garlic, 1 teaspoon cumin seeds, fresh coriander and 1 tsp oil till smooth. Set aside.
6. Heat a thick bottomed pan. Add the 1/2 tsp of cumin seeds and lightly roast them till they are a shade darker and fragrant.
7. Add 2 tbsp oil and add the onions. Fry the onions at medium heat till they are tender, and starting to brown at the edges.
8. Now add the beans and cook them all together with the onion for 5 minutes or so.
9. Next, add the roasted pepper puree to the pan. Add salt to taste and cook at high heat for 5-6 minutes till the oil starts to separate and the puree thickens.
10. Add the corn and the rice and stir them together for a couple of minutes till the green sauce is well combined with the rice.
11. Cook for about 3 more minutes, tossing frequently but carefully so as not to break the rice.
12. Drizzle the chili oil over the rice and stir.
13. Serve hot with lime wedges on the side so that people can squeeze over the juice to taste.
Every day in every way I’m getting lazier and lazier.
This is not what I want to be confessing, dear reader. Believe me, I’d much rather be declaring the more conventional - and infinitely more impressive – version that goes “Every day in every way I’m getting better and better”.
The truth is that I have, at the very least, half a dozen recent recipes to post about and over a dozen older ones which have been ageing gracefully without seeing the light of publication. It’s so easy to take photos while cooking – that’s become second nature now – but it’s a lot less fun to have to edit them (even the simplest, most basic edit that I do which is basically adding my blog name to the photo). It’s infinitely less appealing still to write up the recipes step by step and match the correct photos every step of the way.
I know, nobody’s forcing me to do the whole step-by-step thing, and there wasn’t a gun held to my head when I began to write up the instructions this way. Call me short-sighted but I didn’t envisage a point where I would find it boring to continue doing it in such a painstakingly detailed way. More fool me, because it’s been ever thus with every single one of my enthusiasms over the years.
Don’t get me wrong, I’m not bored with cooking. I’m not even bored of taking photographs while cooking. (And I’m certainly not bored with eating – no fear.) I enjoy writing the posts too, 98% of the time - probably because I feel no urge to stick to the point and no pressure to be topical or even informative. So it’s just the recipe itself, with the ingredients and instructions.
I guess I could stop the step-by-step routine… but after so many years of my blog, I can’t bring myself to do that. (Apparently I can bring myself to ignore my blog and the recipes that are clamouring for release… apparently that isn’t wrong. But simplifying things so that I can bring myself to post more often – oh golly gee gosh, that would feel so wrong.) Look, I can’t explain why this is so – but that is how it is.
Anyway, I decided to post this fairly standard, easy, everyday recipe that I make often - I haven’t posted about it thus far because, you know, it’s fairly standard, easy… etc etc. However, it struck me recently that it might not be standard to everybody, and not everybody might make it this way. So in the interests of posterity, and so on.
I feel quite noble to be dragging myself out of my lethargy comfort zone just for the sake of posterity. How nice of me to do this.
If you’ve finished acknowledging my nobility and niceness, you may go on to the recipe. Which is actually a fairly standard, easy…
Oh. I’ve said this before.
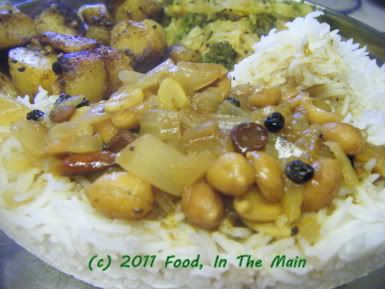
Recipe for: Vengaya vattha kuzhambu
 Ingredients:
2 tsp tamarind paste
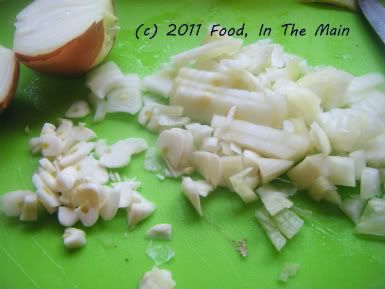
4-5 cloves garlic, chopped
2 medium onions, chopped
Ingredients:
2 tsp tamarind paste
4-5 cloves garlic, chopped
2 medium onions, chopped
 1/4 tsp vendhayam/fenugreek seeds
1 tbsp toor/tuvar dal
1 tbsp manathakkali vatthal
1 tbsp gingelly oil/nallennai
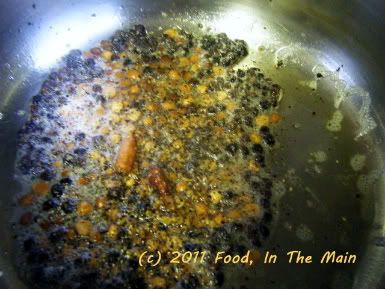
3-4 dried red chillies, broken in half (or to taste)
1 tsp mustard seeds
a few fresh/frozen curry leaves (optional)
1/2 tsp turmeric powder
1/4 tsp asafoetida powder
2-3 tsp sambar powder or vattha kuzhambu powder (if available)
2 tbsp rice flour
1/2 tsp black pepper powder
handful of roasted peanuts (optional)
Method:
1. Dissolve the tamarind paste in 5 cups water. Reserve.
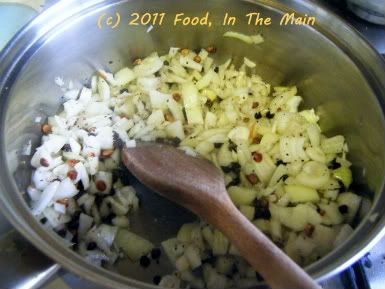
2. Heat the oil and add the manathakkali vatthal, the tur dal, dried red chillies, mustard seeds, fenugreek seeds, curry leaves, asafoetida powder and turmeric powder.
1/4 tsp vendhayam/fenugreek seeds
1 tbsp toor/tuvar dal
1 tbsp manathakkali vatthal
1 tbsp gingelly oil/nallennai
3-4 dried red chillies, broken in half (or to taste)
1 tsp mustard seeds
a few fresh/frozen curry leaves (optional)
1/2 tsp turmeric powder
1/4 tsp asafoetida powder
2-3 tsp sambar powder or vattha kuzhambu powder (if available)
2 tbsp rice flour
1/2 tsp black pepper powder
handful of roasted peanuts (optional)
Method:
1. Dissolve the tamarind paste in 5 cups water. Reserve.
2. Heat the oil and add the manathakkali vatthal, the tur dal, dried red chillies, mustard seeds, fenugreek seeds, curry leaves, asafoetida powder and turmeric powder.
 Fry all these for a couple of minutes on high heat, stirring to prevent burning.
3. Next, add the chopped onions and garlic and stir.
Fry all these for a couple of minutes on high heat, stirring to prevent burning.
3. Next, add the chopped onions and garlic and stir.
 4. When the onions start to soften, add the sambar/vattha kuzhambu powder and stir it in, along with the black pepper powder.
 5. Now pour in the tamarind water.
 Bring to a boil on high heat, then turn it down to medium-low and let it simmer gently for 10 minutes or so.
6. Whisk together 2 tbsp rice flour with some water to make a thick, pourable paste and stir it into the kuzhambu. Let it boil for another 4-5 minutes until the kuzhambu thickens and becomes less watery.
Bring to a boil on high heat, then turn it down to medium-low and let it simmer gently for 10 minutes or so.
6. Whisk together 2 tbsp rice flour with some water to make a thick, pourable paste and stir it into the kuzhambu. Let it boil for another 4-5 minutes until the kuzhambu thickens and becomes less watery.
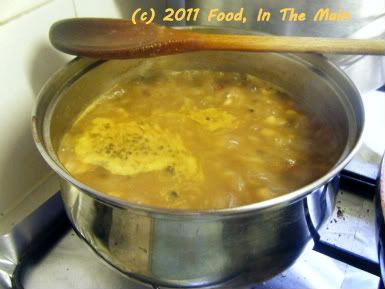 Add salt to taste and throw in the peanuts now, if using. Serve hot with steamed white rice and a dry vegetable curry.
RECIPE: VENGAYA VATTHA KUZHAMBU
Ingredients:
2 tsp tamarind paste
4-5 cloves garlic, chopped
2 medium onions, chopped
1/4 tsp vendhayam/fenugreek seeds
1 tbsp toor/tuvar dal
1 tbsp manathakkali vatthal
1 tbsp gingelly oil/nallennai
3-4 dried red chillies, broken in half (or to taste)
1 tsp mustard seeds
a few fresh/frozen curry leaves (optional)
1/2 tsp turmeric powder
1/4 tsp asafoetida powder
2-3 tsp sambar powder or vattha kuzhambu powder (if available)
2 tbsp rice flour
1/2 tsp black pepper powder
handful of roasted peanuts (optional)
Method:
1. Dissolve the tamarind paste in 5 cups water. Reserve.
2. Heat the oil and add the manathakkali vatthal, the tur dal, dried red chillies, mustard seeds, fenugreek seeds, curry leaves, asafoetida powder and turmeric powder. Fry all these for a couple of minutes on high heat, stirring to prevent burning.
3. Next, add the chopped onions and garlic and stir.
4. When the onions start to soften, add the sambar/vattha kuzhambu powder and stir it in, along with the black pepper powder.
5. Now pour in the tamarind water. Bring to a boil on high heat, then turn it down to medium-low and let it simmer gently for 10 minutes or so.
6. Whisk together 2 tbsp rice flour with some water to make a thick, pourable paste and stir it into the kuzhambu. Let it boil for another 4-5 minutes until the kuzhambu thickens and become less watery. Add salt to taste and throw in the peanuts now, if using. Serve hot with steamed white rice and a dry vegetable curry.
Add salt to taste and throw in the peanuts now, if using. Serve hot with steamed white rice and a dry vegetable curry.
RECIPE: VENGAYA VATTHA KUZHAMBU
Ingredients:
2 tsp tamarind paste
4-5 cloves garlic, chopped
2 medium onions, chopped
1/4 tsp vendhayam/fenugreek seeds
1 tbsp toor/tuvar dal
1 tbsp manathakkali vatthal
1 tbsp gingelly oil/nallennai
3-4 dried red chillies, broken in half (or to taste)
1 tsp mustard seeds
a few fresh/frozen curry leaves (optional)
1/2 tsp turmeric powder
1/4 tsp asafoetida powder
2-3 tsp sambar powder or vattha kuzhambu powder (if available)
2 tbsp rice flour
1/2 tsp black pepper powder
handful of roasted peanuts (optional)
Method:
1. Dissolve the tamarind paste in 5 cups water. Reserve.
2. Heat the oil and add the manathakkali vatthal, the tur dal, dried red chillies, mustard seeds, fenugreek seeds, curry leaves, asafoetida powder and turmeric powder. Fry all these for a couple of minutes on high heat, stirring to prevent burning.
3. Next, add the chopped onions and garlic and stir.
4. When the onions start to soften, add the sambar/vattha kuzhambu powder and stir it in, along with the black pepper powder.
5. Now pour in the tamarind water. Bring to a boil on high heat, then turn it down to medium-low and let it simmer gently for 10 minutes or so.
6. Whisk together 2 tbsp rice flour with some water to make a thick, pourable paste and stir it into the kuzhambu. Let it boil for another 4-5 minutes until the kuzhambu thickens and become less watery. Add salt to taste and throw in the peanuts now, if using. Serve hot with steamed white rice and a dry vegetable curry.

