
Wednesday, April 26, 2006
Stream that became a waterfall
One of the many, many waterfalls and gushing streams in the mountains of Scotland


Sunday, April 23, 2006
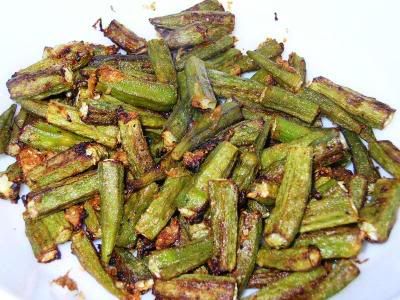
Spicy oven-baked okra
I have to start off saying that I'm going to be somewhat sporadic with my posts for the next month or so. There's simply too much to do and not enough time to do it in... plus I havent been doing much cooking (see first part of this sentence + amma's doing the cooking).
Next Saturday we leave for the USA (NY-DC-Seattle and whatever else my sis & bro have got planned for us) and we're going to be there for 2 weeks and a bit. I'm hoping to be able to shoot off a few food or travel-based posts in that time, but obviously there arent any guarantees. But do keep coming by just to check things out from time to time - and I'll surely be keeping an eye on all my favourite blogs too!
It would be even nicer to meet up with any bloggers who are in the area - drop me a line on shyam69@gmail.com if so, and we can take it from there.
That said, on to the okra that I made today, more or less following a recipe from Neelam Batra's 1000 Indian Recipes.

She said okra is very nice when baked in the oven... that was a new one on me, so of course I had to try it. I have to say the end result wasnt bad at all - they were spicy, tangy and slightly crisp and nicely browned... excellent results for a healthy recipe using only a little oil! They also didnt end up gooey - a very important point because I'm not partial (nor do I know anybody who is) to anything that has the texture of nasal debris arising from a bad cold. (Sorry if I grossed anybody out, but if it's any consolation, I'm grossed out myself just at the thought!)
Ms Batra also says that oven-baked okra freezes very well, but since what I made didnt last beyond one meal (amma, me and Pete demolished it!) the freezing part of this trial will have to be reserved for another time.
Recipe for: Spicy oven-baked okra
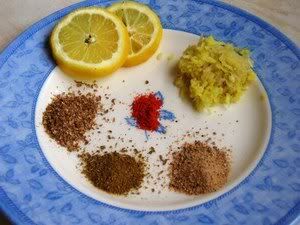
Clockwise (from top right): Ginger-garlic paste, chaat masala, cumin powder, coriander powder, lemon slices. (centre) Red chilli powder.
Ingredients:
4 cups fresh okra, cut into 2-inch pieces (I removed the heads)
1 tbsp ginger-garlic paste
1 tsp cumin powder
1 tsp coriander powder
1/2 tsp red chilli powder (or to taste)
1 tsp chaat masala (readymade is fine)
2 tsp oil (I used olive oil)
Juice of one large lemon (3-4 tbsp)
1 tbsp gram flour (chickpea flour)
1 tbsp rice flour
Salt to taste
Method:
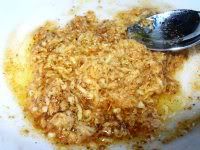
1. Combine everything but the okra in a large bowl, whisking to blend well.
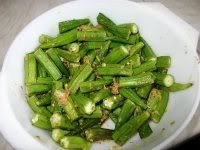
2. Add the okra to the bowl and mix carefully with your hands or a large flat spoon to coat the pieces with the masala.
3. Lay out the okra in a single layer on a lightly greased baking sheet or on non-stick silicone paper.
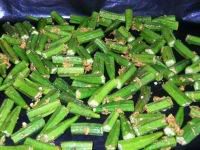
4. Broil it in the oven for 5 minutes or until the tops acquire brown spots.
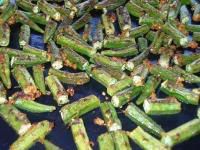
5. Now turn on the oven to 220C and bake the okra on the lowest rack for 6-8 minutes or till the bottoms are browned nicely.
6. Serve hot as a side dish with rice or roti, or as a snack. I served mine with tangy lemon rice.
Next Saturday we leave for the USA (NY-DC-Seattle and whatever else my sis & bro have got planned for us) and we're going to be there for 2 weeks and a bit. I'm hoping to be able to shoot off a few food or travel-based posts in that time, but obviously there arent any guarantees. But do keep coming by just to check things out from time to time - and I'll surely be keeping an eye on all my favourite blogs too!
It would be even nicer to meet up with any bloggers who are in the area - drop me a line on shyam69@gmail.com if so, and we can take it from there.
That said, on to the okra that I made today, more or less following a recipe from Neelam Batra's 1000 Indian Recipes.

She said okra is very nice when baked in the oven... that was a new one on me, so of course I had to try it. I have to say the end result wasnt bad at all - they were spicy, tangy and slightly crisp and nicely browned... excellent results for a healthy recipe using only a little oil! They also didnt end up gooey - a very important point because I'm not partial (nor do I know anybody who is) to anything that has the texture of nasal debris arising from a bad cold. (Sorry if I grossed anybody out, but if it's any consolation, I'm grossed out myself just at the thought!)
Ms Batra also says that oven-baked okra freezes very well, but since what I made didnt last beyond one meal (amma, me and Pete demolished it!) the freezing part of this trial will have to be reserved for another time.
Recipe for: Spicy oven-baked okra


Clockwise (from top right): Ginger-garlic paste, chaat masala, cumin powder, coriander powder, lemon slices. (centre) Red chilli powder.
Ingredients:
4 cups fresh okra, cut into 2-inch pieces (I removed the heads)
1 tbsp ginger-garlic paste
1 tsp cumin powder
1 tsp coriander powder
1/2 tsp red chilli powder (or to taste)
1 tsp chaat masala (readymade is fine)
2 tsp oil (I used olive oil)
Juice of one large lemon (3-4 tbsp)
1 tbsp gram flour (chickpea flour)
1 tbsp rice flour
Salt to taste
Method:
1. Combine everything but the okra in a large bowl, whisking to blend well.

2. Add the okra to the bowl and mix carefully with your hands or a large flat spoon to coat the pieces with the masala.

3. Lay out the okra in a single layer on a lightly greased baking sheet or on non-stick silicone paper.

4. Broil it in the oven for 5 minutes or until the tops acquire brown spots.

5. Now turn on the oven to 220C and bake the okra on the lowest rack for 6-8 minutes or till the bottoms are browned nicely.
6. Serve hot as a side dish with rice or roti, or as a snack. I served mine with tangy lemon rice.
Tuesday, April 18, 2006
I'm still here!
It's just that I didnt do much cooking last week, first because there wasnt the time and then because my mother arrived last Thursday and we whisked her off to Scotland for the long Easter weekend. Scotland is utterly gorgeous - if still in what seems like the middle of winter; the ski slopes in Aviemore were still open! - and we drove around looking at some fantastic mountain scenery. Being vegetarian, there werent many options for my mother and I, as far as food was concerned - but the best thing we had was ice-cold water straight from a gushing little waterfall/stream in the mountainside near Ben Nevis (the highest mountain in the UK). There's no recipe for it and nothing that could convey the fresh sweetness of the water. I'll post a photograph of the waterfall at some point, I guess.
Anyway, I'm back and ready for some home-cooked food. Amma will be the cook, methinks... I abdicate the crown in her favour for now!
Anyway, I'm back and ready for some home-cooked food. Amma will be the cook, methinks... I abdicate the crown in her favour for now!
Tuesday, April 11, 2006
ARF-5-a-day Tuesday #15 - Black-eyed beans in tomato-yogurt sauce
Gosh, I do hate days when I cant get the time to put up any new posts - it's almost like I'm addicted. I guess the constant challenge is to try and take better photos, make the write-up more interesting - I'm always inspired by people who take the time and trouble to make their photos unique. I'd LIKE to, but sometimes cant be bothered to get just the right background or perfect shot... I tend to make do with what I have and get on with it. Which isnt a bad philosophy for life, but not so good for food photography.
But this is meant to be a food post...so I shall get on with the matter in hand. Black-eyed beans (chawli in Hindi, black-eyed beans in English - heheh) are apparently made in the new year for good luck - well, I dont mind making them any time. I mean, good luck and tasty vegetarian proteins are always welcome in MY home!
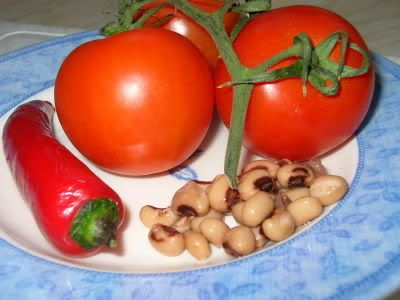
I used a mild Mediterranean chilli to make this curry... serranos, Thai green or even habanero (well, a portion of one habanero, anyway!) would have been my chilli of choice, but since I was taking Pete's capsaicin capability into account, I had to considerably tone down the heat. Not that it was a bad thing, the creamy yogurt base of the sauce was very nice even without being chilli-hot.
So here it is - my entry for this week's ARF/5-a-day Tuesday #15. Gosh, how the weeks fly by! I seem to be measuring time in ARF Tuesdays of late...
Recipe for: Black-eyed beans in tomato-yogurt sauce
Ingredients:
1 tin black-eyed beans (440g)
3 medium tomatoes, chopped fine
1 mild chilli, minced (or hot chillies to taste)
1 large clove garlic, minced or grated
1 tbsp ginger root, grated
1/2 cup yogurt at room temperature, beaten lightly
2 tsp oil
2 tbsp chopped fresh coriander leaves for garnish
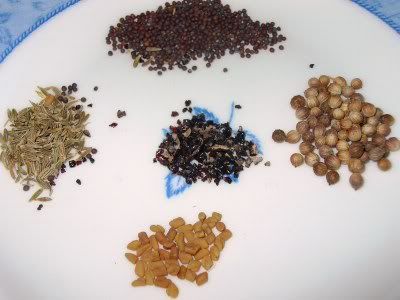 Clockwise from top: Mustard seeds, coriander seeds, fenugreek seeds, cumin seeds. Centre: Kamarkas
Spice mix:
1 tsp coriander seeds
1/4 tsp methi (fenugreek) seeds
1 tsp cumin seeds
1 tsp mustard seeds
1/2 tsp kamarkas (optional, use 1/2 tsp fennel seeds instead)
Method:
1. In a small pan, dry-roast all the seeds till they turn golden brown. Cool, then powder finely with a mortar and pestle.
2. Heat the oil in a pan and add the ginger, garlic and chillies. Fry for 30 seconds.
3. Add the tomatoes and stir, then cover and turn the heat down to medium-high, letting the tomatoes cook down to a mushy sauce.
4. Now add the yogurt one tablespoon at a time, stirring all the time to stop it from curdling.
5. When all the yogurt has been used up, add the powdered spices and stir. Then add the beans and salt to taste, stir again.
6. Let the sauce simmer on medium-low till the consistency is as thick as you want. Do not let the mixture boil on high heat.
7. Garnish with fresh coriander leaves and serve hot with rice.
NB: You can fry 1 tsp whole cumin seeds in 1 tsp oil and add that as seasoning to the hot beans, before adding the coriander leaves.
But this is meant to be a food post...so I shall get on with the matter in hand. Black-eyed beans (chawli in Hindi, black-eyed beans in English - heheh) are apparently made in the new year for good luck - well, I dont mind making them any time. I mean, good luck and tasty vegetarian proteins are always welcome in MY home!

I used a mild Mediterranean chilli to make this curry... serranos, Thai green or even habanero (well, a portion of one habanero, anyway!) would have been my chilli of choice, but since I was taking Pete's capsaicin capability into account, I had to considerably tone down the heat. Not that it was a bad thing, the creamy yogurt base of the sauce was very nice even without being chilli-hot.
So here it is - my entry for this week's ARF/5-a-day Tuesday #15. Gosh, how the weeks fly by! I seem to be measuring time in ARF Tuesdays of late...
Recipe for: Black-eyed beans in tomato-yogurt sauce
Ingredients:
1 tin black-eyed beans (440g)
3 medium tomatoes, chopped fine
1 mild chilli, minced (or hot chillies to taste)
1 large clove garlic, minced or grated
1 tbsp ginger root, grated
1/2 cup yogurt at room temperature, beaten lightly
2 tsp oil
2 tbsp chopped fresh coriander leaves for garnish
 Clockwise from top: Mustard seeds, coriander seeds, fenugreek seeds, cumin seeds. Centre: Kamarkas
Spice mix:
1 tsp coriander seeds
1/4 tsp methi (fenugreek) seeds
1 tsp cumin seeds
1 tsp mustard seeds
1/2 tsp kamarkas (optional, use 1/2 tsp fennel seeds instead)
Method:
1. In a small pan, dry-roast all the seeds till they turn golden brown. Cool, then powder finely with a mortar and pestle.
2. Heat the oil in a pan and add the ginger, garlic and chillies. Fry for 30 seconds.
3. Add the tomatoes and stir, then cover and turn the heat down to medium-high, letting the tomatoes cook down to a mushy sauce.
4. Now add the yogurt one tablespoon at a time, stirring all the time to stop it from curdling.
5. When all the yogurt has been used up, add the powdered spices and stir. Then add the beans and salt to taste, stir again.
6. Let the sauce simmer on medium-low till the consistency is as thick as you want. Do not let the mixture boil on high heat.
7. Garnish with fresh coriander leaves and serve hot with rice.
NB: You can fry 1 tsp whole cumin seeds in 1 tsp oil and add that as seasoning to the hot beans, before adding the coriander leaves.
Sunday, April 09, 2006
Lemon sunflower sponge cake
The "sunflower" is in the title only because my cake WAS in the shape of a sunflower.
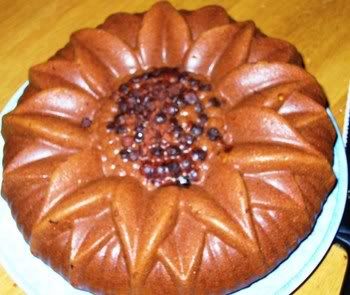
And before anybody begins to think "wow she's a superb baker", let me hasten to add that the shape of a sunflower was entirely and only due to my sunflower-shaped Bundt cake pan, which I bought from the De Cuisine site. They have some really cool cake moulds, and if you go by the descriptions of their wares, you'd think there was nothing better than those since sliced bread!
There are so many things on the site that I'd consider a bit OTT... but I guess if you have unlimited money and a very large kitchen, all them things would be "must-haves". I dont have either of those in abundance, unfortunately, so I have to pick and choose the things I buy. I have to admit, though, that I've bought other items from them before, and the quality is very good. Then again, so are the prices (phew) - of not just the cake moulds but all their items... I can only afford to buy these things one at at time! (I have my eye on their stainless steel Mandolin for my next purchase... it looks terrifyingly efficient!)
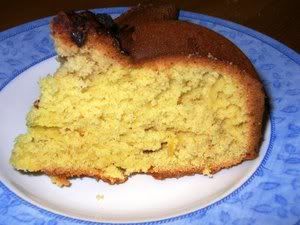
Anyhow, on to the recipe. It's really a basic lemon sponge recipe, and if you dont have a sunflower Bundt pan, use a 10" square or round one. Also be warned that this makes a very BIG cake, and if I were to make it again without using the mould, I'd halve the recipe and use a 7" square pan. This recipe makes a very light sponge, not too crumbly and not dry. It keeps well in an airtight tin for 3-4 days. I was really pleased with it - although I do think that a lemony icing or frosting/filling would have made the cake even nicer. This would work with a round or square cake, not my sunflower. Next time...
Recipe for: Lemon sunflower sponge cake

Ingredients:
2 cups sugar
1 cup butter or margarine
4 eggs
3 cups flour
1 tsp baking powder
1 tsp baking soda
1/2 tsp salt
3/4 cup buttermilk
2 tbsp grated lemon peel
1 tbsp yellow food colouring
2 tbsp lemon juice
2 tbsp chocolate chips (optional)
Method:
1. Preheat the oven to 175C/325F. Grease a 9" square or round pan lightly. (If using a non-stick sunflower mould, no need to grease).
2. Sift together the flour, salt, baking soda and baking powder in a medium bowl.
3. Beat sugar and butter in a large pan until light and fluffy.
4. Add the eggs one at a time, beating well between additions.
5. Now add the flour mix and buttermilk alternately to the egg batter, beating well between additions.
6. (Omit this step if not using a sunflower mould and go directly to Step 7) Remove 3 tbsp of the batter and mix the chocolate chips with it. Fill the centre of the mould with this chocolate-chip batter.
7. Add lemon peel and lemon juice to the batter and mix in well.
8. Pour batter into pan and bake for 55-60 minutes or till a cake tester inserted in the centre comes out clean.
9. Let the cake rest in the pan for 10 minutes, then turn out and cool completely on a wire rack.
10. Serve with cream or lemon cream and a cup of coffee.

And before anybody begins to think "wow she's a superb baker", let me hasten to add that the shape of a sunflower was entirely and only due to my sunflower-shaped Bundt cake pan, which I bought from the De Cuisine site. They have some really cool cake moulds, and if you go by the descriptions of their wares, you'd think there was nothing better than those since sliced bread!
There are so many things on the site that I'd consider a bit OTT... but I guess if you have unlimited money and a very large kitchen, all them things would be "must-haves". I dont have either of those in abundance, unfortunately, so I have to pick and choose the things I buy. I have to admit, though, that I've bought other items from them before, and the quality is very good. Then again, so are the prices (phew) - of not just the cake moulds but all their items... I can only afford to buy these things one at at time! (I have my eye on their stainless steel Mandolin for my next purchase... it looks terrifyingly efficient!)
Anyhow, on to the recipe. It's really a basic lemon sponge recipe, and if you dont have a sunflower Bundt pan, use a 10" square or round one. Also be warned that this makes a very BIG cake, and if I were to make it again without using the mould, I'd halve the recipe and use a 7" square pan. This recipe makes a very light sponge, not too crumbly and not dry. It keeps well in an airtight tin for 3-4 days. I was really pleased with it - although I do think that a lemony icing or frosting/filling would have made the cake even nicer. This would work with a round or square cake, not my sunflower. Next time...
Recipe for: Lemon sunflower sponge cake

Ingredients:
2 cups sugar
1 cup butter or margarine
4 eggs
3 cups flour
1 tsp baking powder
1 tsp baking soda
1/2 tsp salt
3/4 cup buttermilk
2 tbsp grated lemon peel
1 tbsp yellow food colouring
2 tbsp lemon juice
2 tbsp chocolate chips (optional)
Method:
1. Preheat the oven to 175C/325F. Grease a 9" square or round pan lightly. (If using a non-stick sunflower mould, no need to grease).
2. Sift together the flour, salt, baking soda and baking powder in a medium bowl.
3. Beat sugar and butter in a large pan until light and fluffy.
4. Add the eggs one at a time, beating well between additions.
5. Now add the flour mix and buttermilk alternately to the egg batter, beating well between additions.
6. (Omit this step if not using a sunflower mould and go directly to Step 7) Remove 3 tbsp of the batter and mix the chocolate chips with it. Fill the centre of the mould with this chocolate-chip batter.
7. Add lemon peel and lemon juice to the batter and mix in well.
8. Pour batter into pan and bake for 55-60 minutes or till a cake tester inserted in the centre comes out clean.
9. Let the cake rest in the pan for 10 minutes, then turn out and cool completely on a wire rack.

10. Serve with cream or lemon cream and a cup of coffee.
A foodbloggers meme around the world
Phew, at last, a little free time to write a post on my favourite blog! ;) I've been tagged by Priya of Sugar and Spice and Meeta of What's for Lunch Honey for a meme. So here goes:
1. Please list three recipes you have recently bookmarked from foodblogs to try:
Saffron Hut's Upma kozhakottai
Garam Masala's Bharelu Shaak
Sailu's Palakayalu
2. A foodblog in your vicinity:
Ammani's Chai Pani
3. A foodblog (or more) located far from you:
Goodness, that would be almost my entire "Food for Thought - Indian" list of food blogs!
4. A foodblog (or several) you have discovered recently (where did you find it?):
Cant remember quite how I got to these, but it's either from other bloggers or because they were kind enough to leave a comment on my blog:
Nandita from Mumbai with Saffron Trail
Vaishali from Dusseldorf with Happy Burp
Meeta (one of those who tagged me with this meme!) from Weimar with What's for Lunch, Honey?
5. Any people or bloggers you want to tag with this meme?
I think everybody I can think of has already been tagged :) Serves me right for being so late with my meme, I guess... anyway, whoever's interested to do this meme, consider yourself tagged!
Tuesday, April 04, 2006
ARF-5-a-day Tuesday #14 - Cous-cous stuffed bell pepper
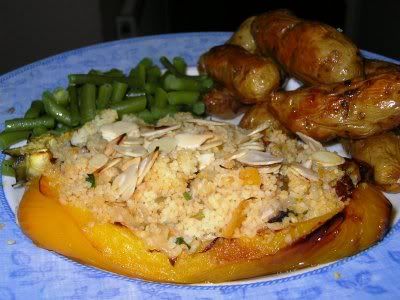
It's light, it's healthy, it's my entry for this week's ARF/5-a-day event. Ladies and gentlemen, I present to you giant Mediterranean bell peppers stuffed with spiced cous-cous, and served with oven-roasted Anya potatoes, fresh boiled green beans tossed with a little butter and salt, and lots of freshly ground black pepper.
mm mm MMMMMMM.
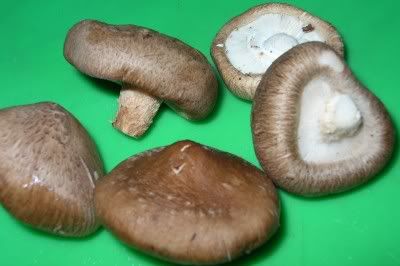
I'm salivating all over again at the very thought of this dish. The cous-cous was jazzed up with chopped shiitake mushrooms (my favourite kind at the moment) and chickpeas, with a topping of toasted slivered almonds. I gave my portion of cous-cous a little extra pizzazz by mixing in a tbsp of harissa paste (store-bought, but I intend to make my own soon). I could have added some feta cheese too, but decided there was no need to gild the lily, as it were. Besides, the feta would probably do better with spinach for stuffing something else.
One thing, though... I left the peppers in the oven for a little too long because I was distracted by the TV (who asked them to make Malcolm in the Middle so addictively funny!), and they sort of flopped shapelessly. They lost points on presentation, because they wouldnt sit up and hold my stuffing nicely. But they didnt lose a thing on flavour - they tasted lovely, as roasted peppers always do.
Recipe for: Couscous-stuffed bell pepper
1 extra large or two medium bell peppers, halved lengthwise and de-seeded
1/2 cup canned cooked chickpeas
2 cloves garlic, minced
10 slices of pickled jalapenos, minced (optional)
OR
1 fresh green chilli, de-seeded and minced (optional)
4-5 pieces of sun-dried tomatoes in oil, drained and chopped
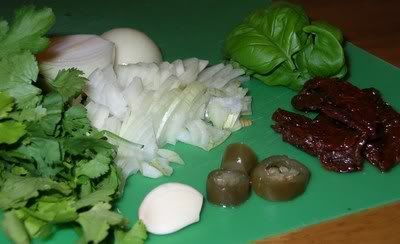
2 medium onions, chopped fine
5-6 shiitake mushrooms (or as per your choice), chopped
A handful of fresh coriander leaves, chopped
A handful of fresh basil leaves, chopped
1/2 tsp dried oregano
1/4 tsp dried thyme
2 tbsp olive oil
1 cup quick-cook couscous (try saying that quickly - heheh!)
2 cups boiling water
1 tsp butter
Salt to taste
For garnish:
1 tbsp toasted slivered almonds
Method:
1. Heat 1 tbsp olive oil in a pan. Add the garlic, chillies/jalapenos, oregano and thyme and fry for 30 seconds.
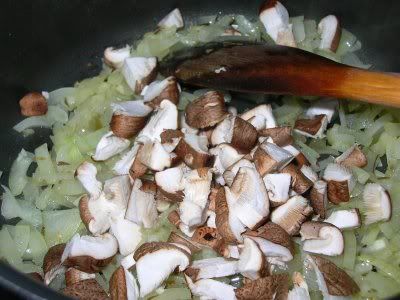
2. Add the chopped onion and fry till it gets soft and transparent, then add the mushrooms and fry for a minute or so.
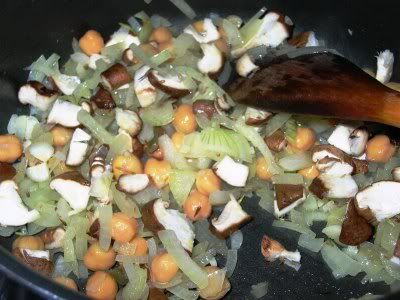
3. Now put the chopped sun-dried tomatoes, the chickpeas and half the coriander and basil leaves and mix well.
4. Drop in the cous-cous and stir, then add the boiling water, butter and salt to taste. Bring the water back to a boil, then cover the pan and turn the heat off.
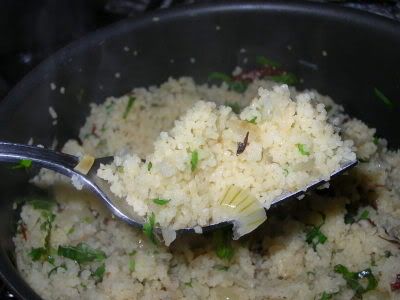
5. Let the cous-cous sit for 5 minutes, then fork in the remaining fresh chopped herbs, fluffing up the grains at the same time.
6. Brush the pepper halves with the remaining tbsp of olive oil and put in the oven on a baking tray at 180C/350F for 20 minutes or so, until the peppers begin to soften.
7. Stuff the peppers with the cous-cous mixture and put them back in the oven for another 15 minutes, until heated through.
8. Sprinkle with the toasted slivered almonds and serve hot as a side dish, or as a light supper with oven-roasted potatoes and fresh steamed vegetables of your choice.
Tip: If your peppers wont stand nicely on their bases, cut a long sliver off the bottom so that it can "rest". Be careful not to cut through the pepper!
mm mm MMMMMMM.

I'm salivating all over again at the very thought of this dish. The cous-cous was jazzed up with chopped shiitake mushrooms (my favourite kind at the moment) and chickpeas, with a topping of toasted slivered almonds. I gave my portion of cous-cous a little extra pizzazz by mixing in a tbsp of harissa paste (store-bought, but I intend to make my own soon). I could have added some feta cheese too, but decided there was no need to gild the lily, as it were. Besides, the feta would probably do better with spinach for stuffing something else.
One thing, though... I left the peppers in the oven for a little too long because I was distracted by the TV (who asked them to make Malcolm in the Middle so addictively funny!), and they sort of flopped shapelessly. They lost points on presentation, because they wouldnt sit up and hold my stuffing nicely. But they didnt lose a thing on flavour - they tasted lovely, as roasted peppers always do.
Recipe for: Couscous-stuffed bell pepper

1 extra large or two medium bell peppers, halved lengthwise and de-seeded
1/2 cup canned cooked chickpeas
2 cloves garlic, minced
10 slices of pickled jalapenos, minced (optional)
OR
1 fresh green chilli, de-seeded and minced (optional)
4-5 pieces of sun-dried tomatoes in oil, drained and chopped
2 medium onions, chopped fine
5-6 shiitake mushrooms (or as per your choice), chopped
A handful of fresh coriander leaves, chopped
A handful of fresh basil leaves, chopped
1/2 tsp dried oregano
1/4 tsp dried thyme
2 tbsp olive oil
1 cup quick-cook couscous (try saying that quickly - heheh!)
2 cups boiling water
1 tsp butter
Salt to taste
For garnish:
1 tbsp toasted slivered almonds

Method:
1. Heat 1 tbsp olive oil in a pan. Add the garlic, chillies/jalapenos, oregano and thyme and fry for 30 seconds.
2. Add the chopped onion and fry till it gets soft and transparent, then add the mushrooms and fry for a minute or so.

3. Now put the chopped sun-dried tomatoes, the chickpeas and half the coriander and basil leaves and mix well.

4. Drop in the cous-cous and stir, then add the boiling water, butter and salt to taste. Bring the water back to a boil, then cover the pan and turn the heat off.
5. Let the cous-cous sit for 5 minutes, then fork in the remaining fresh chopped herbs, fluffing up the grains at the same time.

6. Brush the pepper halves with the remaining tbsp of olive oil and put in the oven on a baking tray at 180C/350F for 20 minutes or so, until the peppers begin to soften.
7. Stuff the peppers with the cous-cous mixture and put them back in the oven for another 15 minutes, until heated through.
8. Sprinkle with the toasted slivered almonds and serve hot as a side dish, or as a light supper with oven-roasted potatoes and fresh steamed vegetables of your choice.
Tip: If your peppers wont stand nicely on their bases, cut a long sliver off the bottom so that it can "rest". Be careful not to cut through the pepper!
Monday, April 03, 2006
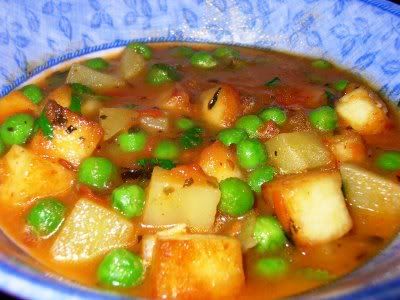
Paneer with potatoes and green peas
This is the first recipe I've tried from Neelam Batra's cookbook 1000 Indian Recipes, which I bought recently. Thus far I'd only been reading the recipes and her descriptions and everything, rather like a storybook, and imagining the results in my head.
It seemed a little complicated, this recipe, at first look, but it isnt. Once the ingredients are at hand, it's quite simple. And whatever extra effort is required is oh so very wonderfully worth it! It's the best paneer dish I've made, as far as I'm concerned. If the rest of Ms Batra's recipes turn out as well as this one, I'm sold. I may never buy another Indian cookbook again... (yeah right!)
I think what gave the recipe the extra nudge, taste-wise, was the boiled onion paste. Normally I dont have the patience for fiddly procedures like this, but this time I thought I'd actually follow the recipe properly... and the REAL reason I did it is because this paste can be made and frozen (according to Ms Batra) and used when required.
PS. In her book, Ms Batra forgot to mention when to add the boiled onion paste, but I haven't! :)
Recipe for: Paneer with potatoes and green peas
Ingredients:
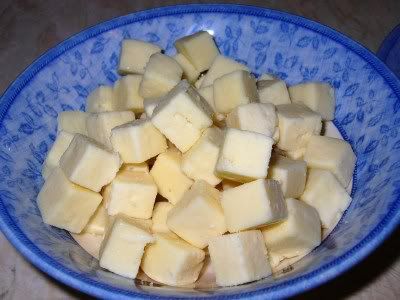
2 cups paneer, cubed
1 cup green peas (frozen is fine)
3 medium red potatoes, cubed
2 large tomatoes, chopped
4-5 fresh green chillies, slit (optional)
1/4 cup yogurt at room temperature, whisked
4 tbsp oil
Salt to taste
1/2 cup boiled onion paste (method given below)
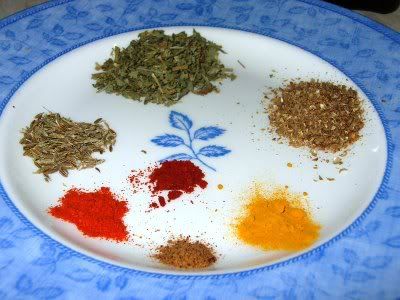
Clockwise from top: Kasoori methi, coriander powder, turmeric powder, fenugreek seed powder, red chilli powder, cumin seeds. Centre: Paprika
2 tsp kasoori methi (dried fenugreek leaves)
1 tsp coriander powder
1 tsp cumin seeds
1/2 tsp turmeric powder
1/4 tsp fenugreek seeds, dry roasted and powdered
1 tsp paprika
1 tsp red chilli powder (or to taste)
1/4 tsp ground nutmeg
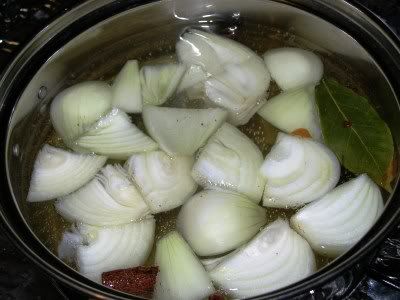
Boiled onion paste:
1/2 cup water
2 onions, peeled and roughly chopped
1 black cardamom pod
1 bay leaf
1" piece of cinnamon stick
Method:
1. To make the boiled onion paste, boil the onions with the spices in a covered pan until the onions are soft and the water is evaporated. Remove the spices and discard. Grind the onions to a smooth paste (use any water that is left).
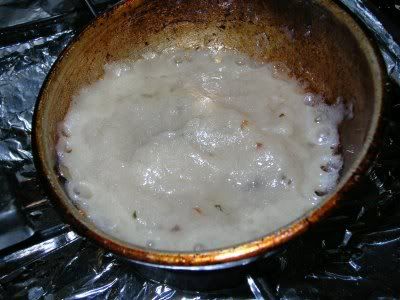
2. Fry the paneer cubes in 2 tbsp oil till they begin to take on a golden tinge. Drain on kitchen towels and reserve.
3. In a big pan, heat 2 tbsp oil. Add the cumin seeds and fry for 20 seconds, then add the rest of the spices. Stir for 30 seconds.
4. Add the chopped tomato and cook till it becomes mushy. Now put in the boiled onion paste and stir well. Let this cook for 5 minutes on medium-high.
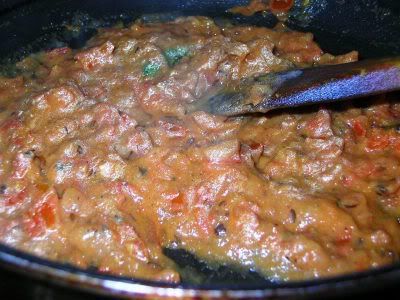
5. Stir in the yogurt, tablespoon by tablespoon, stirring all the time to stop it from curdling.
6. Now add the cubed potatoes and stir well. Cook them for 5 minutes, then add 3 cups water and bring to a boil over high heat.
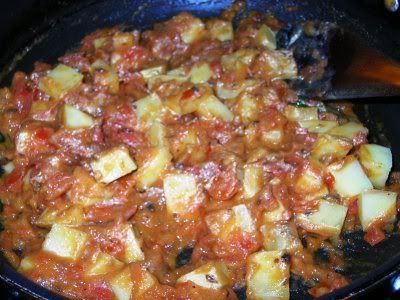
7. Reduce the heat to a simmer, cover the pan and let the potatoes cook till done (15-20 minutes).

8. Add the paneer and the frozen green peas, stir well. Cover and let the curry simmer for about 10 minutes, till the sauce is thick and the peas are done.
9. Serve hot, garnished with a tbsp of fresh chopped coriander leaves. This is excellent with rice and naan.

It seemed a little complicated, this recipe, at first look, but it isnt. Once the ingredients are at hand, it's quite simple. And whatever extra effort is required is oh so very wonderfully worth it! It's the best paneer dish I've made, as far as I'm concerned. If the rest of Ms Batra's recipes turn out as well as this one, I'm sold. I may never buy another Indian cookbook again... (yeah right!)
I think what gave the recipe the extra nudge, taste-wise, was the boiled onion paste. Normally I dont have the patience for fiddly procedures like this, but this time I thought I'd actually follow the recipe properly... and the REAL reason I did it is because this paste can be made and frozen (according to Ms Batra) and used when required.
PS. In her book, Ms Batra forgot to mention when to add the boiled onion paste, but I haven't! :)
Recipe for: Paneer with potatoes and green peas

Ingredients:
2 cups paneer, cubed
1 cup green peas (frozen is fine)
3 medium red potatoes, cubed
2 large tomatoes, chopped
4-5 fresh green chillies, slit (optional)
1/4 cup yogurt at room temperature, whisked
4 tbsp oil
Salt to taste
1/2 cup boiled onion paste (method given below)

Clockwise from top: Kasoori methi, coriander powder, turmeric powder, fenugreek seed powder, red chilli powder, cumin seeds. Centre: Paprika
2 tsp kasoori methi (dried fenugreek leaves)
1 tsp coriander powder
1 tsp cumin seeds
1/2 tsp turmeric powder
1/4 tsp fenugreek seeds, dry roasted and powdered
1 tsp paprika
1 tsp red chilli powder (or to taste)
1/4 tsp ground nutmeg
Boiled onion paste:

1/2 cup water
2 onions, peeled and roughly chopped
1 black cardamom pod
1 bay leaf
1" piece of cinnamon stick
Method:
1. To make the boiled onion paste, boil the onions with the spices in a covered pan until the onions are soft and the water is evaporated. Remove the spices and discard. Grind the onions to a smooth paste (use any water that is left).

2. Fry the paneer cubes in 2 tbsp oil till they begin to take on a golden tinge. Drain on kitchen towels and reserve.
3. In a big pan, heat 2 tbsp oil. Add the cumin seeds and fry for 20 seconds, then add the rest of the spices. Stir for 30 seconds.
4. Add the chopped tomato and cook till it becomes mushy. Now put in the boiled onion paste and stir well. Let this cook for 5 minutes on medium-high.

5. Stir in the yogurt, tablespoon by tablespoon, stirring all the time to stop it from curdling.
6. Now add the cubed potatoes and stir well. Cook them for 5 minutes, then add 3 cups water and bring to a boil over high heat.

7. Reduce the heat to a simmer, cover the pan and let the potatoes cook till done (15-20 minutes).

8. Add the paneer and the frozen green peas, stir well. Cover and let the curry simmer for about 10 minutes, till the sauce is thick and the peas are done.
9. Serve hot, garnished with a tbsp of fresh chopped coriander leaves. This is excellent with rice and naan.
Subscribe to:
Comments (Atom)

