skip to main |
skip to sidebar
http://sweetnicks.blogspot.com/2006/02/arf5-day-8-im-baaaack-edition.html
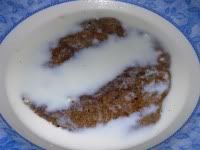
I got this recipe from the Tarla Dalal site a few years back... but although I thought it was an interesting way to use up leftovers, I didnt actually get around to trying it till now.
The thing is, I've tried a few of her recipes before - some of them work out well enough while others did NOT turn out like she said, although I pretty much followed her instructions to the letter. In fact, after 2 or 3 indifferent results, I even wondered if somebody actually tries out the recipes before they're published, or if Ms Dalal's publishers were getting her cookery books out based on her past reputation alone.
So it was with a few reservations that I decided to use up my remaining phulkas from yesterday, in making this recipe. I really didnt know if it would turn out well - but as it happened, it did.
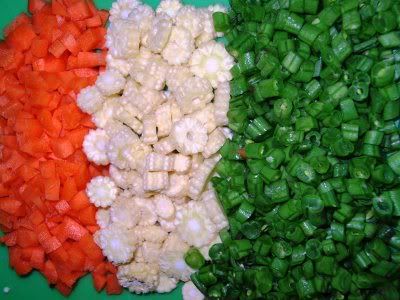
This recipe is a keeper, as far as I'm concerned... you can add whatever vegetables you like to the stuffing (I used green beans, baby corn and carrots along with mashed potatoes and onions), and you end up finishing left-over chapaties or phulkas.
And to cap it off, it's perfect for the ARF/5-a-Day Tuesday event hosted by Sweetnicks who is back this week after some tests, hopefully in the pink of health!
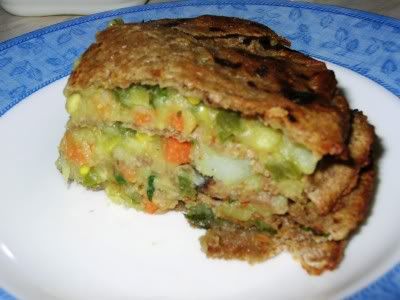
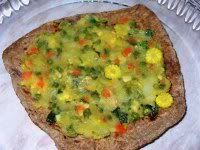
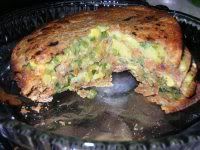
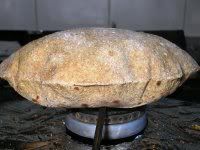
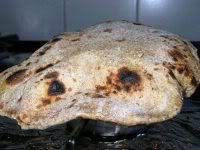
The layered chapati bake turns out a bit like a savoury cake... the inner layers of chapaties/phulkas kind of amalgamate with the filling so that you dont taste them separately. This bake would be great as a light supper and would probably be pretty darn good as a starter, too. It was very nice eaten hot, and surprisingly good even when cold. I know this because I took some to work today for lunch. Yum!
Recipe for: Savoury layered chapati bake
Ingredients:
6 leftover chapaties or phulkas (freshly-made ones would be fine too)
4-5 medium potatoes, boiled peeled and mashed
2 cups finely chopped cooked vegetables (any combination of cauliflower/carrot/cabbage/spinach/green beans etc)
1 medium tomato, chopped
2 medium onions, peeled and chopped fine
3-4 fresh green chillies (or to taste), minced
1/4 cup fresh coriander leaves, chopped
1/2 tsp turmeric powder
1/2 tsp garam masala (optional)
1/2 tsp cumin powder
10 cashewnuts, chopped
2 tsp oil
1 tsp butter
For dipping:
3/4 cup milk mixed with 2 tsp plain flour, in a shallow dish
Method:
1. Heat the oil in a pan and add the turmeric powder, cumin powder and minced green chillies. Fry for 30 seconds. Add the cashewnuts and fry till they turn golden.
2. Add the onions and fry till they soften (I was using baby corn, so I tossed those in at this point), then put in the chopped tomato and cook till it disintegrates.

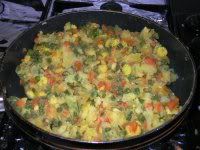
3. Now add the boiled vegetables and mashed potatoes along with the garam masala (if using) and mix them well. Fry for 2-3 minutes, then turn the heat off.
4. Place a chapati on a lightly greased baking dish. Spread with 2 heaped tbsp of stuffing.
5. Take another chapati and dip it in the dish containing the milk.
Shake off the excess and place it on the chapati already in the baking dish, the spread with more filling.
Continue until you have stacked up all the chapaties in this way.
6. Do not put any filling on the top chapati; spread it with the 1 tsp butter instead.
7. Bake in a pre-heated oven (about 180C or 350F) for 15 minutes or until the top is golden brown.
8. Cut into wedges with a sharp knife or slicer.
Serve hot with a dollop of Greek yoghurt on the side, as an appetizer or for brunch. This can also be served cold (great for picnics, I bet).
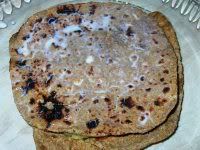
Phulkas are probably the healthiest version of Indian bread, as they are not cooked in ghee or oil or butter, but directly on an open flame. Yes, some people do add ghee or butter AFTER the phulka is cooked while it's still hot - but that's up to personal choice. They are absolutely scrummy when served immediately.
The traditional way is for the cook to make phulkas one by one and serve each immediately after removing from the flame. It's not the most convenient way to do it for the cook, obviously - but if you're lucky enough to be a recepient of this effort, especially when in North India, grab the chance with both hands!
The best ever, and I mean this, phulkas I've had were in a tiny village in Rajasthan, where I'd gone to attend a friend's wedding. After a long, tiring journey, we reached the marriage hall in the evening, famished and ready to eat anything in sight.
What we were offered was the simplest of food - hot phulkas with alu sabji (potato curry) and tarka dal. We sat in a row on the terrace of the marriage hall in the cool of the evening, with stars shining in a cloudless sky - and were fed piping hot phulkas, fresh and smeared in ghee. There were three cooks on duty and they worked perfectly as a team. One of them rolled out the phulkas lightning quick, the second one cooked them over a fire and the third dolloped home-made ghee on the cooked phulkas and placed them on our plates. It was like watching an assembly line production - as fast as we ate them, a fresh phulka landed on our plate and the side-dishes were replenished.
The Rajasthani cooks were overjoyed to be feeding us guests, and we basked in the pleasure of being fed with so much affection and - not the least - expertise. It was sheer heaven, and it was with the greatest of regret that we finally sat back replete, unable to eat a morsel more.
As I said, those were the best phulkas I've ever had. But, gorgeous though that simple meal was, it was only the humblest of starts to three days of unbridled and unabashed feasting and fun - and best of all, it was entirely vegetarian from start to finish. It's one of the most unforgettable experiences I've had, and Rajasthani wedding food is some of the most delicious food in the world. It's also mighty rich... but I guess that's the case with most wedding feasts.
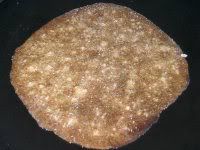
But back to my own phulka-making efforts... I'm not the best at it, not by a long shot. The rolled-out dough is first cooked quickly and partially on the tava and then finished over an open flame. If it puffs up evenly into a near sphere, you can consider it a perfect phulka. I manage to get about one in four to puff up nicely, and it's always a triumphant feeling to see that happen!
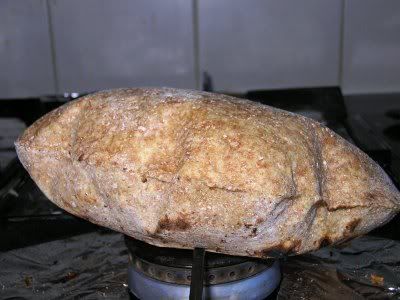
There's nothing wrong if the phulkas dont puff up, in the sense that they'll taste just the same. But a perfectly puffed phulka is proof that everything has come together just right - the dough texture, rolling it out, cooking it quickly on the tava and finally on the open flame. It's a great feeling!
Recipe for: Phulkas
Ingredients:
3 cups wholewheat flour
1/2 cup milk
1/2 tsp salt
4 tbsp oil
Enough water to make a stiff smooth dough
1 extra cup flour for dusting
Method:
1. Mix the flour and salt in a large bowl and make a well in the middle.
2. Add the milk and oil in the well, stirring it into the flour with a large fork in clockwise movements from the centre.
3. Add water little by little, stirring until the flour is just mixed.
4. Remove the fork and mix by hand now, kneading to form a stiff, smooth dough, adding water as required.
5. Cover and let the dough rest for 15 minutes.
6. Pinch off a piece of dough about the size of a golf ball and roll it into a ball.
7. Flatten it in the dusting flour, turn it over and coat the other side with the flour.
8. Roll it into a circle (as much as possible) with a rolling pin, exerting a steady but light pressure so that the dough does not stick. Dust with more flour if required.
9. Heat a tava or flat pan on medium flame. Place the phulka on it and leave it on for 30 seconds, until white spots begin to appear. Turn it over and do the same with the other side.
10. Take the phulka off the tava and place it over a naked flame. You can do it by hand (carefully, because the phulka might tear and release the hot steam) or use a
pair of tongs.
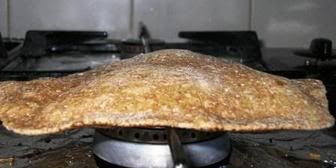
11. Let the phulka puff up and get some dark spots. Then turn it over and cook that side.
12. Serve hot, spread with a little butter or ghee. If not serving immediately, stack the phulkas on a soft clean cloth as you make them. Reheat in the oven or in the microwave before serving with dal and any vegetable curry.
I was inspired to make suji halwa when I saw Atabela's recipe for it. It seemed like such a good idea and a nice change from the usual suji halwa. A small bag of unsweetened dried berries was begging to be used, so the decision was made.
I also added some traditional sultanas and cashewnuts to the halwa, although I guess most nuts (maybe not peanuts, though) would taste just as good. Oh, and the only calories in it come from the ghee, because I used Splenda instead of sugar. There's just no way to compromise on the ghee, unfortunately, because of the flavour and aroma it imparts.
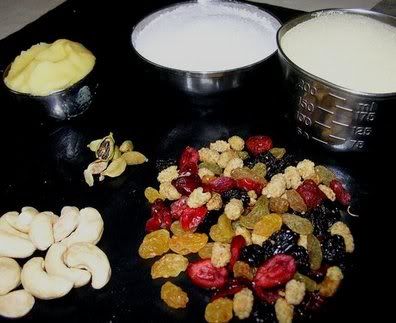
Clockwise from bottom right: Mixed dried berries (cranberries, strawberries, sour cherries and sultanas), cashewnuts, cardamom, ghee, Splenda and suji.
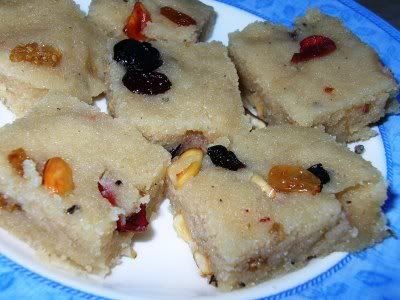
Suji halwa is a quick, fuss-free sweet to make - it's also homey and sort of soothing. Or maybe that's because I associate it with memories of home.
This halwa is nicest eaten hot (the microwave comes in handy here, if you're not eating it fresh). I didnt make mine the usual formless mass of halwa - I spread it on a lightly greased plate straight from the cooking pan, and cut it into squares. The berries looked like little jewels studding the little squares of halwa. They looked pretty and were the perfect size to satisfy my undemanding sweet tooth, one square at a time. And did I say they looked pretty?
Recipe for: Suji halwa with dried berries
Ingredients:
1 cup suji
3/4 cup sugar or Splenda
1/4 cup ghee
3/4 tsp cardamom powder
1/3 cup mixed dried berries and sultanas
2 cups water
Method:
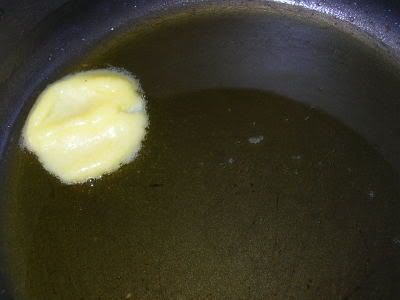
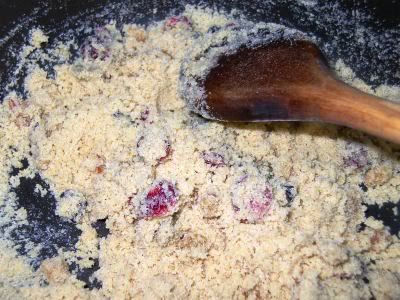
1. Heat 1 tsp of the ghee in a small pan and fry the berries and nuts until the nuts turn golden. Remove from the hot pan (to stop them browning further) and reserve.
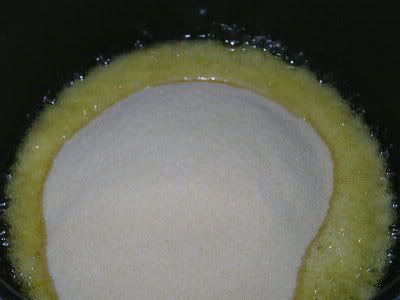
2. Melt the remaining ghee in a wide pan.
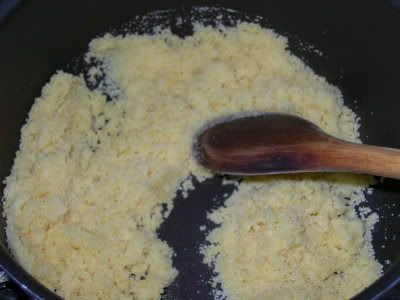
3. Add the suji to the ghee and roast it on medium-high heat, stirring frequently, until the suji starts to turn a darker colour (about 10 minutes) and gives off a nice roasting aroma.
4. The suji is done when it becomes wet-looking and the ghee begins to separate from the mixture.
5. Now is the time to add the berries and nuts, and the sugar. Stir it all into the roasted suji mix.
6. Add the cardamom powder and two cups water to the pan and stir well and frequently, making sure there are no lumps.
7. Keep stirring until the suji absorbs the water and the mixture pulls away from the sides of the pan. At this point, stirring will be difficult as the halwa will have become a soft mass. Turn off the heat. The halwa can be served rightaway in cups.
8. If you want to make serving pieces like I did, spread the hot halwa on a lightly greased flat plate, patting it down quickly and carefully with a wetted palm. Cut into pieces when it has cooled a little.
The halwa stays good for 2 days, and can be re-heated in the microwave prior to serving.
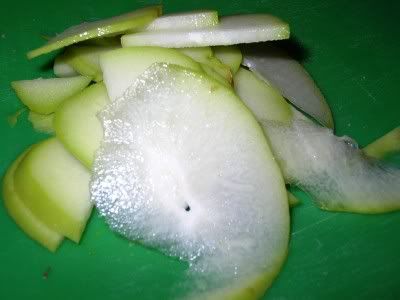
Item 1: 1/4 of a chow-chow (bangalore kathirikkai)
+
Item 2: about 1/2 a coconut
=
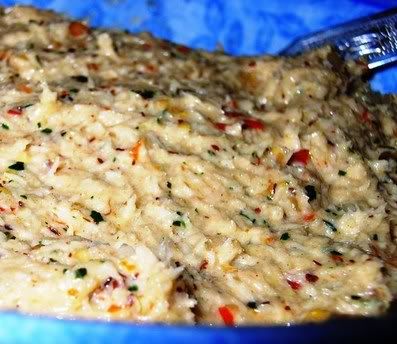
Item 3 = Chow-chow chutney or thogayal
This is probably the only sort of equation I can understand, having been maths-impaired since birth. It's the stuff of my nightmares, mathematics, and it has NO place on my blog or indeed in my life.
So I'll talk about chow-chow thogayal instead.
My mother usually makes thogayal with the addition of a vegetable - cabbage, white pumpkin, chow-chow, etc. When I was younger, I used to think that thogayal made by adding vegetables was inferior to that made with coconut alone - as if the purity of the coconut had been compromised (I guess as a kid I was pompous in thought if not speech!).
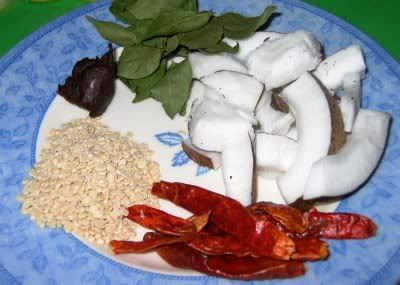
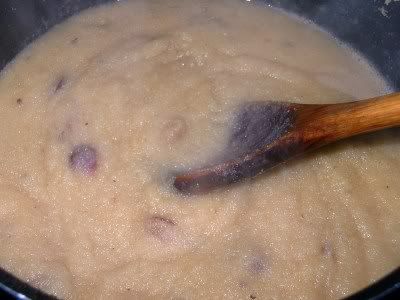
Ingredients for thogayal (clockwise, starting top right): Coconut, dried red chillies, urad dal, tamarind piece and curry leaves
I dont feel that way any more, which is why this recipe is being aired. Also, adding a bit of vegetable is a great idea if you're a bit short of coconut - and it doesnt compromise on taste one whit. Of course, since the vegetable is only partly cooked, the thogayal only stays good for a couple of days.
Putting coconut chutneys in the fridge definitely DOES compromise the taste, because they acquire a sort of staleness that's unattractive on the tongue. It's not that the chutneys go bad, but they lose some vital essence... I like to imagine that it's their soul...
Enough of the belaboured whimsy, and on with the recipe!
Recipe for: Chow-chow thogayal (chutney)
Ingredients:
1/2 cup chow-chow, sliced
1/2 cup coconut, grated or slivered
5-6 dried red chillies (or to taste)
1 tsp tamarind paste or 1/4-lime sized piece of tamarind
10 curry leaves
1/2 tsp asafoetida powder
2 tsp urad dal
2 tsp oil
Salt to taste
Warm water as required (approx 1/4 cup)
Method:
1. Heat 1 tsp oil in a small pan and stir-fry the sliced chow-chow for 2-3 minutes, till the slices start to soften. Remove from the pan and set aside.
2. Heat the second tsp of oil in the same pan and fry the red chillies, urad dal and curry leaves till the dal turns golden. Remove the chillies and set aside.
3. Grind the fried chillies, coconut, tamarind, asafoetida powder and chow-chow together, using only as much water as required to make thick but finely ground mixture.
4. When all the ingredients are ground up properly, add the rest of the tempering (the curry leaves and urad dal) along with salt to taste and grind for another 20 seconds, so that the dal and curry leaves are shredded but not completely amalgamated.
5. Serve as a side dish with idli, dosa, chapaties, etc, use it as a filling for sandwiches, or eat it mixed with ghee and steamed rice with any dry vegetable dish.
 Kala chana is both the name of this variety of chickpeas and of the dish made with them - an economy of words indeed. Although kala chana or black chickpeas (actually they're brown in colour!) are a variety of chickpeas, they look and taste very different from the more common white kind (kabuli chana) that are used to make, among other things, hummous and chole. I personally like them better, because they have a stronger, earthier flavour that is not masked by the masala that is used to make the curry.
These chana can be soaked overnight in water, but 3-4 hours is usually enough to make them grow plump in the water and ready for cooking.

I also like kala chana plain boiled, sauteed in a little oil and tempered with the usual mix of mustard seeds, some dried red chillies, asafoetida powder and urad dal - they make for a tasty, healthy snack with just this tempering, or with the addition of freshly grated coconut for garnish. This dish (called sundal) is usually made as prasadam or holy offering during certain festivals, but I like to make them even otherwise.
Not this time, though... this time it was kala chana curry for my vegetarian sister-in-law, who regularly invites herself over for a home-cooked Indian meal!
Recipe for: Kala chana
Ingredients:
4 tomatoes, de-skinned and chopped finely (To de-skin the tomatoes, make a small shallow cut in the skin, then put the tomatoes in a bowl and cover with boiling water. Let rest for 3-4 minutes. Pour out the water and slip off the tomato skins - they will come off easily)

1 cup kala chana, soaked in plenty of water overnight
2 medium onions, chopped fine
1 tsp ginger, grated
4-5 green chillies (or to taste), minced or sliced into fine rounds
2 bay leaves
1" cinnamon stick
2 black cardamom pods, left whole
1 tsp cumin seeds
1 htsp chana or chole masala
or
1/2 tsp garam masala
Salt to taste
2 tsp oil
Fresh coriander, chopped, for garnish
Thinly sliced tomatoes and onion rings for garnish (optional)
Method:
1. Pressure-cook the soaked kala chana with the bay leaves, whole black cardamom pods and cinnamon stick in enough water to cover the chana fully. Do not overcook. (They should hold their shape yet be easy to mash when a little pressure is applied.) Remove the bay leaves, the whole cardamom and cinnamon stick and discard.
2. In a wide pan, heat the oil. Add the grated ginger, the chopped green chillies, the cumin seeds. Fry for 1 minute, then add the chopped onions. Fry till the onions become soft and are beginning to turn slightly brown.

3. Add the chopped tomatoes and the garam masala/chana or chole masala and stir. Add 1/2 cup water and cook till the tomatoes break down and become mushy.
4. Now add the cooked kala chana (reserving 1/4 cup) and salt to taste. Stir well to coat.
5. Add some more water if required, to make a thick gravy, and let the kala chana simmer away for 5 minutes.
6. Mash the reserved 1/4 cup of the chana and add it to the pan. Stir again. This will thicken the chana.
7. Garnish with the tomato slices and onion rings (if using), and scatter the coriander leaves on top.
8. Serve hot with rice, chapatis or puris.
I got this in my inbox yesterday from one of the food groups I subscribe to - it's too cute! :)
Cabbage always has a heart; green beans string along;
You're such a cute tomato, will you peas to me belong?
You've been the apple of my eye, you know how much I care;
So lettuce get together, we'd make a perfect pear.
Now, something's sure to turnip to prove you can't be beet;
So, if you carrot all for me let's let our tulips meet.
Don't squash my hopes and dreams now, Bee my honey, dear;
Or tears will fill potato's eyes, while sweet corn lends an ear.
I'll cauliflower shop and say, your dreams are parsley mine.
I'll work and share my celery, so be my valentine.
:)
http://sweetnicks.blogspot.com/2006/02/arf5-day-tuesday-7-valentines-edition.html
It's that time again already - welcome back, Sweetnicks! Glad you had a wonderful holiday!
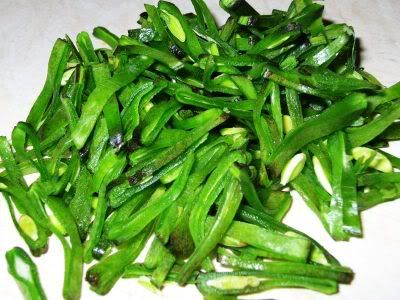
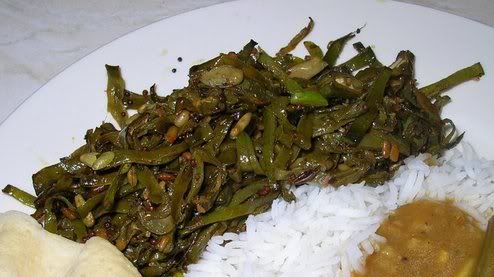
My entry this week is avarakkai - a kind of flat broad green bean that tastes a bit like runner beans but is way better than that! I would give the English name for this vegetable, but I dont know what it's called. So it's going to stay Tamil and be known as avarakkai.
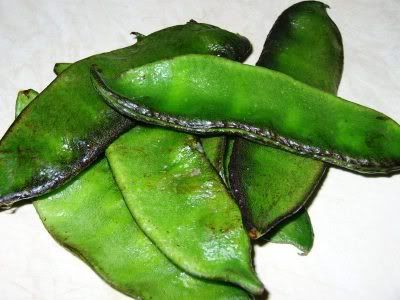
Avarakkai really are my favourite kind of fresh beans. Nowadays French beans (or snap beans) have had the stringy bit bred right out of them, but avarakkai need the string removing before slicing.
You can cook it with sliced onions or add fresh grated coconut to it once it's done, and both versions are nice in their own way. But I like it best the way my mother makes it for me - which is simply sliced, seasoned and pan fried. It's best not overcooked (even though I like it shrivelled) and if, like me, you like the natural, sort of juicy taste of fresh green beans, this is the only way to have them!
I got my avarakkai from a vegetable shop in Southampton last weekend - it was a revelation to see just how much variety there was in groceries "down south", as they call it... all sorts of vegetables and fruit from all over the world, some that I knew and some that I didnt.To think I thought Birmingham was good for fresh "Indian" vegetables...!
I would have loved to experiment with some of the unknown (to me) vegetables, but I didnt buy any because I knew I wouldnt have enough time to do them justice... there wouldnt have been much point buying stuff that would have just gone waste. But how I wish that variety was available closer home!
Oh well. That's what I get for living up North.
Recipe for: Avarakkai curry
Ingredients:
1/4 kg avarakkai (3 cupfuls when sliced)
For seasoning:
2 tsp mustard seeds
1 tsp urad dal
1 tsp garlic-sesame molagapodi (optional)
2 tsp red chilli powder (or to taste)
1/2 tsp black pepper powder
1 tsp oil
1/4 tsp asafoetida powder if you have it
Salt to taste
Method:
1. Heat the oil in a pan and do the seasoning, covering the pan till the mustard seeds have popped.
2. Toss in the sliced avarakkai and stir well to coat.
3. Turn the heat down low and cover the pan, letting the beans steam-cook for 8-10 minutes.
4. Uncover the pan and add salt to taste. Mix and turn the heat up for 3-4 minutes, stirring occasionally, until the beans start to become a bit brownish.
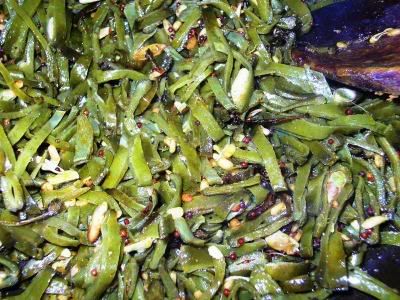
5. Serve hot as a side dish with steamed rice and sambar or other South-Indian gravy preparation.
I love the combination of methi (fenugreek greens) with potatoes - there's something about the slightly bitter taste of the greens combined with the texture and flavour of lightly fried potatoes (first boiled and perhaps peeled) that really appeals to my taste buds. It's best if the greens are not fried to a crisp - just enough to wilt them, much like spinach.
So if you had the time and the patience to fry the greens separately and add them to the potatoes afterwards, when the spuds are beginning to acquire crispy bits, I would say that would be a pretty good thing to do. Alu methi is especially nice with chapaties and rotis, although I wouldnt object to it as a side with rice and sambar/any kuzhambu/rasam/curds.
Recipe for: Alu methi (potatoes with fenugreek greens)

Ingredients:
5-6 medium potatoes, boiled (peeling is optional) and cubed
2 cups methi, washed and chopped
2 tsp oil
Salt to taste
For tempering:
2 tsp mustard seeds
2 tsp urad dal
1/4 tsp asafoetida powder
1 tsp red chilli powder
1/2 tsp freshly ground black pepper
Method:
1. Heat 1 tsp oil in a small pan and add the chopped methi to it. Stir fry on high heat, until it is wilted, then remove from the heat. Reserve.

2. In a bigger pan, heat the remaining tsp of oil and add the tempering ingredients. Close the pan while the mustard seeds pop.
3. Put in the boiled, cubed potatoes and stir carefully to mix the ingredients, adding salt to taste. Dont break up the potatoes.
4. Let the potatoes fry over medium heat till they begin to crisp a little - spray them with oil if required.
5. When the potatoes are done to your liking, add the reserved methi and mix in carefully. Serve hot with chapaties or as a side dish with rice.
Drumsticks (not the chicken kind) or murungakkai, as they are known in Tamil, are a great addition to sambar because of the aroma and flavour they impart. Only the insides of the drumsticks are edible - that is, the seeds and the white pith. The outer green parts are usually chewed to get the maximum flavour and then discarded. It's the discarded bits that put me off eating this vegetable - call me fastidious but I dont like to have chewed up food around or on my plate... even if it's food that I myself have chewed! But I love their flavour and I especially love the seeds.
And, by way of general information, Indira of Mahanandi fame has a lovely post on a curry made with this vegetable.
I had one drumstick, not terribly fresh since it had travelled with me all the way from Southampton (5 hours drive away from where I live) and goodness knows how much longer it had been at the market there - but it was fit for my purpose, which was to make murungakkai sambar.

I made the sambar slightly differently from usual by pressure-cooking the tuvar dal, green chillies, garlic and tomatoes together. I guess I could have put in the drumstick pieces as well, but I didnt for two reasons; One, I was afraid the pieces might disintegrate (making it difficult to pick them out later); and Two, I wanted to smell the divine aroma of the drumsticks cooking in the tamarind water!
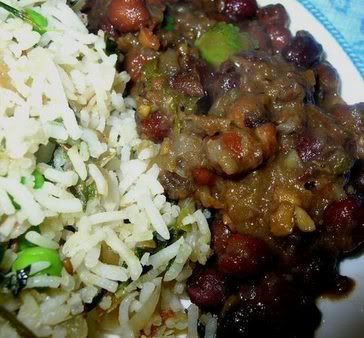
It's a simple recipe especially if you have a pressure cooker (have I said this before?) - and it tastes and smells great. Serve the sambar over steamed rice along with any dry vegetable curry (I made avarakkai - a kind of flat green bean) or even kootu, for an everyday piece of South Indian cooking heaven!
Recipe for: Murungakkai (drumstick) sambar

Ingredients:
2 medium tomatoes, quartered
3 fat cloves garlic, roughly chopped
3-4 green chillies (or to taste), slit
1 cup tuvar dal, washed
1-2 drumsticks, cut into 2-inch long pieces
1 tsp tamarind paste
Salt to taste
2 htsp sambar powder (readymade or home-made)
4 cups water
For tempering:
2 tsp mustard seeds
3-4 dried red chillies (or to taste)
1/4 tsp asafoetida powder
1 tsp oil
6-7 curry leaves
1/2 tsp turmeric powder

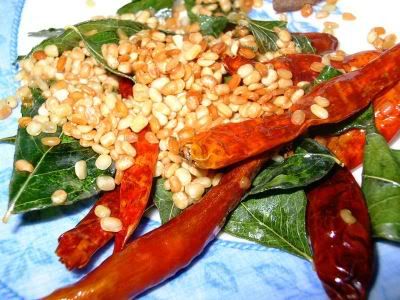
From top right, clockwise: Asafoetida powder, mustard seeds, red chillies, curry leaves
2 tbsp fresh coriander leaves, roughly torn, for garnish
Method:
1. Pressure-cook the tuvar dal, tomatoes, garlic and green chillies in 2 cups water. When the cooker can be opened, mash the dal and tomatoes well. You can remove the green chillies at this point, if you like. Set aside.
2. Dissolve the tamarind paste in 4 cups water, reserving 3 tbsp of the water. Add the drumstick pieces and bring to a boil.
3. Then mix the sambar powder with the 3 tbsp water and add that to the boiling tamarind water. Reduce to a medium simmer and let the drumsticks cook till done (they'll go a dull green).
4. Now add the mashed dal-tomato mixture (if it's gone hard, use some warm water to make it into a thick paste) to the cooked drumsticks and stir well till completely incorporated.
5. Add salt to taste and let the sambar boil for 5 minutes on medium heat, stirring occasionally. If it is too watery, let it cook down. If too thick, add a little more water.
6. Meanwhile, heat the oil in a small pan, put in the tempering ingredients and cover till the mustard seeds stop popping.
7. Pour the tempering straight onto the sambar, so that it sizzles. Stir and let the sambar rest for 2-3 hours. This helps the flavours blend together.

8. To serve, re-heat the sambar on a medium flame till thoroughly hot. Serve garnished with the coriander leaves over steamed rice, with microwaved papad and a vegetable curry.
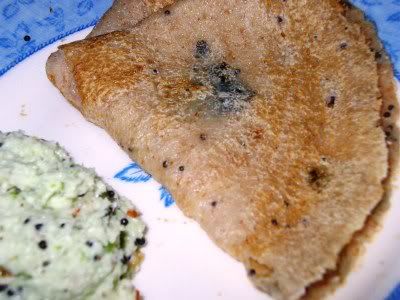
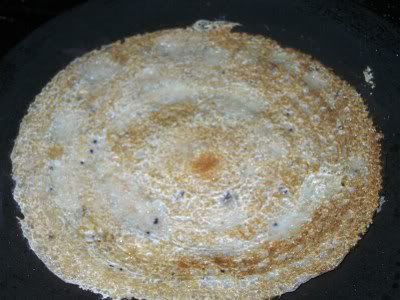
When you have a craving for dosas but no regular dosa batter with which to indulge that craving, there's a quick way of getting your fix. Granted they wont taste like "proper" dosas, but pancakes can be made with any flour and still taste pretty good.
Yesterday I opted to make rava dosas (with the addition of a little rice flour and some wheat flour). The seasoning (or tempering) for the dosas is absolutely essential, because the batter is bland and unfermented.
The rava dosas you get in hotels in India are usually wonderfully crisp and thin, an effect very likely achieved with generous slatherings of ghee or oil. But since I wasnt about to drown my dosas in oil, they turned out mostly soft, but crisp in places - absolutely yummy with coconut chutney and sambar.
Oh, by the way - you can add finely chopped onions or other quick-cooking vegetables to the batter to make the dosas more nutritious.
Recipe for: Rava dosas (cream of wheat/farina/semolina pancakes)
2 cups rava
1/2 cup rice flour
1/2 cup wheat flour (or all-purpose flour)
Salt to taste
Water as required
For tempering:
2 tsp mustard seeds
1 tsp cumin seeds
8-10 curry leaves
3-4 fresh green chillies, finely minced (according to taste)
2 tsp oil
1/4 tsp asafoetida powder (optional)
Method:
1. Use only as much water as required to make a pouring batter from the flours and salt. Set aside.
2. Heat the oil in a small pan and add the ingredients for tempering. Cover the pan and let the mustard seeds pop.
3. Pour the tempering on the batter and stir well.
4. To make the dosas, heat a non-stick tava and spread a couple of ladlefuls of batter in a swirling motion, trying to keep the dosa as thin as possible.
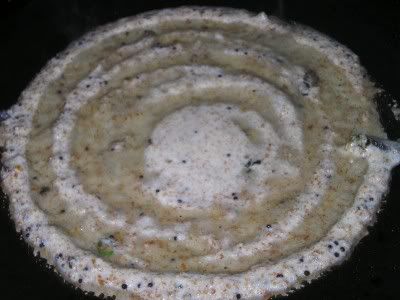
5. Cook on medium heat till the top dries out and the bottom part is golden, then carefully lift with a spatula and turn it over.
Let this side cook till the dosa becomes stiff. (It will soften as it cools.)
6. Serve hot with chutney and sambar.
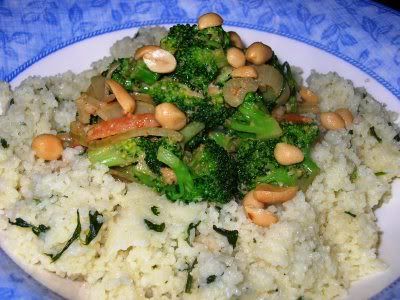
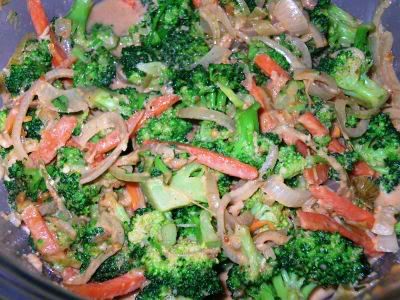
Another broccoli entry from me for ARF/5-a-day Tuesday #6, usually hosted by Sweetnicks, but this week being hosted by Stephanie, the Happy Sorceress.
Since finding out that peanuts are a good source of anti-oxidants, well, I just HAD to use them along with my veggies for this event. I've had this broccoli recipe for a while, printed off from one of the food groups that I've subscribed to, and I've tweaked it only slightly. A lot of the recipes are too complicated or call for ingredients not available in the UK - fair enough, the groups are mostly US-based, so it's to be expected. But this recipe seemed interesting and simple, and even better, perfect for the Tuesday event.
It is vaguely reminiscent of Thai cuisine, although I suppose peanut butter isnt the most authentic of Thai ingredients. And come to think of it - couscous isnt really a hallmark of Thai cooking either.... Okay, so perhaps it ISNT reminiscent of Thai cuisine. Let's just say it's a pretty darn good recipe, and leave it at that!
Recipe for: Broccoli in peanut sauce
Ingredients:
1/4 c peanut butter
1 tbsp sugar
1 1/2 tbsp hot water
Juice from half a lime (about 2 tbsp)
1 generous tbsp dark soy sauce
1 tbsp sesame oil
3 whole dried red chillies (or 1/2 tsp chilli flakes, if you dont like chillies)
1 1/2 tbsp oil
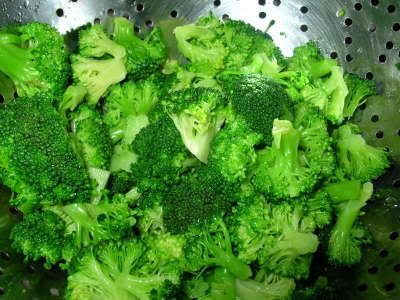
2 cups fresh broccoli, in florets
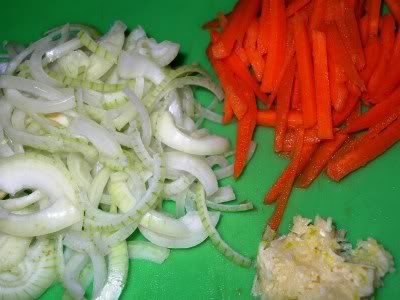
1 medium carrot, cut into matchsticks (or use red bell pepper)
1 small onion, thinly sliced
3 cloves garlic, minced
A handful of roasted peanuts, for garnish
Method:
1. Put the broccoli in a big bowl of very hot water for 4 minutes. Remove, refresh under cold running water and set aside in a colander to drain.
2. Combine peanut butter, sugar, water, lime juice, soy sauce, sesame oil, and pepper in a blender or spice grinder, until the chillies are well blended. Set aside.
3. Heat the oil in a wok. Add the onions, carrots/bell pepper and garlic, and
stir-fry for 4 minutes, or until tender crisp.
4. Add the broccoli and stir. Remove from the heat after 1 minute.
5. Place the vegetables in a bowl and pour the peanut sauce over it.
Mix well and serve warm over couscous (I flavoured mine with lemongrass and fresh coriander) or with noodles.


